
Related Manuals for Rangemaster ECL60HPNGFBL/BL


Summary of Contents for Rangemaster ECL60HPNGFBL/BL
- Page 1 ECL60HPNGFBL/BL Gas on Glass Hob User Guide & Installation & Service Instructions U111052-02...
-
Page 3: Table Of Contents
Contents Before You Start... Installation Installation and Maintenance Dear Installer Peculiar Smells Provision of Ventilation If You Smell Gas Location of the Hob Ventilation Conversion Personal Safety Checking the Parts Cleaning Positioning the Hob Fixing the seal to the back of the hob Hob Overview Fastening the Installation Brackets Cleaning Your Hob... -
Page 5: Before You Start
Before You Start... DocNo.011-0001 - Introduction gas • Thank you for buying a Rangemaster hob. It should give you Ventilation many years trouble-free cooking if installed and operated CAUTION: Using a gas cooking appliance will result in the correctly. It is important that you read this section before you production of heat and moisture in the room in which it start, particularly if you have not used a gas hob before. -
Page 6: Cleaning
Never leave a chip pan unattended. Always heat fat slowly, and watch as it heats. Deep fry pans should be only one third full of fat. Filling the pan too full of fat can cause spill over when food is added. If you use a combination of oils or fats in frying, stir them together before heating, or as the fats melt. -
Page 7: Hob Overview
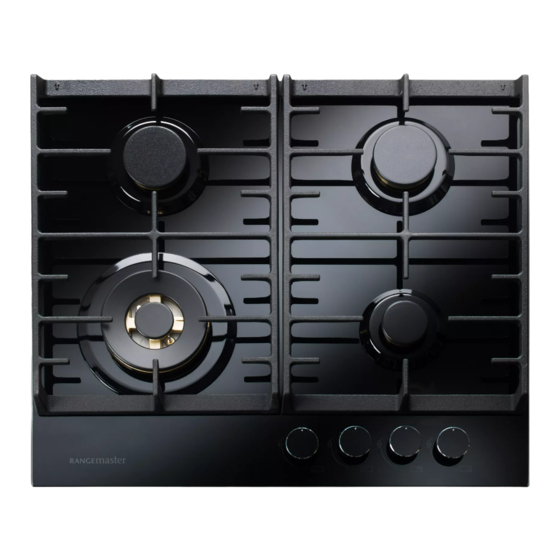
Hob Overview Fig. 2.1 Semi-rapid Semi-rapid Diameter: 16-18 cm Diameter: 16-18 cm Gas burner: 1.75 kW Gas burner: 1.75 kW Auxilliary Diameter: 22-24 cm Diameter: 10-14 cm Gas burner: 4.0 kW Gas burner: 1.0 kW Type Material Power supply ECL60HPNGFBL-BL Glass 230V 50Hz The diagram by each of the control knobs indicates which Fig. - Page 8 Pans and kettles with concave bases or down turned base Fig. 2.5 rims should not be used (Fig. 2.5). Simmering aids, such as asbestos or mesh mats, are NOT recommended. They will reduce burner performance and could damage the pan supports (Fig. 2.6). ArtNo.311-0002 Pan with rim You should also avoid using unstable and misshapen pans that may tilt easily, and pans with a very small base diameter,...
-
Page 9: Cleaning Your Hob
Cleaning Your Hob DocNo.041-0002 - Cleaning gas 5-element Essential Information Fig. 3.1 Allow the cooker to cool and then isolate the electricity supply before carrying out any thorough cleaning. Never use paint solvents, washing soda, caustic cleaners, biological powders, bleach, chlorine based bleach cleaners, coarse abrasives or salt. -
Page 10: Cleaning Table
Cleaning Table Recommended Part Finish cleaning method Refer to the cleaning Table 3.1 Cleaning the hotplate and Table 3.2 Cleaning outside the hotplate. Hotplate top Stainless steel or Hot soapy water and a soft cloth. glass remove stubborn stains gently The cleaners listed are available from supermarkets or with a nylon scourer. -
Page 11: Troubleshooting
Troubleshooting If there is an installation problem and I don’t get my original installer to come back to fix it, who pays? You do. Service organisations will charge for their call-outs if they are correcting work carried out by your original installer. Therefore, it’s in your own interest to keep track of this installer so that you can contact them as required. -
Page 12: Installation
INSTALLATION Check the appliance is electrically safe and gas sound when you have finished. Installation DocNo.061-0004 - Installation RGG77 gas • Dear Installer In the UK: In your own interest and that of safety, it is law that Before you start your installation, please complete the details all gas appliances be installed by competent persons. -
Page 13: Location Of The Hob
INSTALLATION Check the appliance is electrically safe and gas sound when you have finished. Location of the Hob The hob may be installed in a kitchen/kitchen diner but NOT in a room containing a bath or shower. NOTE: An appliance for use on LPG shall not be installed in a room or internal space below ground level, e.g. -
Page 14: Positioning The Hob
INSTALLATION Check the appliance is electrically safe and gas sound when you have finished. Positioning the Hob Fig. 5.1 It is recommended that the hob be installed in a worktop with a minimum thickness of 38 mm and depth of 600 mm. The cut-out dimensions and the recommended minimum clearances from the hob to nearby surfaces are shown in Fig. -
Page 15: Fixing The Seal To The Back Of The Hob
INSTALLATION Check the appliance is electrically safe and gas sound when you have finished. Fixing the seal to the back of the The hob must be sealed to the work surface to prevent liquid from entering into the cabinet. A tape seal is supplied with the hob. - Page 16 INSTALLATION Check the appliance is electrically safe and gas sound when you have finished. Fig. 5.4 Gas Connection Gas Connection Rear Screw (R) seal C seal C overlaps Rear Screw (R) seals B Mains Connection seal C overlaps seal B seals B seal A Front Screw (F)
-
Page 17: Conversion To Lpg
WARNING – SERVICING TO BE CARRIED OUT ONLY BY AN AUTHORISED PERSON Disconnect from electricity and gas before servicing. Check appliance is safe when you have finished. Conversion to LPG Check in the ‘Technical Data’ section at the back of the Fig. -
Page 18: Tap Adjustment
WARNING – SERVICING TO BE CARRIED OUT ONLY BY AN AUTHORISED PERSON Disconnect from electricity and gas before servicing. Check appliance is safe when you have finished. Tap Adjustment Fig. 6.3 Disconnect from the electricity supply. When changing from one type of gas to another, the minimum tap output must also be correct, considering that in this position the flame must be about 4 mm long and must remain lit even when the knob is turned sharply from the... -
Page 19: Conversion To Lp
INSTALLATION Check the appliance is electrically safe and gas sound when you have finished. Conversion to LP If the appliance is to be converted to LP gas do the conversion at this point. See the conversion section of these instructions. Gas Connection Before connecting the appliance, check that it is suitable for your gas and electricity supply. -
Page 20: Connection To The Gas Supply
INSTALLATION Check the appliance is electrically safe and gas sound when you have finished. Connection to the Gas Supply Fig. 6.1 ½" G cylindrical ½" G cylindrical Gas connection (GB) Cat: II 2H3+ (ISO 228-1) male (ISO 228-1) female The fitting (Fig. 6.1) is made up of: •... -
Page 21: Pressure Testing
INSTALLATION Check the appliance is electrically safe and gas sound when you have finished. Safety Information Ensure that the gas supply pipe is never able to touch moveable parts of the built-in cabinet (e.g. drawers). It must not pass through compartments that could be used for storage purposes. -
Page 22: Electrical Connections
INSTALLATION Check the appliance is electrically safe and gas sound when you have finished. Electrical Connections This appliance must be installed by a qualified electrician to comply with the relevant Institute of Electrical Engineers (I.E.T.) regulations and also the local electricity supply company requirements. -
Page 23: Circuit Diagram
Circuit Diagram Spark 1 Spark 2 Igniter Spark 3 Spark 4 Blue Micro Switch Blue Yellow & Green Brown Blue Yellow & Green... -
Page 24: Technical Data
Technical Data The hob is an independent Class 3 built-in unit. This hob is category II It is supplied set for group H natural gas. A conversion kit from NG to LP is available for the hob. INSTALLER: Please leave these instructions with the user. DATA BADGE LOCATION: Base of the hob. - Page 25 Hotplate Efficiency Brand Rangemaster Model Identification ECL60HPNGFBL-BL Size (mm) Type Type of Hob Number of gas burners Wok (EE gas burner) 52.64 % Semi-rapide / Medium Burner (EE gas burner) 60.20 % Semi-rapide / Medium Burner (EE gas burner) 60.20 %...
-
Page 26: Warranty/After Sales Service
Any cosmetic damage to the appliance must be reported within 90 days of delivery. Please note that AGA Rangemaster Limited have appointed UK Warranty Solutions to administer in warranty repairs on our behalf. If you make a request for an in warranty repair,... - Page 27 NOTE...
- Page 28 NOTE...
- Page 29 NOTE...
- Page 30 NOTES...
- Page 31 NOTES...
- Page 32 Clarence Street, Royal Leamington Spa, Warwickshire, CV31 2AD, England. Tel: +44 (0) 800 8046261 E-mail: consumers@agarangemaster.co.uk...
Need help?
Do you have a question about the ECL60HPNGFBL/BL and is the answer not in the manual?
Questions and answers