
Related Manuals for Rangemaster RMB75HPECGL


Summary of Contents for Rangemaster RMB75HPECGL
- Page 1 RMB75HPECGL/ Ceramic Hob User Guide & Installation & Service Instructions U110605-05d...
-
Page 3: Table Of Contents
Contents Before You Start... Installation and Maintenance Ventilation Personal Safety Hob Care Cleaning Hob Overview The Hob Heat Settings Residual Heat Indicator, ‘H’ Operating the Hob Automatic Shutdown Key Lock Function Dual Cooking Function Cleaning Your Hob Essential information Daily Care Cleaning Spills Cleaning Burned-on Spills To Remove Metal Rub-off... -
Page 5: Before You Start
Before You Start... Personal Safety Thank you for buying a Rangemaster hob. It should give you many years trouble-free cooking if installed and operated Accessible parts will become hot during use and will correctly. It is important that you read this section before you retain heat even after you have stopped cooking. -
Page 6: Hob Care
Hob Care Fig. 1.1 ArtNo.312-0001 Not cooking surface NEVER cook food directly on the hob surface Fig. 1.1. DO NOT use the hob surface as a cutting board. DO NOT leave utensils, foodstuffs or combustible items on the hob when it is not in use (e.g. tea towels, frying pans containing oil). -
Page 7: Cleaning
Cleaning The ceramic surface should be washed after use in order to prevent it from becoming scratched or dirty. In the interests of hygiene and safety, the hob should be kept clean at all times as a build up in fats and other foodstuffs could result in a fire. -
Page 8: Hob Overview
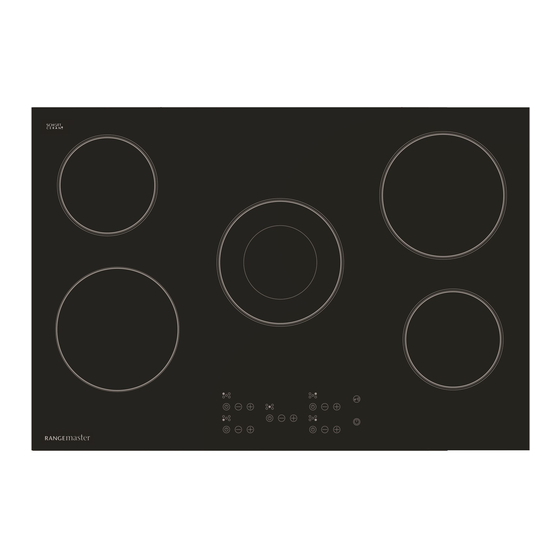
Hob Overview DocNo.023-0002 - Overview - RI77 hob The ceramic hob comprises of five cooking zones containing Fig. 2.1 ceramic elements with different ratings and diameters (Fig. Zone 2 Zone 3 Diameter: 140 mm Diameter: 180 mm 2.1), each with a pan detector and residual heat indicator. Max: 1.2 kW Max: 1.8 kW Each zone is controlled via the touch sensitive controls with... -
Page 9: Heat Settings
Heat Settings The exact setting will depend on several factors, including your cookware and the amount you are cooking. Experiment with the ceramic hob to find the settings that best suit you. Residual Heat Indicator, ‘H’ After use, a cooking zone will remain hot for a while as heat dissipates. -
Page 10: Automatic Shutdown
Rapid shutdown Power Level Default operating hours All of the cooking zones can be switched off by pressing the main On/Off button. Any ‘hot‘ zones that were in use will show the Risdual Heat Indicator ‘H’ in the display. Automatic Shutdown The hob will automatically shutdown if you ever forget to turn them off. -
Page 11: Cleaning Your Hob
• Cleaning Your Hob DocNo.042-0001 - Cleaning - BI hob ceramic Scrape major spills or melted material from the cooking zone Fig. 3.1 and push into a cold area. Then turn the unit ‘OFF’ and allow it to cool before cleaning further. After the cooking surface cools down and the residual heat indicator lights go off, follow the ‘Daily care’... -
Page 12: Troubleshooting
Troubleshooting DocNo.052-0001 - Troubleshooting ceramic & induction If there is an installation problem and I don’t get my original installer to come back to fix it, who pays? You do. Service organisations will charge for their call-outs if they are correcting work carried out by your original installer. Therefore, it’s in your own interest to keep track of this installer so that you can contact them as required. -
Page 13: Installation
INSTALLATION Check the appliance is electrically safe and gas sound when you have finished. Installation Dear Installer Location of the Hob Before you start your installation, please complete the details The hob may be installed in a kitchen/kitchen diner but NOT below. -
Page 14: Positioning The Hob
INSTALLATION Check the appliance is electrically safe and gas sound when you have finished. Positioning the Hob Fig. 5.1 It is recommended that the hob be installed in a worktop with a minimum thickness as shown in Fig. 5.5. The cut-out dimensions and the recommended minimum clearances from the hob to nearby surfaces are shown in (Fig. - Page 15 INSTALLATION Check the appliance is electrically safe and gas sound when you have finished. Fixing the seal to the back of the hob The hob must be sealed to the work surface to prevent liquid from entering into the cabinet. A tape seal is supplied with the hob.
- Page 16 INSTALLATION Check the appliance is electrically safe and gas sound when you have finished. Fig. 5.4 Rear Screw (R) Mains Connector Rear Screw (R) Seal no gaps in corners Front Screw (F) Front Screw (F) Fig. 5.5 Worktop 30 mm Sleeve Bracket Retaining...
-
Page 17: Electrical Connections
INSTALLATION Check the appliance is electrically safe and gas sound when you have finished. Electrical Connections This appliance must be installed by a qualified electrician to comply with the relevant Institution of Engineering and Technology (I.E.T.) regulations and also the local electricity supply company requirements. -
Page 18: Circuit Diagram
Circuit Diagram 1.2 kW 1.8 kW 1.7 kW 1.2 kW 1.8 kW A15 A14 A13 A12 A8 A7 230v 50 Hz... -
Page 19: Technical Data
Technical Data INSTALLER: Please leave these instructions with the user. DATA BADGE LOCATION: Base of the hob. COUNTRY OF DESTINATION: GB, IE. Dimensions Outside Inside Width 750 mm 720 mm Length 510 mm 480 mm Depth 50 mm / 70 mm mains connector 45 mm / 65 mm mains connector Mass (kg) Space for fixing... - Page 20 Hotplate Efficiency Data Brand Rangemaster Model Identification RMB75HPECGL/ Size Type Ceramic Type of Hob Radiant Number of electric zones Zone 1 - Ø cm Heating Technology Radiant Plates Energy Consumption (ECElectric cooking) - Wh/kg 204.7 Zone 2 - Ø cm...
-
Page 21: Warranty/After Sales Service
Warranty/After Sales Service DocNo.111-0003 Warranty No.10 If consultation or technical assistance is needed, please provide the local authorised service agent with the purchase invoice and the product code/serial number. The 2 years free maintenance for the operation of the appliance started from the date of purchase of this product. Any cosmetic damage to the appliance must be reported within 90 days of delivery. - Page 24 Clarence Street, Royal Leamington Spa, Warwickshire, CV31 2AD, England. Tel: +44 (0) 800 8046261 E-mail: consumers@agarangemaster.co.uk...
Need help?
Do you have a question about the RMB75HPECGL and is the answer not in the manual?
Questions and answers