Bticino Classe 300EOS User And Installation Manual
With netatmo
Hide thumbs
Also See for Classe 300EOS:
- User manual (114 pages) ,
- Installation manual (84 pages) ,
- User manual (64 pages)

Related Manuals for Bticino Classe 300EOS


Summary of Contents for Bticino Classe 300EOS
- Page 1 Classe 300EOS 344842 - 344845 User and installation manual RA00194AB-07/21-PC www.bticino.com...
- Page 2 Classe 300EOS User and installation manual...
- Page 3 Associate your Classe 300EOS with Netatmo Access your home through invitation Forgotten password Authentication Home Page To receive a video door entry call Display the cameras or Entrance Panels Call home: call your Classe 300EOS with Netatmo Open door locks Staircase Lights Event log...
- Page 4 Help Shop Tell us what you think Notifications My tips Logout Use with Amazon Alexa® Introduction Associate the Classe 300EOS with Netatmo with an Alexa® account Settings Basic setup General Language Date and time Video internal unit Answering machine functions...
-
Page 5: General Information
We would like to inform you that the service provided by BTicino by means of remote use via the App involves the use of data. The cost linked to data usage depends on the type of contract which... - Page 6 Classe 300EOS User and installation manual Warnings and consumer rights Read carefully before use and keep for future reference. Touching the units with wet hands is forbidden. Using liquid cleaners or aerosols is forbidden. Blocking the ventilation openings is forbidden.
-
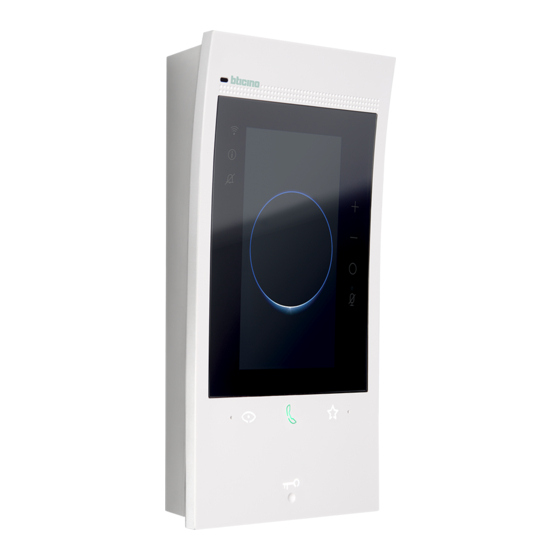
Page 7: Front View
Classe 300EOS User and installation manual Front view LEDs and pushbuttons 5” vertical touch screen display. “Favourites” touch key. Microphone. Touch key for answer: – Green LED flashing: incoming call; – Green LED steady: communication in progress. Entrance panel/scrolling activation touch key. -
Page 8: Rear View
Classe 300EOS User and installation manual Rear view BUS-MH (OFF) 2-1 (ON) BTICINO V.le Borri, 231 (ON) (OFF) 21100 (VA) ITALY (OFF) MASTER (ON) Made in Italy (OFF) (ON) BUS-AV 1. Speaker. 2. Clamps for connection to the MH BUS (MyHOME) - (future application). -
Page 9: Dimensional Data And Installation Heights
Classe 300EOS User and installation manual Dimensional data and installation heights Caution: installation, configuration, starting-up and maintenance must be performed by qualified personnel. 32 mm 121 mm 112 mm 84 mm 60 mm... - Page 10 Classe 300EOS User and installation manual Mounting...
- Page 11 Classe 300EOS User and installation manual...
- Page 12 Classe 300EOS User and installation manual Disassembling...
-
Page 13: Wiring Diagram
Classe 300EOS User and installation manual Wiring diagram (OFF) 2-1 (ON) = – (ON) (OFF) = – 230 Vac (OFF) (ON) MASTER = – (OFF) (ON) = – = – ( * ) BUS-MH = – BUS-AV The accessory 344844 (not supplied) is required. -
Page 14: First Switching On
DEVICE SETUP LANGUAGE Choose language English Français Italiano Español Deutsche Welcome to Classe 300EOS with Netatmo Português setup. Before starting, make sure the device is correcly plugged. START CONTINUE 1. Touch to start the customisation. 2. Select the interface language. - Page 15 Classe 300EOS User and installation manual TIMEZONE DATE AND TIME Choose a timezone Set date and time automatically from network GMT 00 London, Lisbon, Dublin Time will be set automatically once the device is connected to internet GMT +1 Rome, Paris, Berlin...
- Page 16 10 : 45 Main unit will be the only that can be connected to apps. Intercom Attention: only one Classe 300EOS with Netatmo per plant can be a main unit Camera Entrance Panel Activation...
-
Page 17: Professional Studio
P address Professional Studio When enabled by user, professional studio auto opens door lock each time someone rings Intercom Congratulations! Camera Your Classe 300EOS with Netatmo is now configured and ready to use. Entrance Panel Activation Lock CONTINUE FINISH 20. Touch to enter Intercom, Cameras and Activations to manage the... - Page 18 19:32 No new notifications No new notifications Complete Alexa configuration on Answer calls when you’re away, connect Home + Security app Classe 300EOS with Netatmo! You’re a few steps away from activating it START CONFIGURATION START CONFIGURATION DISMISS DISMISS Voicemail...
- Page 19 Classe 300EOS User and installation manual Physically configure To physically configure the device, use physical configurators as shown below. MM = Mode of operation according to the tables on the following pages. PP = Address of the EP of which you can open the Door Lock with IU idle, and to which you can send the auto-on command.
- Page 20 Classe 300EOS User and installation manual The MM (tens) physical configurator defines which 4 actions can be activated from the Edit Favourites menu. The possible configurations are shown in the following table. Legend Activation of the EP (configured with P+1) directly without call or activation of 346210 actuator 346200 (configured with P+1 and MOD=9).
- Page 21 Classe 300EOS User and installation manual MOD = MM 346210 346210 MOD= 9 MOD= 9 346210 346210 MOD= 9 MOD= 9 346210 346210 346210 346210 346210 MOD= 9 MOD= 9 MOD= 5 MOD= 5 MOD= 9 346210 346210 346210 346210...
- Page 22 Classe 300EOS User and installation manual MOD = MM 346210 346210 MOD= 5 MOD= 9 346210 346210 MOD= 9 MOD= 5 346210 MOD= 5 346210 346210 MOD= 9 MOD= 5 346210 MOD= 5 346210 346210 MOD= 5 MOD= 5 346210...
- Page 23 Classe 300EOS 346210 User and installation manual MOD= 5 346210 MOD = MM MOD= 5 346210 346210 MOD= 5 MOD= 5 346210 346210 MOD= 5 MOD= 5 346210 MOD= 5 346210 MOD= 5...
- Page 24 DEVICE SETUP LANGUAGE Choose language English Français Italiano Español Deutsche Welcome to Classe 300EOS with Netatmo Português setup. Before starting, make sure the device is correcly plugged. START 1. Touch to start the customisation. 2. Select the interface language. 3. Touch to continue.
- Page 25 Classe 300EOS User and installation manual TIMEZONE DATE AND TIME Choose a timezone Set date and time automatically from network GMT 00 London, Lisbon, Dublin Time will be set automatically once the device is connected to internet GMT +1 Rome, Paris, Berlin...
- Page 26 10 : 45 Main unit will be the only that can be connected to apps. Intercom Attention: only one Classe 300EOS with Netatmo per plant can be a main unit Intercom Intercom Camera MAIN UNIT...
- Page 27 19:32 19:32 No new notifications No new notifications Complete Alexa configuration on Answer calls when you’re away, connect Classe 300EOS with Netatmo! You’re a Home + Security app few steps away from activating it START CONFIGURATION START CONFIGURATION DISMISS DISMISS...
- Page 28 Classe 300EOS User and installation manual It is possible to use the video door entry functions in different ways: Use from the device Use with Home + Security App Use with Amazon Alexa®...
- Page 29 Classe 300EOS User and installation manual Use from the device Home Page This page can show different contents based on the configuration mode (physical or from the menu). Below is the Home Page with all the functions enabled. 19:32 Enable Alexa skills to...
-
Page 30: Function Status
Classe 300EOS User and installation manual Function status Icon Meaning The connection of the device to a Wi-Fi Wi-Fi connection active and not network has been activated, but not connected. connected to a Wi-Fi network. The Wi-Fi signal is not sufficient to Weak Wi-Fi signal. -
Page 31: Internal Unit
Classe 300EOS User and installation manual Favourites The video door entry objects and the corresponding functions can be used only from the Settings/Advanced settings/Video Favourites page. First of all configure the objects in the internal unit section and then add them in the Favourites page. - Page 32 Classe 300EOS User and installation manual Add an object to the favourites Note: if the device has been physically configured, it is not possible to delete or modify the objects but only customise their names. 19:32 FAVORITES EDIT FAVORITES Homepage...
- Page 33 Classe 300EOS User and installation manual Modify an object For each object it is possible to modify its description, move it or delete it. FAVORITES EDIT FAVORITES Homepage Homepage Voicemail Voicemail Ringtone Ringtone Others Others CALL Intercom Intercom VIEW Camera...
- Page 34 Classe 300EOS User and installation manual EDIT FAVORITES EDIT FAVORITES FAVORITES Homepage Homepage Homepage Voicemail Voicemail Voicemail Ringtone Ringtone Ringtone Others Others Others VIEW Camera 01 Camera 01 Keylock Add other favorites Intercom Intercom Add other favorites Keylock Keylock EDIT FAVORITES...
- Page 35 Classe 300EOS User and installation manual Notifications In this page it is possible to display the messages of the video door entry answering machine and the system messages. If there are new messages recorded on the answering machine or a system message (e.g.: software update available), a visual notification appears on the notification bar (A).
-
Page 36: Firmware Update
Classe 300EOS User and installation manual Firmware update When a new firmware update is available, the system automatically downloads it and sends a notification message. The firmware may then be installed immediately or postponed to another time. Note: the update file can be up to 500Mb in size. - Page 37 Classe 300EOS User and installation manual UPDATE NOTIFICATIONS Today Firmware installed Version 0.16.2 correctly 15:27 installed Installing updates. Device update available. This may take some time When do you want to install it? Install now Today - 10:00 Today - 14:00...
- Page 38 Classe 300EOS User and installation manual Functions Answer a call • Call another room or apartment (intercom) • Main entrance panel or cameras direct auto-switching on • Open the Entrance panel door lock and/or perform an activation • Listen to the video door entry answering machine •...
- Page 39 Classe 300EOS User and installation manual Swipe down for adjustments Swipe down for adjustments 2. Double click to return to the face detection mode. 3. Touch to answer the call, the LED comes on steady. Touch the connection key again to end the call.
-
Page 40: Call Another Room Or Apartment (Intercom)
Classe 300EOS User and installation manual Call another room or apartment (intercom) It is possible to communicate with another device installed in another room of the apartment or with a device of another apartment. For an intercom, the corresponding object must be configured in advance in the... - Page 41 Classe 300EOS User and installation manual When the Internal Unit answers, the LED comes on steady and the keys used to disable audio and microphone appear. Swipe down for adjustments Speaker volume Speaking Speaking Intercom Intercom 3. If necessary scroll down to adjust the audio parameters.
- Page 42 Classe 300EOS User and installation manual Main entrance panel or cameras direct auto-switching on Using the automatic switch on key it is possible to display the main Entrance Panel camera and, if installed, scroll through other cameras/Entrance Panels. It is also possible to display directly a specific camera or Entrance Panel, using the Camera object...
- Page 43 Classe 300EOS User and installation manual Swipe down for adjustments A During the conversation, it is possible to modify the audio/video parameters or mute the microphone (for details see Answer a call section). 3. Touch to display another Entrance Panel or camera (using the scrolling service, if preset by the installer during the configuration phase).
- Page 44 Classe 300EOS User and installation manual It is possible to display directly a specific Entrance Panel or Camera, using the corresponding objects found in the favourites page. Warning: to use the function, the corresponding objects must be properly configured in the...
- Page 45 Classe 300EOS User and installation manual Open the Entrance panel door lock and/or perform an activation It is possible to open the main Entrance panel door lock, using the door lock key. It is also possible to activate some actuators (e.g.: driveway gate, garden light, etc.) found in your...
-
Page 46: Listen To The Video Door Entry Answering Machine
Classe 300EOS User and installation manual FAVORITES Homepage Voicemail Ringtone Others CALL Intercom OPEN Keylock OPEN Activation EDIT FAVORITES 3. Touch the desired activation. Listen to the video door entry answering machine When there are one or more unread messages in the answering machine, the corresponding LED comes on. - Page 47 Classe 300EOS User and installation manual NOTIFICATIONS MISSED CALL Today Swipe down for adjustments Missed video call 15:27 Message 1/1 July 13, 15:30 Date and time the message was recorded. 3. Touch the preview to display the message. 4. Touch to pause or restart playback.
- Page 48 Classe 300EOS User and installation manual Paging This function can be used to broadcast voice messages to the compatible devices, using the corresponding object found in the favourites page. Warning: o use the function, the corresponding object must be properly configured in the...
-
Page 49: Door Status
Classe 300EOS User and installation manual Door status This function indicates through the door lock LED if the entrance door is open or closed. In order to use this function, a door lock actuator 346260 and corresponding magnetic contact must be present in the system. - Page 50 Classe 300EOS User and installation manual Professional Studio (Office) When a call is received from the Entrance Panel, this function automatically opens the associated door lock without the need for pressing the door lock control key. It is possible to enable this function in the Settings/Advanced settings/Video internal unit section.
- Page 51 Classe 300EOS User and installation manual Safe door lock When active, this function prevents the opening of the Entrance Panel door lock unless communication with the same is active. Therefore, the opening of the door lock is only permitted when Entrance Panel and Internal Unit are in voice communication.
- Page 52 Classe 300EOS User and installation manual Inductive loop (only item 344845) The INDUCTIVE LOOP service enables the device to be used by people wearing hearing aids with (T) selector. Switch the acoustic device to the T position. To ensure correct magnetic coupling between the handset and the acoustic device, we recommend a position in front of the device, at a distance of 25 - 35 cm.
- Page 53 Classe 300EOS User and installation manual Use with Home + Security App Note: In the event that there is a need for several devices in a home, one will need to be set as primary device and the others as secondary.
-
Page 54: Account Registration
Classe 300EOS User and installation manual Account registration You must first register to be able to use the Home + Security App and thus use the advanced functions of your device. After opening the App follow the registration instructions: 1. Touch to register and create an account otherwise use your credentials if you are already registered. - Page 55 Classe 300EOS User and installation manual 6. Select the country. A Touch to accept the terms and conditions of use laid down in the associated text (obligatory). Touch to enable the forwarding of news and promotions regarding Legrand group products.
-
Page 56: Data Network
Classe 300EOS User and installation manual Associate your Classe 300EOS with Netatmo At this point the system will show you a tutorial to help you associate to your device. Note: before starting the association, make sure that the device is connected to the internet. - Page 57 Classe 300EOS User and installation manual 3. Touch to enable the smartphone camera needed to scan the QR Code. 4. Touch to continue. 19:32 SETUP No new notifications Answer calls when you’re away, connect Home + Security Home + Security app...
- Page 58 Classe 300EOS User and installation manual SETUP SETUP On Home + Security app select Classe 300EOS with Netatmo in the device list and follow instructions Scan setup code from Home + Security app to continue configuration When asked for Setup QR code tap...
- Page 59 Classe 300EOS User and installation manual COMPLETE Congratulations! Your Classe 300EOS with Netatmo is now connected to Home + Security app. FINISH 11. The device is connected to the App, touch to end. 12. Touch to create a new Home + Security home or select an existing one.
- Page 60 Classe 300EOS User and installation manual 13. Enter a name for the home. 14. Touch to create a new Home + Security home. 15. Touch to end. The device is correctly associated with the Home + Security App.
- Page 61 – Access the App with the credentials just created. – Control your Classe 300EOS with Netatmo using the App. 1. Touch the link in the email received from the system following an invitation. 2. Touch to access with the credentials.
-
Page 62: Forgotten Password
Classe 300EOS User and installation manual Forgotten password When you have forgotten the password: 1. Touch to open the login page. 2. Touch to activate the password recovery procedure. 3. Enter the email address, to which the system will send the link for changing the password. - Page 63 Classe 300EOS User and installation manual A message will confirm that the password has been changed successfully; open the App to enter the authentication data. Authentication After registering with the portal, authenticate by entering email and password. A Create a new account.
- Page 64 Section where it is possible to select and save the videos in Cloud saving the Dropbox or on a FTP server (function not available for the Classe 300EOS with Netatmo) Section where it is possible to display those users which can Manage Guests interact with your device, invite new ones or if necessary delete them.
- Page 65 Classe 300EOS User and installation manual Section where it is possible to display FAQ (and their answers) Help regarding the use of the Home + Security App. Section where it is possible to display and purchase the Shop Netatmo products from the shop.
- Page 66 Classe 300EOS User and installation manual To receive a video door entry call Using this function you can receive the calls from the Entrance Panel. With Smartphone in stand-by, following a call from the Entrance Panel, a push notification arrives...
- Page 67 Classe 300EOS User and installation manual 3. Scroll upwards to display other functions. A Opens the door lock of the Entrance Panel from which the call comes. Mutes the microphone C Opens the main Entrance Panel door lock. D Activates the Staircase Lights.
-
Page 68: Display The Cameras Or Entrance Panels
Classe 300EOS User and installation manual Display the cameras or Entrance Panels By means of this function you can display the cameras and Entrance Panels configured on the device by your installer. 1. Scroll the cameras or Entrance Panels. A. Opens the Event Log section. - Page 69 Classe 300EOS User and installation manual Call home: call your Classe 300EOS with Netatmo You can communicate with your device by means of this function. 1. Touch to call the device. A. Ends the call. Swipe down for adjustments Someone is ringing Smartphone 2.
-
Page 70: Open Door Locks
Classe 300EOS User and installation manual The communication is played automatically in hands free. 3. Touch to change from hands-free to telephone mode. 4. Touch to silence the microphone. 5. Touch to end the call. Open door locks By means of this function, it is possible to open the main entrance panel door locks and the door locks added in the favourites page of the device, without having to activate the communication. -
Page 71: Staircase Lights
Classe 300EOS User and installation manual Staircase Lights This function can be used to activate the Staircase Lights function. Check with your installer that the system is set up. 1. Touch to open the menu. 2. Touch to activate the Staircase Lights function. - Page 72 Classe 300EOS User and installation manual Settings Manage my home This section can be used: – to set some home parameters – to customise and delete the device – to customise the video door entry devices – to create and manage the rooms.
- Page 73 Classe 300EOS User and installation manual Advanced settings Position 1. Touch to set your home position. 2. Enter the address and select it among the suggested ones. Time zone 1. Touch to set the reference time zone. 2. Enter the zone.
- Page 74 Classe 300EOS User and installation manual Delete my access to the home In this section it is possible to delete the possibility of managing the home with your account. 1. Touch to delete the home. 2. Touch to confirm, all the home settings will be deleted.
- Page 75 Classe 300EOS User and installation manual Product customisation In this section it is possible to customise your device and the video door entry products configured on the device. A Customises the device. Customises the video door entry products. 1. Touch to customise the device This procedure will show, for example, how to: –...
- Page 76 Classe 300EOS User and installation manual A Renames the object. Moves the device. C Deletes the device. 3. Touch to move the device in another room. 4. Touch to create a new room. 5. Select the type of room. 6. Touch to confirm.
- Page 77 Classe 300EOS User and installation manual 10. Touch to delete the device. 11. Touch to confirm. The device and all the video door entry devices have been deleted. 12 Touch to end. To return to manage the device, the association process must be repeated...
- Page 78 In this section it is possible to enable/disable the video door entry answering machine and the welcome message on the Classe 300EOS with Netatmo. It is also possible to enable/disable the display of the Netatmo cameras on the Classe 300EOS with Netatmo.
- Page 79 Classe 300EOS User and installation manual Manage Guests In this section it is possible to display the users who can interact with your device, invite new ones or if necessary delete them (the user will not be deleted, just the possibility of interacting with this device).
- Page 80 Classe 300EOS User and installation manual Add a user 1. Touch to invite one or more people to control your home devices. 2. Select how you want to send the invitation. Once the guests accept the invitation, register and access the App, they can be found in the list of enabled users.
- Page 81 1. Touch to add a product into the home 2. Touch to select the device data network 3. Check that the device is connected to a and touch to start. Associate your Classe 300EOS with Netatmo. For more details, see...
- Page 82 Classe 300EOS User and installation manual My account In this section it is possible to view and display some functions regarding your account. 1. Touch to enter the account section. A Account Login/Email address. account registration Displays/modifies your Netatmo Legrand details BTicino.
- Page 83 Classe 300EOS User and installation manual Email/account (validate your email/account) To receive communications from the Legrand group it is necessary to validate the email address. 1. Touch to receive the validation link email. 2. Touch the link in the email received from the system.
- Page 84 Classe 300EOS User and installation manual 3. Touch the link in the email received from the system. 4. The screen confirming the validation of the email address appears. Safety This section can be used to change the password of your account and to disconnect it from all devices.
- Page 85 Classe 300EOS User and installation manual Modify password 1. Touch to modify the password. 2. Enter the current password. 3. Touch to continue. 4. Enter the new password with the following requirements: - at least 8 characters; - at least one lower case letter (e.g.: a);...
-
Page 86: Legal Information
User and installation manual Authorisation This section can be used to enable the reception of communications from Netatmo, Legrand and BTicino and the sharing of the App usage data. 1. Touch to enable the reception of communications and the data sharing. Legal information Using this section you will be able to view terms and conditions of use and privacy information for each App to which your Legrand account is associated. - Page 87 Classe 300EOS User and installation manual Partner apps In this section you can display all the third parties to whom you granted rights to operate on your connected devices. (e.g.: Amazon Alexa®). A Display more information regarding the access to your system by partner Apps.
- Page 88 Classe 300EOS User and installation manual Help In this section it is possible to display FAQ and their answers regarding the use of the Home + Security app. 1. Touch to enter the Help section. 2. Touch to select the product for which you need help.
- Page 89 Classe 300EOS User and installation manual Tell us what you think This section can be used to rate the application. 1. Click to rate the App 2. Touch the stars to rate the App from 1 to 5. Notifications In this section it is possible to activate/deactivate and choose the notifications to display in the Home Page of the Smartphone.
- Page 90 Classe 300EOS User and installation manual My tips In this section it is possible to display some suggestions about the use and functions of the Home + Security App. Each time you open "My tips", you will receive a different tip.
- Page 91 Amazon account from the same. Nota: in case of issues with the Amazon account or for general information regarding Amazon Alexa, please contact Amazon support directly. Associate the Classe 300EOS with Netatmo with an Alexa® account 19:32 No new notifications On your phone go to amazon.com/code...
- Page 92 Classe 300EOS User and installation manual 4. Type the address amazon.com/code on the browser. 5. Enter login and password of your Amazon account. Note: in case of issues with the Amazon account or for general information regarding Amazon Alexa, please contact Amazon support directly.
- Page 93 Classe 300EOS User and installation manual You’re ready to use Alexa, here are some things to try: “Alexa, what’s the weather today?” “Alexa, play some jazz music” “Alexa, set a timer for 20 minutes” To learn more and access additional features,...
-
Page 94: Basic Setup
My app the App. If already associated, it manages guests. Runs a tutorial that explains the steps to associate the Help device to the Netatmo Legrand BTicino skills. C Advanced settings Sets advanced video door entry functions such as Advanced settings... - Page 95 Classe 300EOS User and installation manual General This section contains the general settings and device information. GENERAL Global Language Italiano Set date and time automatically from network Time will be set automatically once the device is connected to internet Timezone...
-
Page 96: Date And Time
Classe 300EOS User and installation manual Date and time Set the current date and time. Set the automatic date and time. GENERAL TIMEZONE Global Choose a timezone Language English GMT 00 London, Lisbon, Dublin Set date and time GMT +1 Rome, Paris, Berlin... - Page 97 Classe 300EOS User and installation manual Set the date and time manually GENERAL GENERAL DATE Global Global Tap the values that you want to edit Language English Language English 09 / 03 / 2021 Set date and time Set date and time...
- Page 98 Classe 300EOS User and installation manual Video internal unit Video door In this section it is possible to set some video door entry basic parameters such as the entry answering machine and the ringtones. To modify some video door entry advanced parameters such as addresses, Intercom, Cameras and...
- Page 99 Classe 300EOS User and installation manual VIDEO QUALITY DOOR ENTRY Select video registration quality Voicemail Low quality Voicemail High quality Greetings message Video registration quality High RECORD A NEW GREETINGS MESSAGE Ringtones Ringtone volume High Main external unit Intercom 2. Set if video messages must be recorded in high resolution (maximum 25 x 15 sec. messages), or in low resolution (maximum 150 x 15 sec.
- Page 100 Classe 300EOS User and installation manual Ringtones This section can be used to modify the ringtone volume and associate a specific melody to some events (call). DOOR ENTRY Voicemail Greetings message Video registration quality High RECORD A NEW GREETINGS MESSAGE...
- Page 101 We would like to inform you that the service provided by BTicino by means of remote use via the App involves the use of data. The cost linked to data usage depends on the type of contract which the customer has with his ISP (Internet Service Provider) and is solely the customer’s responsibility.
- Page 102 Classe 300EOS User and installation manual NETWORK CONNECTION TYPE Parameters Choose the type of network Connection type Ethernet Wi-Fi LAN Home Ethernet Touch to select which type of network connection your device will use to connect to your home router.
- Page 103 Classe 300EOS User and installation manual ETHERNET ETHERNET Parameters Parameters DHCP DHCP Automatic configuration of network parameters Automatic configuration of network parameters IP address 192.168.2.102 IP address 192.168.2.102 Subnet mask 255.255.255.0 Subnet mask 255.255.255.0 Gateway 192.168.2.1 Gateway 192.168.2.1 Serial number...
- Page 104 Classe 300EOS User and installation manual Connection to the network using Wi-Fi technology CONNECTION TYPE NETWORK NETWORK Choose the type of network Parameters Enter password Wi-Fi Connection type Wi-Fi 123456– Ethernet Wi-Fi Select network 5GHz Wi-Fi networks are not supported...
- Page 105 Classe 300EOS User and installation manual NETWORK My Home My Home Parámetros Parameters Parameters Connection type Wi-Fi Signal -50dB Signal -50dB Wi-Fi DHCP DHCP Automatic configuration of network parameters Automatic configuration of network parameters My Home IP address 192.168.2.102 IP address 192.168.2.102...
-
Page 106: Amazon Alexa
Classe 300EOS User and installation manual Amazon Alexa® This section can be used to associate the device with Amazon Alexa® and take advantage of its features (see section Use with Amazon Alexa®). After the association, it is possible to set some parameters. - Page 107 Classe 300EOS User and installation manual My App This section can be used to associate the device with the Home + Security App (see section with Home + Security App). After completing the association, it is possible to remove all the accounts associated with the device.
-
Page 108: Advanced Settings
HELP AMAZON ALEXA SKILLS Help Amazon Alexa skills For all the Alexa features of your Classe 300EOS with Netatmo, enable the following two skills CONTINUE 1. Touch to display the tutorial. 2. Follow the tutorial step by step. Advanced settings... - Page 109 When enabled by user, professional studio auto opens door lock each time someone rings Main unit Main unit will be the only that can be connected to apps. Attention: only one Classe 300EOS with Netatmo for plant can be a Main unit Intercom Camera...
- Page 110 When enabled by user, professional studio auto opens door lock each time someone rings Main unit Main unit will be the only that can be connected to apps. Attention: only one Classe 300EOS with Netatmo for plant can be a Main unit Intercom Camera...
- Page 111 Classe 300EOS User and installation manual Intercom, Door Lock and Activation objects To use the video door entry objects in the Favourites page, first of all it is necessary to create them in this section. The available video door entry objects are:...
- Page 112 When enabled by user, professional studio auto opens door lock each time someone rings General Main unit Main unit will be the only that can be connected to apps. Attention: only one Classe 300EOS with Netatmo for plant can be a Main unit Intercom Camera External unit...
- Page 113 When enabled by user, professional studio auto opens door lock each time someone rings Main unit Main unit will be the only that can be connected to apps. Attention: only one Classe 300EOS with Netatmo for plant can be a Main unit Intercom Interno 1...
-
Page 114: Device Reboot
Classe 300EOS User and installation manual Device reboot This function restarts the device without losing the configurations. ADVANCED SETTINGS ADVANCED SETTINGS Settings Settings Door entry Door entry Reboot Reboot Reboot The device will be unavailable for 1 minute. Do you want to reboot? - Page 115 Classe 300EOS User and installation manual DEVICE SETUP Restore in progress This may take some time Welcome to Classe 300EOS with Netatmo setup. Before starting, make sure the device is correcly plugged. START After a certain period of time the device will restart, displaying the first configuration screen.
- Page 116 BTicino SpA Viale Borri, 231 21100 Varese www.bticino.com BTicino Spa reserves at any time the right to modify the contents of this booklet and to communicate, in any form and modality, the changes brought to the same.
Need help?
Do you have a question about the Classe 300EOS and is the answer not in the manual?
Questions and answers