Table of Contents
Advertisement
Quick Links
Changing Date and Time
Operators may need to change the date and time displayed
on the instrument. This may be accomplished by tapping the
Date/Time field at the bottom of Warm Up Screen or the
Ready to Test Screen. These fields are soft buttons which
will access Date and Time Screen. This screen provides list
boxes to set the Year, Month, Day of Month, Hour and Minute.
The current time string is displayed on Operational Pages and
on the test result printout in the standard ISO-8601 format of
"YYYY-MM-DD HH:MM".
Calibrating Temperature
Periodically, the temperature calibration should be checked with
a digital reference thermometer. The temperature should be
recalibrated if the displayed temperature does not agree with
the reference thermometer.
The user may access Temperature Calibration Screen
from the Ready to Test Screen by tapping the temperature
field 3 times within 2 seconds. The Temperature
Calibration Screen will appear and then the user may
enter the temperature as read from the reference thermometer
to the nearest 0.01°C. This may need to be repeated if the
temperature still does not agree with the reference with the
desired tolerance.
It is recommended that the instrument temperature be at target
for at least 30 minutes before recalibrating if the instrument has
been powered down for more than a couple of hours. This will
insure proper calibration as it may take some time for the entire instrument to come to proper thermal equilibration
from a cold start.
2139 High Tech Road • State College • PA • 16803 • USA
800-676-6232 • 814-353-8000 • Fax 814-353-8007
cannon@cannoninstrument.com • www.cannoninstrument.com
SimpleVIS Quick Start Guide
This guide contains basic instructions for unpacking,
setting up and running single determination kinematic
viscosity measurements on the SimpleVIS
Step 1. Unpack your SimpleVIS™
Remove all packing materials from the components.
1.
Verify that you have received all components for the
SimpleVIS by comparing equipment items with the shipped
materials. Report missing items to CANNON® Instrument
Company immediately.
2.
Inspect each component for signs of damage. Report
damages to the shipper and CANNON® Instrument
Company immediately.
3.
Retain all packing materials until the instrument is
connected and functioning properly. If any component(s)
must be returned to CANNON® Instrument Company,
the damaged item(s) should be packaged in the enclosed
shipping case.
Step 2. Setting up your SimpleVIS™
Complete the following rear panel electrical connections:
4.
Plug the AC/DC adapter into the power connector on the
rear panel of the instrument. Make sure the power switch on
the AC/DC adapter is off.
5.
Plug the power cord into the AC/DC adapter.
6.
Plug the other end of the power cord into an appropriate
outlet matching the voltage requirements indicated on the
AC/DC adapter
7.
Do not turn on the AC/DC adapter switch at this time.
(Optional printer: Plug the 9 pin serial printer cable into
the RS232-C port on the rear panel of the instrument. Then
plug the other end into the printer.)
Complete the following tubing
connections:
8.
Locate the glass waste bottle
and securely tighten the bottle
cap to ensure an air-tight
seal. Place the bottle in the
holder on the top rear of the
SimpleVIS.
9.
Connect the 1/8" transparent
tubing as indicated in the
image.
10.
Make sure that the waste line
extends into the cap further
than the vacuum line.
11.
Place the plug in the bottle
cap.
continued next page...
6-16-09
.
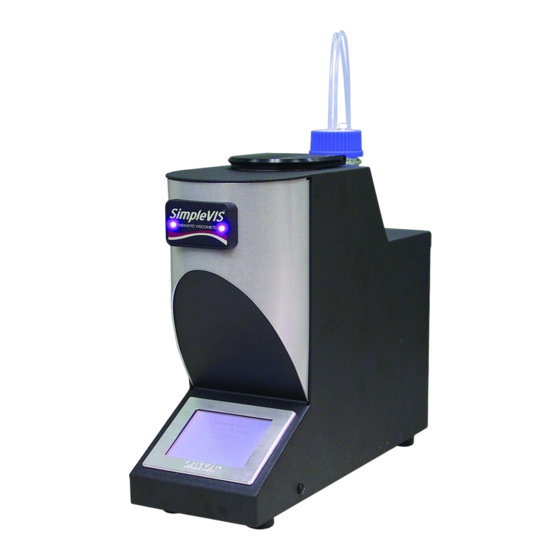
TM
Waste Bottle
Sample/Solvent Port
Sample/Solvent Port
Waste Bottle
RS-232
Serial
Port
Exhaust
Vacuum
Display
Screen
Power Connector
Waste Line
Advertisement
Table of Contents

Related Manuals for Cannon SimpleVIS


Summary of Contents for Cannon SimpleVIS
- Page 1 Remove all packing materials from the components. “YYYY-MM-DD HH:MM”. Sample/Solvent Port Verify that you have received all components for the SimpleVIS by comparing equipment items with the shipped materials. Report missing items to CANNON® Instrument Company immediately. Inspect each component for signs of damage. Report damages to the shipper and CANNON®...
- Page 2 Step 3. Getting started Step 6. Wash/ Dry cycle Press the ON switch on the AC/DC adapter. The Warm-Up Screen will display a Please Wait message. Press the Wash button on the display screen to start the wash During this time, the instrument will seek the preset target temperature and when reached, the instrument will cycle.
Need help?
Do you have a question about the SimpleVIS and is the answer not in the manual?
Questions and answers