
Related Manuals for Gastroback 62438


Summary of Contents for Gastroback 62438
- Page 1 DESIGN TEA & MORE ADVANCED OPERATING INSTRUCTIONS Art.- No. 62438 » Design Tea & More Advanced « Read all provided instructions before first usage! Model and attachments are subject to change For household use only!
-
Page 2: Table Of Contents
We attach a certain importance to your safety. Thus, we ask you to read all provided instructions and information in this booklet carefully and completely, before you start Making Yoghurt ................73 running the appliance. This will help you to know all functions and properties of Warming Baby Food ................ -
Page 3: Important Safeguards
DESIGN TEA & MORE ADVANCED. at an authorised service centre (see: ‘Warranty’). We hope that you will enjoy your new DESIGN TEA & MORE ADVANCED. Your Gastroback GmbH GENERAL SAFETY INSTRUCTIONS • This appliance is for household use only and NOT intended for use in moving vehicles. - Page 4 mechanical stress, to avoid injuries and damage. Do not expo- ting devices, fire). Do not fill the kettle anew with cold water, when se the glass parts to extreme variations in temperature to avoid the kettle is still hot, to avoid cracks and leakage. When adding cracks.
-
Page 5: Important Safeguards For Electrical Appliances
• Do not use any abrasive cleaners, cleaning pads (e.g. metal scouring • Always handle power cords with care. Do not place the appliance pads), or any corrosive chemicals (e.g. bleach) for cleaning. Do not on a power cord. Power cords may never be knotted, twisted, pulled, place the power base or kettle in an automatic dishwasher! strained or squeezed. -
Page 6: High Temperature - Risk Of Burns
TECHNICAL SPECIFICATIONS HIGH TEMPERATURE – RISK OF BURNS Model: Art.- No.: 62438 Design Tea & More Advanced Power supply: 220 - 240 V AC, 50/60 Hz WARNING: The Tea & More is equipped with electric heating elements for heating up drinking water. Thus, the appliance could cause severe scalds, burns... -
Page 7: Knowing Your New Tea & More
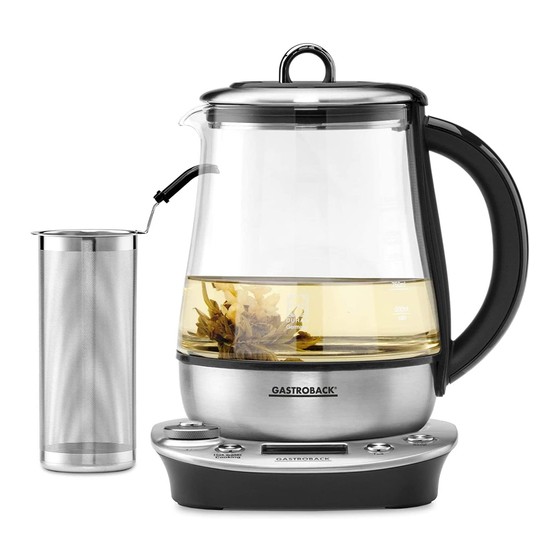
KNOWING YOUR NEW TEA & MORE PROPERTIES OF YOUR TEA & MORE 1| Tea filter lid and tea filter lid ring – for ope- 10| “°C/Time” button and dial: press the cen- Your new Design Tea & More Advanced is intended for heating up drinking water ration with the tea filter. -
Page 8: Keep Warm Function And Waiting Function
FUNCTIONS, DISPLAY AND ACOUSTIC SIGNALS Important: If you do not press “Start/Stop”, the appliance will cancel the running program after 10 minutes automatically. When connecting the appliance to the power supply, the display will be illuminated. Then the first tea program (“Green”) is selected and the display shows the pre-program- med water temperature for this type of tea. -
Page 9: The Following Cooking Programs Are Offered
insert and the glass insert lid set (lid ring with large opening and large lid). Especially up larger amounts, simply leave the glass insert holding the food in the kettle some- delicate food that could burn easily when heated on a range, can be cooked this what longer. -
Page 10: Operation
ance (see: ‘Care and Cleaning’). Rinse the interior of the kettle thoroughly with If water runs out during operation, immediately unplug the appliance (see: ‘Solving clear tap water. Problems’). 3. Select a suitable place for operating the appliance near a sufficient wall power Ensure to place the appliance on a level, flat, stable, and dry surface. -
Page 11: Bringing Water To The Boil
ling level is above the MIN indicator (“500 ml/MIN”). However, do not overfill 2. Press the “Hot water/Cooking” button to select the “Hot water” program. “100°C” the kettle. Observe the maximum filling level depending on the intended task. will be shown on the display. With this program you cannot make any further entries. •... -
Page 12: Cooking In The Kettle - Hot Water/Cooking
7. Press the “Start/Stop” button to start the program. The appliance will heat the Note water within the kettle. As soon as the set temperature is reached, a signal sounds You may cancel any running program whenever you like. For this, simply hold the and the “Start/Stop”... -
Page 13: Cooking Meals Within The Kettle - "Boil" And "Custom
3. Replace the glass insert in the kettle by holding the glass insert with the handles Important: Please keep in mind, that the water within the kettle will vaporize gra- of the glass insert lid ring. The kettle will heat the water up to the set temperature dually, when kept at high temperature for an elongated time. -
Page 14: Creating Your Own Cooking Program
appliance automatically switches to the keep warm function (“Warm”). The values you had set when starting the “Custom” program will be kept in memory even after switching off and unplugging the appliance. Tip: To keep your work space dry, you should keep the provided stainless steel bowl or another sufficient coaster at hand, to place the glass insert on it after cooking. -
Page 15: Making Yoghurt
MAKING YOGHURT WARNING: If you have been cooking with high temperature settings, the glass insert and glass lid will be hot. Protect your hands with rubber gloves or oven You can produce your own yoghurt from up to 400 ml pure milk and 40-50 ml living mitts to avoid burns due to hot parts, steam and hot condensate, when taking out lactobacillus yoghurt by using the glass insert with glass lid and the assigned lid set. -
Page 16: Warming Baby Food
11. After usage, you should discard the water within the kettle to avoid excessive kettle. Close the opening of the lid ring via the appropriate stainless steel lid. build-up of scale on the heating plate. Unplug the appliance. 6. Press the “Hot water/Cooking” button repeatedly until “Baby” is shown at the lowest line of the display. -
Page 17: Solving Problems
1. Cancel any running program, by holding the “Start/Stop” button pressed for 3 Problem Reason The Solution seconds. The appliance will be in standby mode then. The set temperature is equal or The set temperature must be higher (at least 5°C) 2. -
Page 18: Care And Cleaning
Problem Reason The Solution Problem Reason The Solution The kettle is leaking. Immediately unplug the appliance and wipe dry “E5” is displayed. Overheat alarm of the “Yogurt” Please ensure that the water temperature inside the appliance completely. Then check the kettle program. -
Page 19: Cleaning The Power Base And Kettle
CLEANING THE POWER BASE AND KETTLE 3. After cleaning, dry all parts thoroughly and leave dry naturally for approx. ½ hour, where they are out of reach of young children. 1. Always remove the kettle from the power base, unplug, and leave the appliance cool down to room temperature, before cleaning the appliance. -
Page 20: Notes For Disposal
INFORMATION AND SERVICE Please check www.gastroback.co.uk for further information. For technical support, please contact Gastroback Customer Care Center by phone: +49 (0)4165/22 25-0 or e-mail info@gastroback.co.uk. Please refer to our home page for a copy of these operating instructions in pdf for-... - Page 21 GASTROBACK GmbH Gewerbestraße 20 . 21279 Hollenstedt / Germany Telefon + 49 (0) 41 65 / 22 25 - 0 . Telefax + 49 (0) 41 65 / 22 25 -29 info@gastroback.co.uk . www.gastroback.co.uk...
Need help?
Do you have a question about the 62438 and is the answer not in the manual?
Questions and answers