Table of Contents
Advertisement
Quick Links
SCALANCE SC-600
SIMATIC NET
Industrial Ethernet security
SCALANCE SC-600
Operating Instructions
10/2021
C79000-G8976-C453-04
Introduction
Safety notices
Security
recommendations
Description of the device
Installation
Connecting
Upkeep and maintenance
Technical specifications
Dimension drawings
Approvals
1
2
3
4
5
6
7
8
9
10
Advertisement
Table of Contents

Related Manuals for Siemens SIMATIC NET SCALANCE SC-600


Summary of Contents for Siemens SIMATIC NET SCALANCE SC-600
- Page 1 SCALANCE SC-600 Introduction Safety notices Security SIMATIC NET recommendations Description of the device Industrial Ethernet security SCALANCE SC-600 Installation Connecting Operating Instructions Upkeep and maintenance Technical specifications Dimension drawings Approvals 10/2021 C79000-G8976-C453-04...
- Page 2 Note the following: WARNING Siemens products may only be used for the applications described in the catalog and in the relevant technical documentation. If products and components from other manufacturers are used, these must be recommended or approved by Siemens. Proper transport, storage, installation, assembly, commissioning, operation and maintenance are required to ensure that the products operate safely and without any problems.
-
Page 3: Table Of Contents
Table of contents Introduction ..............................5 Safety notices ............................11 Security recommendations ........................13 Description of the device ........................23 Product overview ..........................23 Accessories ............................24 Spare parts ............................27 Device views ............................. 28 4.4.1 Device view of a SCALANCE SC6x2-2C ..................28 4.4.2 Device view of a SCALANCE SC6x6-2C .................. - Page 4 Table of contents Functional ground ..........................62 Upkeep and maintenance ........................63 Loading new firmware using WBM ....................63 Restoring the factory settings ......................66 Technical specifications ......................... 67 Technical specifications of the SCALANCE SC-600 ..............67 Mechanical stability (in operation) ....................70 Cable lengths .............................
-
Page 5: Introduction
Introduction CAUTION To prevent injury, read the manual before use. Purpose of the Operating Instructions These operating instructions support you when installing and connecting up the SCALANCE SC-600 product line. The configuration and the integration of the devices in a network are not described in these operating instructions. - Page 6 • On the data medium that ships with some products: – Product CD / product DVD – SIMATIC NET Manual Collection • On the Internet pages of Siemens Industry Online Support: Link: (https://support.industry.siemens.com/cs/ww/en/ps/15327/man) Further documentation In the system manuals "Industrial Ethernet / PROFINET Industrial Ethernet" and "Industrial Ethernet / PROFINET passive network components", you will find information...
- Page 7 • On the Internet pages of Siemens Industry Online Support: Link: (https://support.industry.siemens.com/cs/ww/en/ps/15247) Catalogs You will find the article numbers for the Siemens products of relevance here in the following catalogs: • SIMATIC NET Industrial Communication / Industrial Identification, catalog IK PI •...
- Page 8 In order to protect plants, systems, machines and networks against cyber threats, it is necessary to implement – and continuously maintain – a holistic, state-of-the-art industrial security concept. Siemens’ products and solutions form one element of such a concept. Customers are responsible for preventing unauthorized access to their plants, systems, machines and networks.
- Page 9 1. Make sure that the package is complete. 2. Check all the parts for transport damage. Device defective If a fault develops, please send the device to your Siemens representative for repair. Repairs on-site are not possible. Decommissioning Shut down the device properly to prevent unauthorized persons from accessing confidential data in the device memory.
- Page 10 Explanations of many of the specialist terms used in this documentation can be found in the SIMATIC NET glossary. You will find the SIMATIC NET glossary on the Internet at the following address: Link: (https://support.industry.siemens.com/cs/ww/en/view/50305045) Electrostatic discharge NOTICE Electrostatic sensitive devices (ESD) Electronic modules contain electrostatic sensitive components These components can easily be destroyed if handled incorrectly.
-
Page 11: Safety Notices
Safety notices Read the safety notices Note the following safety notices. These relate to the entire working life of the device. You should also read the safety notices relating to handling in the individual sections, particularly in the sections "Installation" and "Connecting up". NOTICE Cleaning the housing If the device is not in a hazardous area, only clean the outer parts of the housing with a... - Page 12 Safety notices WARNING Do not remove or replace while circuit is live when a flammable or combustible atmosphere is present. Batteries: Replacement, recycling and disposal Handling batteries WARNING Risk of explosion and danger of release of harmful substances! Do not throw batteries into a fire, do not solder the body of the cell, do not open batteries, do not short-circuit batteries, do not reverse the polarity of batteries, do not heat batteries above 100 ºC.
-
Page 13: Security Recommendations
• Check regularly for security updates of the products and use them. • Check the user documentation of other Siemens products that are used together with the device for additional security recommendations. • Check regularly for news on the Siemens Internet pages. - Page 14 Security recommendations • Use passwords with a high password strength. Avoid weak passwords, (e.g. password1, 123456789, abcdefgh) or recurring characters (e.g. abcabc). This recommendation also applies to symmetrical passwords/keys configured on the device. • Make sure that passwords are protected and only disclosed to authorized personnel. •...
- Page 15 • Verify certificates based on the fingerprint on the server and client side to prevent "man in the middle" attacks. Use a second, secure transmission path for this. • Before sending the device to Siemens for repair, replace the current certificates and keys with temporary disposable certificates and keys, which can be destroyed when the device is returned.
- Page 16 Security recommendations • Ensure that the latest firmware version is installed, including all security-related patches. You can find the latest information on security patches for Siemens products at the Industrial Security (https://www.siemens.com/industrialsecurity) or ProductCERT Security Advisories website. For updates on Siemens product security advisories, subscribe to the RSS feed on the ProductCERT Security Advisories website or follow @ProductCert on Twitter.
- Page 17 Security recommendations • If non-secure protocols and services are required, ensure that the device is operated in a protected network area. • Check whether use of the following protocols and services is necessary: – Non-authenticated and unencrypted ports – MRP, HRP –...
- Page 18 Security recommendations Available protocols The following list provides you with an overview of the open protocol ports. The table includes the following columns: • Protocol • Port • Factory setting – Open The factory setting of the port is "Open". –...
- Page 19 Closed ✓ RADIUS UDP/1812 Outgoing only Outgoing only ✓ ✓ ✓ UDP/1813 SFTP TCP/22 Outgoing only Outgoing only ✓ ✓ ✓ ✓ Siemens Remote TCP/443 Outgoing only Outgoing only ✓ Optional ✓ Service (cRSP/SRS) SCALANCE SC-600 Operating Instructions, 10/2021, C79000-G8976-C453-04...
- Page 20 Security recommendations Service/Protocol Protocol/ Default status Configurable Authenticati Encryption SINEMA RC HTTPS/443 Outgoing only Outgoing only ✓ ✓ ✓ ✓ TCP/UDP depending on the server configuratio SMTP Client TCP/25 Outgoing only Outgoing only ✓ ✓ Optional SMTP (secure) TCP/465 Outgoing only Outgoing only ✓...
- Page 21 Security recommendations SCALANCE SC-600 Operating Instructions, 10/2021, C79000-G8976-C453-04...
-
Page 23: Description Of The Device
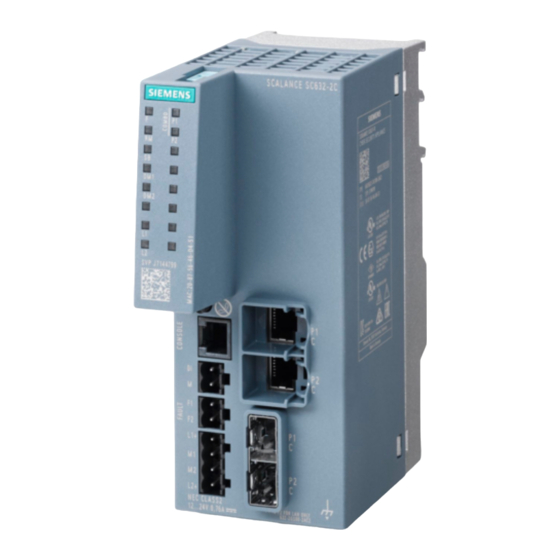
Description of the device Product overview Article numbers Device Description Article number SCALANCE SC622-2C 2 RJ45 ports, 2 SFP transceiver slots as combo ports 6GK5622-2GS00-2AC2 SCALANCE SC626-2C 6 RJ-45 ports, 2 SFP transceiver slots as combo ports 6GK5626-2GS00-2AC2 SCALANCE SC632-2C 2 RJ45 ports, 2 SFP transceiver slots as combo ports 6GK5632-2GS00-2AC2 SCALANCE SC636-2C... -
Page 24: Accessories
Description of the device 4.2 Accessories Components of the product The following components are supplied with a SCALANCE SC-600: • A SCALANCE SC-600 module • A SIMATIC NET Manual Collection with documentation • One securing screw for mounting on an S7 standard rail •... - Page 25 WARNING Use only approved pluggable transceivers If you use pluggable transceivers that have not been approved by Siemens AG, there is no guarantee that the device will function according to its specifications. If you use unapproved pluggable transceivers, this can lead to the following problems: •...
- Page 26 Description of the device 4.2 Accessories Type Properties Article number SFP992-1LD 1 x 1000 Mbps LC port optical for glass FO 6GK5 992-1AM00-8AA0 cable (single mode) up to max. 10 km SFP992-1LD (C) 1 x 1000 Mbps LC port optical for glass FO 6GK5 992-1AM00-8FA0 cable (single mode) up to max.
-
Page 27: Spare Parts
Description of the device 4.3 Spare parts Spare parts The following spare parts are available for SCALANCE SC-600: Component Description Article number Spring-loaded terminal 4-terminal spring-loaded terminal block to 6GK5 980-1DB10-0AA5 block, 4 terminals connect the power supply (24 VDC), for SCALANCE X/W/S/M, pack of 5 Spring-loaded terminal... -
Page 28: Device Views
Description of the device 4.4 Device views Device views 4.4.1 Device view of a SCALANCE SC6x2-2C The following figure shows the design of the SC6x2-2C. ① Electrical ports ⑧ Signaling contact ② SFP transceiver slots ⑨ Digital input ③ Grounding screw ⑩... -
Page 29: Device View Of A Scalance Sc6X6-2C
Description of the device 4.4 Device views 4.4.2 Device view of a SCALANCE SC6x6-2C The following figure shows the design of the SC6x6-2C. ① Electrical ports ⑧ Signaling contact ② SFP transceiver slots ⑨ Digital input ③ Grounding screw ⑩ Serial interface ④... -
Page 30: Led Display
Description of the device 4.5 LED display LED display The following figure shows the arrangement of the LEDs based on the example of the SCALANCE SC646-2C. The number of port LEDs depends on the device. 4.5.1 "RM" LED / "SB" LED This function/LED is not currently used. -
Page 31: Leds "Dm1" And "Dm2
Description of the device 4.5 LED display Meaning during operation LED color LED status Meaning during operation The device is operating free of errors. The device has detected a problem. 4.5.3 LEDs "DM1" and "DM2" The "DM1" and "DM2" LEDs indicate which display mode is set. There are 4 display modes (A, B, C and D). -
Page 32: Port Leds
Description of the device 4.5 LED display Meaning in display modes A, B and C In display modes A, B and C, from the "L1" and "L2" LEDs you can see whether the power supply is higher or lower than 9.3 V. L1/L2 LED L1/L2 connector LED color... - Page 33 Description of the device 4.5 LED display Meaning in display mode B In display mode B, the port LEDs indicate the transmission speed. LED color LED status Meaning Port operating at 10 Mbps Green Port operating at 100 Mbps Orange Port operating at 1000 Mbps If there is a connection problem and the type of transmission is fixed (autonegotiation off), the desired status, in other words the set transmission speed (1000 Mbps, 100...
-
Page 34: Select/Set Button
Description of the device 4.6 SELECT/SET button SELECT/SET button Position The "SELECT/SET" button is located on the front of the device. Figure 4-1 Position of the "SELECT/SET" button, for example on the SCALANCE SC646-2C Setting the display mode To set the required display mode, press the "SELECT/SET" button. For more detailed information on the display modes, refer to the section "LED display (Page 30)". - Page 35 Description of the device 4.6 SELECT/SET button Requirement • The device is in operation. • The function "Reset to Factory Defaults" is enabled for the "SELECT / SET" button. Note Reset despite disabled "SELECT/SET" button If you have disabled the "Restore Factory Defaults" function for the "SELECT/SET" button in the configuration, this does not apply during the startup phase, see section "Restoring the factory settings (Page 66)".
- Page 36 Description of the device 4.6 SELECT/SET button To define the fault mask, follow the steps below: 1. Switch to display mode D. Display mode D is active if the "DM1" and "DM2" LEDs are lit green. If another display mode is active, you will need to press the "SET/SELECT" button repeatedly until the "DM1"...
-
Page 37: C-Plug/Key-Plug
Description of the device 4.7 C-PLUG/KEY-PLUG C-PLUG/KEY-PLUG 4.7.1 Function of the C-PLUG/KEY-PLUG NOTICE Do not remove or insert a C-PLUG/KEY-PLUG during operation A C-PLUG/KEY-PLUG may only be removed or inserted when the device is turned off. Saving the configuration data A PLUG is an exchangeable storage medium for storing the configuration data of the device. -
Page 38: Replacing The C-Plug/Key-Plug
Description of the device 4.7 C-PLUG/KEY-PLUG Operation with C-PLUG/KEY-PLUG The configuration stored on the C-PLUG/KEY-PLUG is displayed via the user interfaces. If changes are made to the configuration, the device stores the configuration directly on the C-PLUG/KEY-PLUG, if this is in the "ACCEPTED" status. The internal memory is neither read nor written. - Page 39 Description of the device 4.7 C-PLUG/KEY-PLUG Replacing a C-PLUG/KEY-PLUG Removing a C-PLUG/KEY-PLUG 1. Turn off the power to the device. 2. Insert a screwdriver between the front edge of the C-PLUG/KEY-PLUG (A) and the slot and release the C-PLUG/KEY-PLUG. 3. Remove the C-PLUG/KEY-PLUG. Inserting a C-PLUG/KEY-PLUG 1.
-
Page 40: Combo Ports
Description of the device 4.8 Combo ports Combo ports Characteristics Combo port is the name for two communication ports. A combo port has the two following jacks: • a fixed RJ-45 port • an SFP transceiver slot that can be equipped individually Of these two ports, only one can ever be active. -
Page 41: Installation
Installation Safety notices for installation Safety notices When installing the device, keep to the safety notices listed below. WARNING If a device is operated at an ambient temperature of more than 50 ºC, the temperature of the device housing may be higher than 70 ºC. The device must therefore be installed so that it is only accessible to service personnel or users that are aware of the reason for restricted access and of the required safety measures at an ambient temperature higher than 50 ºC. - Page 42 Installation 5.1 Safety notices for installation WARNING When used in hazardous environments corresponding to Class I, Division 2 or Class I, Zone 2, the device must be installed in a cabinet or a suitable enclosure. Notes for use in hazardous locations according to ATEX, IECEx, UKEX and CCC Ex If you use the device under ATEX, IECEx, UKEX or CCC Ex conditions you must also keep to the following safety instructions in addition to the general safety instructions for protection against explosion:...
- Page 43 Installation 5.1 Safety notices for installation WARNING Wall mounting is only permitted if the requirements for the housing, the installation regulations, the clearance and separating regulations for the control cabinets or housings are adhered to. The control cabinet cover or housing must be secured so that it can only be opened with a tool.
-
Page 44: Types Of Installation
Installation 5.2 Types of installation Types of installation Types of installation The following types of installation are permitted for the device: • DIN rail • S7-300 standard rail • S7-1500 standard rail • Wall mounting Permitted mounting positions Note Installation location - Dependency of the temperature range Note the dependency of the permitted temperature range of the installation location: •... -
Page 45: Mounting On Din Rails
Installation 5.2 Types of installation 5.2.1 Mounting on DIN rails Installation Note Note the position of the securing bar, see also section “Dimension drawings (Page 73)“. When supplied, the securing bar is in the wall mounting position. To change the position of the securing bar, refer to the section “Changing the position of the securing bar (Page 49)“. -
Page 46: Installation On A Standard S7-300 Rail
Installation 5.2 Types of installation Removal To remove the device from a DIN rail, follow the steps below: 1. Disconnect all connected cables. 2. If necessary, loosen the knurled screw with your hand or a screwdriver. 3. Lever the securing bar down using a screwdriver as far as it will go. 4. -
Page 47: Installation On A Standard S7-1500 Rail
Installation 5.2 Types of installation 4. When you tighten the knurled screw. you cannot release the securing bar (torque 0.5 Nm). The device is additionally fixed. 5. Connect the electrical connecting cables, refer to the section "Connecting (Page 51)". Removal To remove the device from a standard rail, follow the steps below: 1. -
Page 48: Wall Mounting
Installation 5.2 Types of installation Securing bar in the wall mounting position (as supplied). To install the device on an S7-1500 standard rail, follow the steps below: 1. Place the first housing guide of the device on the top edge of the standard rail. 2. -
Page 49: Changing The Position Of The Securing Bar
Installation 5.2 Types of installation Installation Note The wall mounting must be capable of supporting at least four times the weight of the device. To mount the device on a wall, follow the steps below: 1. Prepare the wall mounting with drilled holes and plugs. For the precise dimensions, refer to the section "Dimension drawings (Page 73)". - Page 50 Installation 5.2 Types of installation 4. Tighten the knurled screw (torque 0.5 Nm). The securing bar is fixed in the wall mounting position. 5. Remove the pin. Wall mounting position - rail mounting position To move the securing bar from the wall mounting position to the rail mounting position, loosen the knurled screw.
-
Page 51: Connecting
Connecting Safety when connecting up Safety notices When connecting up the device, keep to the safety notices listed below. WARNING Power supply The device is designed for operation with a directly connectable safety extra low voltage (SELV) from a limited power source (LPS). The power supply therefore needs to meet at least one of the following conditions: •... - Page 52 Connecting 6.1 Safety when connecting up Safety notices on use in hazardous areas General safety notices relating to protection against explosion WARNING EXPLOSION HAZARD Do not connect or disconnect cables to or from the device when a flammable or combustible atmosphere is present. Safety notices when using the device according to Hazardous Locations (HazLoc) If you use the device under HazLoc conditions you must also keep to the following safety notices in addition to the general safety notices for protection against explosion:...
-
Page 53: Wiring Rules
Connecting 6.2 Wiring rules WARNING EXPLOSION HAZARD Do not press the SELECT/SET button when there is an explosive atmosphere. Wiring rules When wiring use cables with the following AWG categories or cross sections. Wiring rules for ... Screw/spring-loaded terminals connectable cable cross without wire end ferrule 0.25 - 2.5 mm sections for flexible cables ... -
Page 54: Power Supply
Connecting 6.3 Power supply Power supply Notes on the power supply WARNING Incorrect power supply When the device is connected to a redundant power supply (two separate power supplies), both must meet these requirements. Never operate the device with AC voltage or DC voltage higher than 32 V DC. CAUTION Damage to the device due to overvoltage The connector of the external power supply is not protected against strong... - Page 55 Connecting 6.3 Power supply Position and assignment Figure 6-1 Position of the power supply based on the example of the SCALANCE SC646-2C and the assignment of the terminal block Contact Assignment 24 VDC Ground Ground 24 VDC SCALANCE SC-600 Operating Instructions, 10/2021, C79000-G8976-C453-04...
-
Page 56: Signaling Contact
Connecting 6.4 Signaling contact Signaling contact Information on the signaling contact • The signaling contact is a floating switch that signals error states by interrupting the contact. • The signaling contact must be operated within the range of the operating voltage. •... - Page 57 Connecting 6.4 Signaling contact Position and assignment Figure 6-2 Position and assignment of the signaling contact based on the example of the SCALANCE SC646-2C. Contact Assignment Fault contact 1 Fault contact 2 Signaling of errors at the signaling contact • The signaling of errors by the signaling contact is synchronized with the fault LED "F", see section "LED display (Page 30)".
-
Page 58: Digital Input
Connecting 6.5 Digital input Signaling of errors at the digital output • If the signaling contact is configured as digital output, by default the signaling of errors does not run parallel to the fault LED "F". • For an error to also be signaled by the fault LED "F", you must enable the event "Fault State Change"... - Page 59 Connecting 6.5 Digital input Position and assignment Figure 6-3 Position and assignment of the digital input based on the example of the SCALANCE SC646-2C. Contact Assignment -30 to +30 VDC Ground SCALANCE SC-600 Operating Instructions, 10/2021, C79000-G8976-C453-04...
-
Page 60: Serial Interface
Connecting 6.6 Serial interface Serial interface Information on the serial interface • Via the serial interface on the device (RJ-11 jack), you can access the Command Line Interface of the device directly via an RS-232 (115200 8N1) connection without assigning an IP address. •... - Page 61 Connecting 6.6 Serial interface Assignment of the terminal block The connecting cable has the following assignment: Contact Pin assignment of the RJ-11 plug Pin assignment of the D-sub female connector TD (Transmit Data) TD (Transmit Data) RD (Receive Data) SG (Signal Ground) RD (Receive Data) SG (Signal Ground) Note...
-
Page 62: Functional Ground
Connecting 6.7 Functional ground Functional ground EMC disturbances are diverted to ground via the functional ground. This ensures the immunity of the data transmission. The functional ground must be implemented with low impedance. The connection of the functional ground must be established directly on the mounting plate or the DIN rail terminal. -
Page 63: Upkeep And Maintenance
Upkeep and maintenance Loading new firmware using WBM Requirement • The device has an IP address. • The user is logged in with administrator rights. Firmware update via HTTP 1. Click "System > Load&Save" in the navigation area. Click the "HTTP" tab. 2. - Page 64 Upkeep and maintenance 7.1 Loading new firmware using WBM Result When the firmware is successfully loaded, a dialog is displayed. Confirm the dialog with "OK". The device is restarted. In "Information > Versions" there is the additional entry "Firmware_Running". Firmware_Running shows the version of the current firmware. For "Firmware", the firmware version stored after loading the firmware is displayed.
- Page 65 Upkeep and maintenance 7.1 Loading new firmware using WBM 4. Connect a PC to the device over the Ethernet interface (P1 - P4). 5. Open a DOS box, change to the directory where the new firmware file is located and then execute the command "tftp -i <ip address>...
-
Page 66: Restoring The Factory Settings
Upkeep and maintenance 7.2 Restoring the factory settings Restoring the factory settings NOTICE Previous settings If you reset, all the settings you have made will be overwritten by factory defaults. NOTICE Inadvertent reset An inadvertent reset can cause disturbances and failures in the configured network. Requirement The device is in the startup phase. -
Page 67: Technical Specifications
Technical specifications Technical specifications of the SCALANCE SC-600 Technical specifications Attachment to Industrial Ethernet Electrical connectors SC6x2-2C SC6x6-2C Quantity Connector RJ-45 jack Properties Half/full duplex, MDI-X pinning Transmission speed 10 / 100/ 1000 Mbps Slots for pluggable transceivers Quantity Connector SFP transceiver Transmission speed 100 / 1000 Mbps... - Page 68 Technical specifications 8.1 Technical specifications of the SCALANCE SC-600 Technical specifications Design Terminal block, 2 terminals Property Isolated from electronics Rated voltage 24 VDC safety extra-low voltage (SELV) For state "0": -30 to 3 VDC For state "1": 13 to 30 VDC Maximum input current 8 mA Maximum cable length...
- Page 69 Technical specifications 8.1 Technical specifications of the SCALANCE SC-600 Technical specifications Dimensions (W x H x D) 60 x 145 x 125 mm Weight 580 g Installation options • Wall mounting • Installation on a DIN rail • Mounting on an S7-300 standard rail •...
-
Page 70: Mechanical Stability (In Operation)
Technical specifications 8.2 Mechanical stability (in operation) Mechanical stability (in operation) Mechanical stability (in operation) Device IEC 60068-2-27 shock IEC 60068-2-6 vibration 15 g, 11 ms duration 10 - 58 Hz: 0.075 mm 6 shocks per axis 85 - 150 Hz: 1 g 1 octave/min, 20 sweeps SC6x2-2C ●... - Page 71 Technical specifications 8.3 Cable lengths SCALANCE SC-600 Operating Instructions, 10/2021, C79000-G8976-C453-04...
-
Page 73: Dimension Drawings
Dimension drawings All dimensions specified in millimeters. ① Securing bar in the wall mounting position (as supplied). Figure 9-1 Front view and side view of the SCALANCE SC646-2C. All SCALANCE SC-600 modules have the same dimensions. SCALANCE SC-600 Operating Instructions, 10/2021, C79000-G8976-C453-04... - Page 74 Dimension drawings SCALANCE SC-600 Operating Instructions, 10/2021, C79000-G8976-C453-04...
-
Page 75: Approvals
The approvals for shipbuilding are an exception to this. Certificates for shipbuilding and national approvals The device certificates for shipbuilding and special national approvals can be found in Siemens Industry Online Support on the Internet: Link: (https://support.industry.siemens.com/cs/ww/en/ps/15326/cert) Notes for the manufacturers of machines The devices are not machines in the sense of the EC Machinery Directive. - Page 76 EC L174, 01/07/2011, pages 88-110 You will find the EC declaration of conformity for these products on the Internet pages of Siemens Industry Online Support (https://support.industry.siemens.com/cs/ww/en/ps/15326/cert). The EC Declaration of Conformity is available for all responsible authorities at:...
- Page 77 Hazardous Area". You will find this document • on the data medium that ships with some devices. • on the Internet pages under Siemens Industry Online Support (https://support.industry.siemens.com/cs/ww/en/ps). Enter the document identification number "C234" as the search term. The products described in these operating instructions meet the requirements of the EU directive 2014/34/EU "Equipment and Protective Devices for Use in Potentially Explosive...
- Page 78 Approvals You will find the current versions of the standards in the currently valid ATEX certificates. IECEx The products described in these operating instructions meet the requirements of explosion protection according to IECEx. Note Type of protection of the device The devices are approved for various types of protection.
- Page 79 Approvals Applied standards: • EN 61000-6-2 Electromagnetic compatibility (EMC) - Part 6-2: Generic standards - Immunity for industrial environments • EN 61000-6-4 Electromagnetic compatibility (EMC) - Part 6-4: Generic standards - Emission standard for industrial environments You will find the current versions of the standards in the currently valid EC/UK Declaration of Conformity.
- Page 80 Approvals cULus Approval Hazardous Location cULus Listed I. T. E. FOR HAZ. LOC. Underwriters Laboratories Inc. complying with • UL 60950-1 (Information Technology Equipment) • ANSI/ISA 12.12.01-2007 • CSA C22.2 No. 213-M1987 Approved for use in Cl. 1, Div. 2, GP A, B, C, D T4 Cl.
-
Page 81: Index
Index Grounding screw, 28, 29 Approvals, 75 Article number, 25 Housing, 68 Article numbers, 23 Industrial Ethernet CE mark, 75 Connector, 67 Combo port, 40 Installation, 68 Command Line Interface (CLI), 60 Installation on a DIN rail, 45 Components of the product, 24 Installation on a standard rail, 46, 48 Configuration, 35 Wall mounting, 48... - Page 82 Index S7-1500, 48 S7-300, 46 Safety notices for installation, 41 general, 11 Use in hazardous areas, 11, 41, 51 when connecting up, 51 Securing bar, 28, 29, 45, 46, 48 SELECT/SET button, 28, 29, 31, 34, 66 Serial interface, 28, 29, 60 SFP transceiver, 25 Signaling contact, 28, 29, 30, 56 SIMATIC NET glossary, 10...
Need help?
Do you have a question about the SIMATIC NET SCALANCE SC-600 and is the answer not in the manual?
Questions and answers