Table of Contents

Related Manuals for Broil King Premium BCP-500L


Summary of Contents for Broil King Premium BCP-500L
- Page 1 User Manual BCP-500L, BCP-500S, BCP-600L, BCP-600S, BCP-5001L, BCP-5001S BCP-500L BCP-500S BCP-600L BCP-600S BCP-5001S BCP-5001L FOR CUSTOMER SERVICE: CALL 1 -877-885-8227 (TOLL-FREE) 10:00 A.M. – 7:00 P.M. (EST) MONDAY-FRIDAY - 1 -...
- Page 2 Grill Operation 1-2-3 Before Grilling Step 1 Keep your grill a safe distance away from your property.* Step 2 Always perform a Leak Test on all connections and hoses. * Step 3 Keep children away from the grill. During Grilling (To avoid tripping safety valves, please follow these instructions carefully!) Step 1 First open lid and turn gas tank on slowly.
-
Page 3: Table Of Contents
Table of Contents For Your Safety.........................4 Safe Locations for Use of This Outdoor Grill................5 BBQ FEATURES…………………………………………………………………………………………………………………….6 BBQ Specifications........................10 Grill Parts ..........................10 Installing the Appliance in a BBQ Island.................11 Building BBQ Specifications....................12 Installation Method……………………………………………………………………………………………………………13 Conversion from LP to NG Grill………………………………………………………………………………………….14 Operating Your Grill.......................16 Connecting &... -
Page 4: For Your Safety
For Your Safety Dear Valued Customer, Congratulations on your new barbecue grill purchase! You’ve made the right choice. In this manual, you will find assembly instructions, suggestions for grilling and helpful hints, as well as guidelines for the safe operation, proper care and use of your grill. -
Page 5: Safe Locations For Use Of This Outdoor Grill
Safe Locations for Use of This Outdoor Grill CAUTION Never use this outdoor grill inside any building, garage, shed or breezeway, or inside any boat, trailer or recreational vehicle to prevent a possible fire and to prevent the possibility of carbon monoxide poisoning or asphyxiation. WARNING Do not use this appliance under overhead combustible surface or covered area (e.g., awnings, umbrellas, porches or gazeboes). -
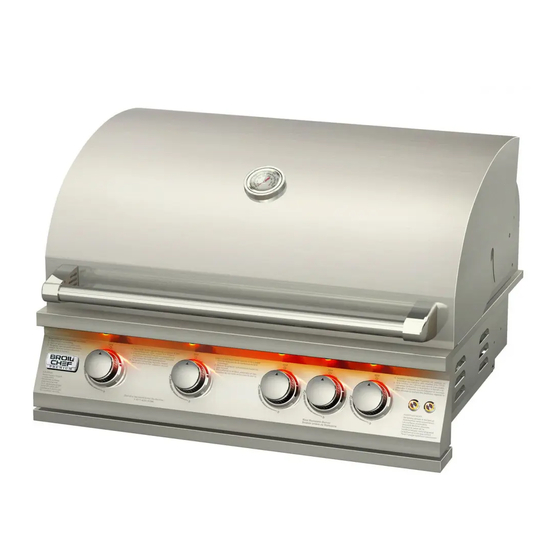
Page 6: Bbq Features
THIS MANUAL APPLIES TO THE FOLLOWING BBQ GRILLS: BBQ FEATURES: Model: BCP-500L 5 BURNER Model: BCP-500S 5 BURNER Grill Dimensions 32 7/16”W x 23 1/2”D x 19 5/8”H Grill Dimensions 32 7/16”W x 23 1/2”D x 19 5/8”H BTU Output 15,000 BTU per Burner x4 BTU Output 15,000 BTU per Burner x4... - Page 7 Model: BCP-600S 6 BURNER Model: BCP-600L 6 BURNER Grill Dimensions 39 3/4”W x 23 3/8”D x 19 3/8”H Grill Dimensions 39 3/4”W x 23 5/8”D x 20 1/2”H BTU Output 15,000 BTU per Burner x5 BTU Output 15,000 BTU per Burner x5 Infrared Back Burner 12,000 BTU Infrared Back Burner...
- Page 8 Model: BCP-5001S Model: BCP-5001L Side Burner Dimensions 23.6”W x 18.9”D x 5.3 ”H Side Burner Dimensions 24.8”W x 12.6”D x 9.5”H BTU Output 12,000 BTU per Burner x2 BTU Output 12,000 BTU per Burner x2 Infrared Back Burner Infrared Back Burner Total BTU 24,000 Total BTU...
-
Page 9: Bbq Specifications
BBQ SPECIFICATIONS - 9 -... -
Page 10: Grill Parts
GRILL PARTS Thermometer BCP-500L-01-01 6 Burner Body Bottom BCP-600L-01-15 Thermometer Base BCP-500L-01-02 Cooking Grid BCP-500L-01-16 5 Burner Lid BCP-500L-01-03 Lava Stone Heat Sheet BCP-500L-01-17 6 Burner Lid BCP-600L-01-03 Burner Ignite Plate BCP-500L-01-18 Lid Pin BCP-500L-01-04 Burner BCP-500L-01-19 Handle Seat BCP-500L-01-05 Oil Baffle BCP-500L-01-20 5 Burner Handle Tube... -
Page 11: Installing The Appliance In A Bbq Island
BCP 6 Burner BCP600S has no Part#22 (Knob Lamp) and Part#27 (Lamp Switch). Installing the Appliance in a BBQ Island You will need a second person to help you avoid damaging the appliance or your appliance island. The island must be made out of non-combustible material. In the event it is combustible, the use of an insulation jacket is required. -
Page 12: Building Bbq Specifications
BUILDING BBQ SPECIFICATIONS ALL BBQ ISLANDS MUST BE MANUFACTURED FROM “NON-COMBUSTIBLE” MATERIAL. Minimum clearance to adjacent combustible construction at 14” from sides & 16” from back Cut-Out Dimensions MODEL DESCRIPTION WIDTH (A) DEPTH (B) HEIGHT (C) BCP-500L 32” 5 Burner 30 3/4”... -
Page 13: Installation Method
INSTALLATION METHOD Installation Method for Propane Installation Method for Side Burner for BCP-500L,(S),BCP-600L,(S) with a Grill NOTE: You will need to use a gas rated sealer on gas connectors that are not flared. Installing Side Burner with a Built-in Grill If you are installing a side burner in conjunction with a gas grill, install it in the following manner:... -
Page 14: Conversion From Lp To Ng Grill
Natural Gas Conversion When converting an LP side burner that is connected to an LP grill, you MUST convert both appliances. It is dangerous to have an LP appliance and an NG appliance supplied by the same fuel. BroilChef Premium side burners and built-in grills are manufactured to use standard liquid propane (LP) and can be converted to burn natural gas (NG). - Page 15 Replacing the Built-In Grill’s Orifices (BCP500S/BCP500L/BCP600S/BCP600L): Main Burner Valve Assembly 1. Remove the Cooking Grids and Upper Flame Tamers. 2. Remove the Cotter Pins that holds the burners at the back of the grill by using a screwdriver or needle nose pliers. (See illustration below left).
-
Page 16: Operating Your Grill
REMEMBER TO LEAK CHECK ALL FITTINGS AND ORIFICES AFTER ALL OF THE CONVERSION IS COMPLETED. TEST FIRE ALL BURNERS TO ENSURE PROPER AND SAFE OPERATION. WARNING. This outdoor cooking gas appliance is equipped with a three-prong (grounding) plug for your protection against shock hazard and should be plugged directly into a properly grounded three-[prong receptacle. -
Page 17: Connecting & Disconnecting Gas Cylinder
DANGER A fire causing death or serious injury may occur if the following is not followed exactly: Never store or use gasoline or other volatile substances in the vicinity of this grill. Never store a spare propane cylinder in the vicinity of this grill, or in the vicinity of another potential heat source. Never fill the propane cylinder beyond 80% full. -
Page 18: Flame Adjustment
WARNING Never stand with your head directly over the grill when preparing to light the main burners, to prevent possible bodily injury. Lighting Main Burner WARNING: Attempting to light the burner with the lid closed may cause an explosion. Make sure there are no obstructions of airflow to the gas unit. -
Page 19: Excess Flow Safety Valve Reset Procedure
preheated before cooking with the main burner control settings on HIGH for five minutes with the lid closed. WARNING Adjusting the air-shutter while the grill is operating. If it is still hot, please wear protective gear and be careful. Failure to follow this instruction could cause personal injury. -
Page 20: Care And Maintenance
Care and Maintenance IMPORTANT Always allow to completely cool off before covering your grill to prevent corrosion from condensation. CAUTION All cleaning and maintenance should be done when the grill is cool, with the fuel supply turned off at the control dial and the propane cylinder disconnected. -
Page 21: Troubleshooting
TROUBLESHOOTING Problem Possible cause Prevention/Cure Burner doesn't light using knobs or Wires or electrode is covered by Clean wire or electrode using a igniter cooking residue cloth and rubbing alcohol Electrode and burners are wet Wipe with dry cloth Ignition electrode cracked or Replace electrode broken;... - Page 22 Flare-up Grease fill-up Clean grill Excessive fat in meat Trim fat from meat before grilling Excessive cooking temperature Adjust (lower) temperature Persistent grease fire Grease trapped between burner Turn knobs to OFF. Turn gas OFF at and food on the grate propane tank.
-
Page 23: Warranty Program
Warranty Program Proof of purchase is required to access this warranty program, which is in effect from the date of purchase. If unable to provide proof of purchase or after the warranty has expired, customers will be subject to parts, shipping and handling fees. Full 30-Day Warranty Any missing parts can be replaced at no charge within 30 days from the date of purchase with a valid proof of purchase. -
Page 24: Broilchef Premium Accessories
Broilchef Premium Built-in Accessories Manufactured by: Broilchef Premium - 24 -...
Need help?
Do you have a question about the Premium BCP-500L and is the answer not in the manual?
Questions and answers