Table of Contents
Advertisement
Available languages
Available languages
Quick Links
Item #
Model #YJAF052
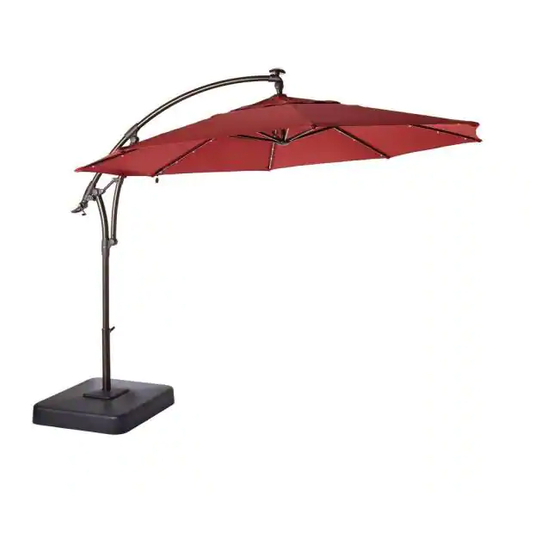
USE AND CARE GUIDE
11FT SOLAR LIGHTED OFFSET UMBRELLA
Questions, problems, missing parts? Before returning to the store call
Hampton Bay Customer Service
8 a.m. - 6 p.m., EST, Monday-Friday
1-877-527-0313
HOMEDEPOT.CA
THANK YOU
We appreciate the trust and confidence you have placed in Hampton Bay through the purchase of this umbrella. We strive to continually create
quality products designed to enhance your home. Visit us online to see our full line of products available for your home improvement needs.
Thank you for choosing Hampton Bay!
Advertisement
Chapters
Table of Contents

Related Manuals for HAMPTON BAY YJAF052


Summary of Contents for HAMPTON BAY YJAF052
- Page 1 THANK YOU We appreciate the trust and confidence you have placed in Hampton Bay through the purchase of this umbrella. We strive to continually create quality products designed to enhance your home. Visit us online to see our full line of products available for your home improvement needs.
-
Page 2: Table Of Contents
Table of Contents Table of Contents ............2 Pre-Assembly ..............3 Planning Assembly ..............3 Safety Information ............2 Hardware Included ..............3 Product Caution ...............2 Package Contents ..............4 Safety Warnings ..............2 Warranty ................. 2 Assembly ............... 5 Operation ..............18 What is Covered ...............2 Care and Cleaning ............ -
Page 3: Pre-Assembly
Pre-Assembly PLANNING ASSEMBLY Read all instructions before assembly. To avoid damaging this product, assemble it on a soft, non- abrasive surface such as carpet or cardboard. NOTE: More than one person may be required to complete the assembly of this product. H H ARDWARE INCLUDED NOTE: Hardware not shown to actual size. -
Page 4: Package Contents
Pre-Assembly (continued) PACKAGE CONTENTS Part Description Quantity Part Description Quantity Lower bracket Upper base cover Upper bracket Support tube rim Lower umbrella pole Corner connector Knob Side panel Solar receiver Lock panel Crank Sandbag Upper umbrella pole Canopy Lower base cover ON/OFF Switch... -
Page 5: Assembly
Assembly Attaching the brackets Attach the upper bracket (B) onto the lower bracket (A). NOTE: This umbrella should be set up in its desired location to avoid moving it after assembly. HOMEDEPOT.CA Please contact 1-877-527-0313 for further assistance. - Page 6 Assembly (continued) Attaching the lower umbrella pole to the brackets Attach the lower umbrella pole (C) to the upper bracket (B) and lower bracket (A) using the M8x20 hex bolts (AA) and M8 washers (BB). NOTE: Fully tighten all bolts using the wrench (DD).
- Page 7 Assembly (continued) Inserting the corner connectors Insert the corner connectors (K) into the four ends of the attached brackets. HOMEDEPOT.CA 1-877-527-0313...
- Page 8 Assembly (continued) Sliding the lock panels Slide the perforated lock panels (M) downward between the corner connectors (K).
- Page 9 Assembly (continued) Sliding the side panels Slide the side panels (L) downward between the corner connectors (K). Connect the two pieces of the support tube rims (J). Slide the support tube rims (J) down the lower umbrella pole (C) and connect it to the brackets (A and B). HOMEDEPOT.CA Please contact 1-877-527-0313 for further assistance.
- Page 10 Assembly (continued) Placing the sand bag Place the sandbag (N) in the umbrella base. Place the umbrella base in the area where the umbrella is to be used. It will be heavy once filled with sand.
- Page 11 Assembly (continued) Filling the sand bag Pull open the velcro pouch on the sand bag (N) and fill with sand. After filling the sand bags (N), close the pouch and ensure the velcro is sealed. Lock the two sections of the sand bags (N) together. NOTE: The sand bags (N) are to be filled with sand only.
- Page 12 Assembly (continued) Closing the lid on the base Ensure the locking mechanism on the lock panel (M) is in the OPEN position by using the wrench (DD). Attach the bottom covers (H) to the side panels (L). Close the bottom covers (H) and ensure they are fully closed.
- Page 13 Assembly (continued) Locking the lower base cover Lock the lower base cover (H) in place by turning the 12 locking mechanisms on the lock panel (M) to the CLOSE position using the wrench (DD). Attach the upper base cover (I) to the assembled base. HOMEDEPOT.CA Please contact 1-877-527-0313 for further assistance.
- Page 14 Assembly (continued) Attaching the knob Attach the knob (D) to the lower umbrella pole (C) using M5x8 bolts (CC). NOTE: Fully tighten all bolts using the hex wrench (EE).
- Page 15 Assembly (continued) Preparing the umbrella Push down and pull the hinge to prepare the upper umbrella pole (G) as the picture shows. HOMEDEPOT.CA 1-877-527-0313...
- Page 16 Assembly (continued) Attaching the solar reciever Attach the solar receiver (E) to the top of the upper umbrella pole (G) by turning the solar receiver (E) clockwise until fully tightened. Insert the plug into the plug hole of the solar receiver (E).
- Page 17 Assembly (continued) Inserting the umbrella into the pole Insert the upper umbrella pole (G) into the lower umbrella pole (C). Rotate the knob (D) clockwise to secure the upper umbrella pole (G) to the lower umbrella pole (C). HOMEDEPOT.CA Please contact 1-877-527-0313 for further assistance.
-
Page 18: Operation
Operation Attaching the crank Attach the crank (F) to the handle as shown below. NOTE: Align the holes on the crank (F) to the handle and it will lock. If the holes are not aligned, the crank (F) will be easy to take out. To take the crank (F) out, insert the hex wrench (EE) into the same hole and pull. - Page 19 Operation (continued) Raising the umbrella Loosen the knob on the handle as shown in figure (1) by turning counterclockwise. Slide the umbrella handle upward as shown in figure (2) until it stops and the umbrella is fully extended. Tighten the knob on the handle clockwise as shown in figure (3) to lock the handle in place. HOMEDEPOT.CA Please contact 1-877-527-0313 for further assistance.
- Page 20 Operation (continued) Opening the umbrella Release the belt on the canopy (O). The crank handle must be on top of the pole, in the up position, prior to opening the umbrella. Slowly turn the crank clockwise to open the umbrella. When the umbrella is open, fasten the belt around the pole to stabilize the umbrella.
- Page 21 Operation (continued) Operating the umbrella Loosen the knob on the umbrella handle by turning counterclockwise. Use one hand to hold the umbrella handle and the other hand to rotate the umbrella shade. The umbrella can turn up to 360 degrees. When the umbrella is at the desired position, tighten the knob by turning clockwise.
- Page 22 Operation (continued) Operating the umbrella Press the ON/ OFF switch (P) to turn the light on and off. When adjusting the umbrella angle release the belt from the pole. Loosen the knob on the umbrella handle by turning it counterclockwise, then slide the umbrella handle down to adjust the angle of the umbrella.
- Page 23 Operation (continued) Closing the umbrella Prior to closing the umbrella, move the crank handle to the top of the pole in the up position and loosen the belt. To close the umbrella, turn the crank counterclockwise. When the umbrella is closed, loosen the knob on the umbrella handle by turning it counterclockwise. Pull the umbrella handle downward.
-
Page 24: Care And Cleaning
Operation (continued) Storing the umbrella Tie the umbrella closed using the belt when not in use. Care and Cleaning For best results, clean the frame and fabric with a damp cloth, and dry thoroughly. This will help prevent mildew by removing dirt particles that may accumulate. - Page 25 Questions, problems, missing parts? Before returning to the store, call Hampton Bay Customer Service. 8 a.m. - 6 p.m., EST Monday - Friday 1-877-527-0313 HOMEDEPOT.CA Retain this manual for future use.
- Page 26 GRACIAS Apreciamos la confianza que has depositado en Hampton Bay al comprar esta sombrilla. Nos esforzamos para continuamente crear productos de calidad diseñados para mejorar tu hogar. Visítanos por Internet para ver nuestra línea completa de productos disponibles para las necesidades...
- Page 27 Tabla de contenido Tabla de contenido............2 Preensamblaje .............. 3 Planificación del ensamblaje...........3 Información de seguridad..........2 Herrajes incluidos..............3 Precaución sobre el producto..........2 Contenido del paquete.............4 Advertencias de seguridad .............2 Garantía................2 Ensamblaje..............5 Funcionamiento............18 Qué cubre la garantía..............2 Mantenimiento y limpieza...........
-
Page 28: Preensamblaje
Preensamblaje PLANIFICACIÓN DEL ENSAMBLAJE Lee todas las instrucciones antes de ensamblar. Para evitar daños al producto, ensámblalo sobre una superficie suave y no abrasiva, como una alfombra o un cartón. NOTA: Se puede necesitar más de una persona para ensamblar completamente este producto. HERRAJES INCLUIDOS NOTA: No se muestra el tamaño real de los herrajes. -
Page 29: Contenido Del Paquete
Preensamblaje (continuación) CONTENIDO DEL PAQUETE Pieza Descripción Cantidad Pieza Descripción Cantidad Soporte inferior Cubierta de la base superior Soporte superior Casquillo del tubo de soporte Vara inferior de la sombrilla Conector de esquina Perilla Panel lateral Receptor solar Panel de cierre Manivela Bolsa de arena Parte superior de la sombrilla... -
Page 30: Ensamblaje
Ensamblaje Adjuntando los soportes Coloca el soporte superior (B) sobre el soporte inferior (A). NOTA: Debes instalar esta sombrilla en el lugar elegido para evitar moverla después del ensamblaje. HAMPTONBAY.COM Para obtener asistencia, llama al 1-855-HD-HAMPTON. - Page 31 Ensamblaje (continuación) Cómo instalar la vara inferior de la sombrilla en los soportes Fija la vara inferior de la sombrilla (C) al soporte superior (B) y al soporte inferior (A) con pernos hexagonales M8x20 (AA) y arandelas M8 (BB). NOTA: Aprieta completamente todos los pernos con la llave (DD).
- Page 32 Ensamblaje (continuación) Como insertar los conectores de esquina Inserta los conectores de esquina (K) en los cuatros extremos de los soportes ensamblados. HAMPTONBAY.COM Para obtener asistencia, llama al 1-855-HD-HAMPTON.
- Page 33 Ensamblaje (continuación) Cómo deslizar los paneles de cierre Desliza los paneles de cierre perforados (M) hacia abajo entre los conectores de esquina (K).
- Page 34 Ensamblaje (continuación) Cómo deslizar los paneles laterales Desliza los paneles laterales (L) hacia abajo entre los conectores de esquina (K). Une las dos piezas de los casquillos de soporte del tubo (J). Desliza los casquillos de soporte del tubo (J) hacia abajo por la vara inferior de la sombrilla (C) y conéctalos a los soportes (A y B). Inserta los cables largo (O) y corto (P) en el orificio de los soportes como se muestra a continuación.
- Page 35 Ensamblaje (continuación) Cómo colocar la bolsa de arena Coloca la bolsa de arena (N) en la base de la sombrilla. NOTA: Coloca la base en el lugar donde se usará la sombrilla. Esta se volverá muy pesada después de llenar la bolsa con arena.
- Page 36 Ensamblaje (continuación) Cómo llenar la bolsa de arena Abre la bolsa con cierre de velcro que está en la bolsa de arena (N) y llénala con arena. Después de llenar las bolsas de arena (N), cierra la bolsa con velcro y asegúrate de que este quede sellado. Une y asegura las dos secciones de las bolsas de arena (N).
- Page 37 Ensamblaje (continuación) Cómo asegurarte de que el mecanismo de cierre esté en la posición abierta Usando la llave (DD), asegúrate de que el mecanismo de cierre en el panel del cierre (M) esté en la posición de OPEN (ABIERTO). Fija la cubierta de la base inferior (H) a los paneles laterales (L).
- Page 38 Ensamblaje (continuación) Cómo cerrar la cubierta de la base inferior Cierra la cubierta inferior de la base (H) en su lugar girando los 12 mecanismos de cierre en el panel de cierre (M) a la posición de CLOSE (CERRADO) usando la llave (DD). Fija la cubierta superior de la base (I) a la base ensamblada.
- Page 39 Ensamblaje (continuación) Cómo instalar la perilla de cierre en la vara inferior de la sombrilla Fija la perilla de cierre (D) a la vara inferior de la sombrilla (C) con la llave hexagonal S3 (EE) y los pernos M5x8 (CC). Asegúrate de que la perilla de cierre (D) esté...
- Page 40 Ensamblaje (continuación) Cómo preparar la sombrilla Empuja el tubo curvo largo de la parte superior de la sombrilla (G) un poco hacia afuera mientras sostienes la parte roscada macho del tubo curvo corto hacia abajo para que la bisagra encaje en su lugar como se muestra a continuación. HAMPTONBAY.COM Para obtener asistencia, llama al 1-855-HD-HAMPTON.
- Page 41 Ensamblaje (continuación) Cómo instalar el receptor solar Fija el receptor solar (E) a la parte superior de la sombrilla (G) girando el receptor solar (E) en sentido de las manecillas del reloj hasta que quede bien apretado. Inserta la clavija en el orificio destinado para ésta en el receptor solar (E).
- Page 42 Ensamblaje (continuación) Cómo insertar la parte superior de la sombrilla en la vara inferior de ésta Gira la perilla de cierre (D) 180ºen el sentido de las manecillas del reloj como se muestra en la figura (1). Inserta la parte superior de la sombrilla (G) en la vara inferior de ésta (C) como se muestra en la figura (2). Gira la perilla de cierre (D) 180º...
-
Page 43: Funcionamiento
Funcionamiento Cómo instalar la manivela Fija la manivela (F) en la manija como se muestra a continuación. Fija la manivela (F) alineando la parte roscada macho con el orificio en la manivela (F) hasta que encaje en su lugar. Para desenganchar la manivela, se requiere la llave (EE) para presionar en la parte roscada macho y quitar la manivela (F). Fija la manivela (F) sin usar la parte roscada macho. - Page 44 Funcionamiento (continuación) Cómo levantar la sombrilla Afloja la perilla en la parte superior de la sombrilla como se muestra en la figura (1), girándola de derecha a izquierda hasta aflojarla por completo. Sostén la manija de la sombrilla y empuja el tubo curvo largo hacia arriba como se muestra en la figura (2) hasta que se detenga y la sombrilla quede completamente extendida.
- Page 45 Funcionamiento (continuación) Cómo abrir la sombrilla Desabrocha la correa de velcro de la cubierta y sacúdela para separar los varillas de la sombrilla. Gira lentamente la manivela (F) en el sentido de las manecillas del reloj para abrir la sombrilla. Cuando la sombrilla esté...
- Page 46 Funcionamiento (continuación) Cómo usar la sombrilla Gira la perilla de cierre (D) 180ºen el sentido de las manecillas del reloj como se muestra en la figura (1). Sostén la manija de la sombrilla con una mano y sostén el tubo curvo corto con la otra mano para girar la sombrilla como se muestra en la figura (2).
- Page 47 Funcionamiento (continuación) Cómo usar la sombrilla Oprime el interruptor de encendido y apagado (ON/OFF) para encender o apagar la luz LED. Afloja la perilla de la parte superior de la sombrilla (G) girándola en sentido contrario a las manecillas del reloj y luego desliza la manija hacia abajo para ajustar el ángulo de la sombrilla.
- Page 48 Funcionamiento (continuación) Cómo cerrar la sombrilla Afloja la correa de velcro como se muestra en la figura (1). Gira la manivela en sentido contrario a las manecillas del reloj para cerrar la sombrilla, como se muestra en la figura (2). Cuando la sombrilla esté...
-
Page 49: Mantenimiento Y Limpieza
Funcionamiento (continuación) Cómo guardar la sombrilla Ata la sombrilla a la vara usando la correa de velcro cuando no esté en uso, como se muestra a continuación. Mantenimiento y limpieza Para obtener mejores resultados, limpia el armazón y la tela con un paño húmedo y seca completamente. Esto ayudará a prevenir la aparición de moho al quitar las partículas de polvo que puedan acumularse. - Page 50 ¿Preguntas, problemas o piezas faltantes? Antes de regresar a la tienda, llama al servicio al cliente de Hampton Bay de lunes a viernes de 8 a.m. a 6 p.m. (hora estándar del Este) 1-855-HD-HAMPTON HAMPTONBAY.COM Conserva este manual para uso en el futuro.
Need help?
Do you have a question about the YJAF052 and is the answer not in the manual?
Questions and answers