Advertisement
VAB-600-C
Daughter board for VAB- - - - 600 Pico
Daughter board for VAB
600 Pico- - - - ITX mainboard
ITX mainboard
Daughter board for VAB
Daughter board for VAB
600 Pico
600 Pico
ITX mainboard
ITX mainboard
Quick Guide
Key Features:
Key Features:
Key Features:
Key Features:
Allows TTL display supported by VAB-600 mainboard
•
Quick installation and easy setup
•
Installing VAB-600-C
1
to VAB-600 mainboard
Step 1
Step 1
Step 1
Step 1
Install the VAB-600-C daughter board to a suitable surface and
secure it with 2 screws.
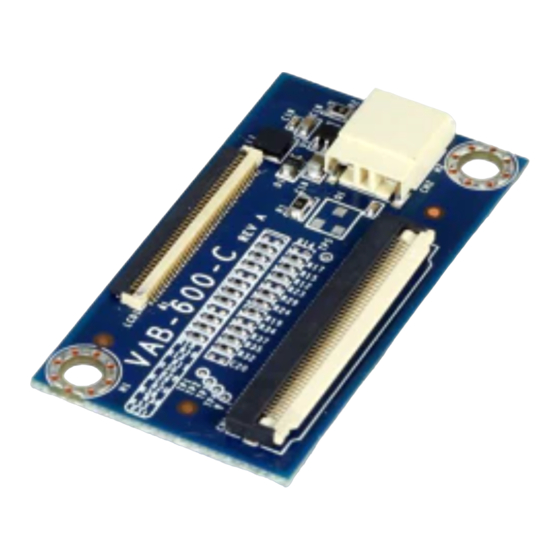
The VAB-600-C is a TTL converter board specially designed for
VAB-600 Pico-ITX mainboard. By connecting the VAB-600-C to the
VAB-600 mainboard, TTL display can be fully supported. VAB-600-
C is equipped with 3 I/O ports which are DVO signal connector,
TTL panel signal connector and backlight connector.
Specifications:
Specifications:
Specifications:
Specifications:
PCB Size
PCB Size
PCB Size
PCB Size
•
46mm x 25mm x 1mm (L x W x H)
•
4-layer
•
I/O Connector
I/O Connector
I/O Connector
I/O Connector
•
DVO signal connector
•
TTL panel signal connector
•
Package Lists:
Package Lists:
Package Lists:
Package Lists:
1 x VAB-600-C daughter board
•
1 x DVO flex cable
•
Notes
Notes
Notes
Notes: : : :
Please ensure that all items in the packing list are present before
using this product. If any of the items are missing or damaged,
contact your distributor or sales representative immediately.
Step 2
Step 2
Step 2
Step 2
Connect one end of the DVO flex cable to the DVO connector
(CN1) on VAB-600-C daughter board and the other end to DVO
connector (CN13) on VAB-600 mainboard.
Layout Diagram
Item
Item
Item
Item
Description
Description
Description
Description
1
CN2: Backlight connector
2
CN1: DVO connector
3
LCD1: TTL panel connector
Step 3
Step 3
Step 3
Step 3
Connect the TTL panel flex cable to TTL panel connector (LCD1)
on VAB-600-C.
Dimension
Top view
Top view
Top view
Top view
Side view
Side view
Side view
Side view
Step 4
Step 4
Step 4
Step 4
Connect backlight cable of TTL panel to the backlight connector
(CN2) on VAB-600-C.
Note:
Note:
Note:
Note:
Please boot up the system after confirming all the cables
are firmly connected, otherwise it may damage the VAB-600
mainboard.
Advertisement
Table of Contents

Related Manuals for VIA Technologies VAB-600-C


Summary of Contents for VIA Technologies VAB-600-C
- Page 1 Connect the TTL panel flex cable to TTL panel connector (LCD1) Connect backlight cable of TTL panel to the backlight connector to VAB-600 mainboard (CN1) on VAB-600-C daughter board and the other end to DVO on VAB-600-C. (CN2) on VAB-600-C.
- Page 2 CN1: DVO signal connector Connector Pinouts Signal Signal Signal Signal Signal Signal Signal Signal LD02 DVP1CLK+ LD03 CN2: Back Light connector LD04 LD18 LD05 LD19 LD06 LD20 LD07 Pin Signal Signal Signal Signal Pin Signal Signal Signal Signal Signal Signal Signal Signal Signal...
Need help?
Do you have a question about the VAB-600-C and is the answer not in the manual?
Questions and answers