Table of Contents
Advertisement
Available languages
Available languages
Quick Links
PLeaSe read
CarefULLy
Before USinG
yoUr medLine
Commode.
To ensure the safe
installation, adjustment,
and operation of Medline
Elements Commode,
these instructions MUST
be followed.
Lea Con
atenCiÓn
anteS de USar
SU inodoro
PortÁtiL
medLine.
Para una instalación,
ajuste y funcionamiento
seguros del banco para
baño, se DEBEN seguir
estas instrucciones.
MEDLINE ELEMENTS
BEDSIDE COMMODE
INODORO PORTÁTIL
User Instructions and Warranty
Instrucciones para el usuario y garantía
MDS89664ELMB
inhibits the Growth of Stains and odors from Bacteria, mold & mildew
Inhibe El Crecimiento De Manchas y Olores De Bacterias, Moho y Hongos
Keeps the Bedside Commode Cleaner for Longer
Mantiene El Inodoro Portátil Más Limpio Por Más Tiempo
TM
Advertisement
Table of Contents

Related Manuals for Medline ELEMENTS MDS89664ELMB


Summary of Contents for Medline ELEMENTS MDS89664ELMB
- Page 1 User Instructions and Warranty CarefULLy Instrucciones para el usuario y garantía Before USinG MDS89664ELMB yoUr medLine Commode. To ensure the safe installation, adjustment, and operation of Medline Elements Commode, these instructions MUST be followed. Lea Con atenCiÓn anteS de USar SU inodoro PortÁtiL medLine.
-
Page 2: General Warnings
* 2. The bedside commode can be easily cleaned with regular household cleaning prod ucts. Use a non-abra sive cleaner with warm water. DO NOT use abrasive powders or scouring pads. 2 MEDLINE | GPI074-IM19 (Rev. 05-20-2015) -
Page 3: Maintenance
» Check the rubber feet on the leg extensions for rips or wear. If any of these conditions exist, or if they are missing, replace them immediately. assembly instructions Ensure that you have all the necessary components before assembling your Medline Elements™ Bedside Commode. 1 Commode compartment (bucket,... - Page 4 Picture 3: Take plastic screw piece and hand tighten over screw pressing washer up against bronze brace. Picture 4: Hand Tighten till hand screw is secure. PIC 1 PIC 2 PIC 3 PIC 4 4 MEDLINE | GPI074-IM19 (Rev. 05-20-2015)
- Page 5 Make sure push-buttons are fully protruded before using. Repeat this step with the other armrest. NOTE: Apply the armrests (E) so the handles (top portion) are angled outward creating more clearance between the two armrests (E). 1-800-MEDLINE (633-5463) | medline.com 5...
- Page 6 (B). Once inserted align the holes and tighten the small hand screw (G). HAND TIGHTEN ONLY. Repeat this step with the second backrest extension bar (F) on the other side. 6 MEDLINE | GPI074-IM19 (Rev. 05-20-2015)
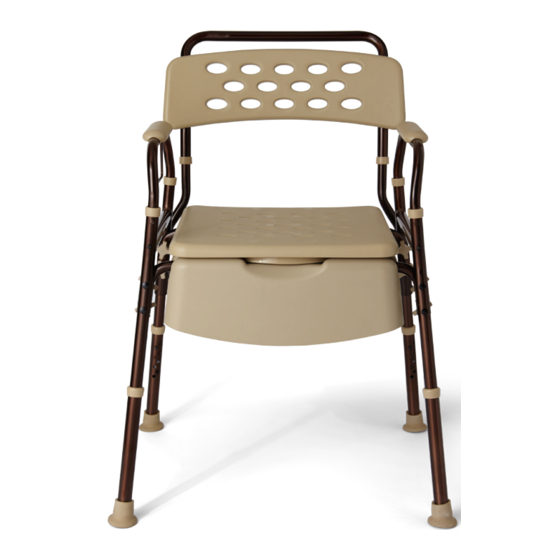
- Page 7 Medline Elements™ Bedside Commode has multiple adjustment points to create a custom fit that keeps you comfortable while bathing. Use the push-buttons on the various adjustable features to find the setting that you like best. Once you have made an adjustment please make sure push-buttons on both sides are fully protruded and secure before using.
- Page 8 Cleaning a commode after it is used is an unpleasant job for caretakers. In addition, being cleaned up after can be a source of embarrassement for those using the commode. Medline Commode Liner with Absorbent Pad answers those concerns. - Safe collection...
-
Page 9: Advertencias Generales
* 2. El inodoro portátil puede limpiarse fácilmente con productos de limpieza normales. Utilice un limpiador no abrasivo con agua tibia. NO utilice polvos ni almohadillas abrasivas. 1-800-MEDLINE (633-5463) | medline.com 9... -
Page 10: Mantenimiento
En caso de encontrar algún tipo de daño, NO USE EL PRODUCTO. Comuníquese con Medline al 1-800-MEDLINE para informar de inmediato el problema. 10 MEDLINE | GPI074-IM19 (Rev. 05-20-2015) - Page 11 Imagen 3: Tome la pieza plástica del tornillo y ajústela a mano al tornillo, presionando la arandela contra la abrazadera de bronce. Imagen 4: Ajuste a mano hasta que el tornillo a rosca esté asegurado. PIC 1 PIC 2 PIC 3 PIC 4 1-800-MEDLINE (633-5463) | medline.com 11...
- Page 12 Repita este paso con el otro apoyabrazos. NOTA: Coloque los apoyabrazos (E) de manera tal que los mangos (parte superior) sobresalgan hacia afuera para lograr una mayor separación entre los dos apoyabrazos (E). 12 MEDLINE | GPI074-IM19 (Rev. 05-20-2015)
- Page 13 (B). Una vez insertados, alinee los orificios y ajuste los tornillo a rosca pequeños (G). AJUSTE SOLO A MANO. Repita este paso con la segunda barra extensible del respaldo (F) del otro lado. 1-800-MEDLINE (633-5463) | medline.com 13...
- Page 14 Levante la Tapa al usar el inodoro mantener las funciones de aseo El inodoro portátil de Medline ELEMENTS tiene una amplia cubierta plana para asiento que oculta el asiento y el cubo del inodoro cuando no se lo utiliza. La posibilidad de ocultar el inodoro cuando no se lo utiliza propicia la dignidad del usuario y ayuda a lograr un aspecto menos institucional.
- Page 15 REF# MDS89664LINER 12 fundas por estuche, 6 estuches por caja Las bolsas para inodoro Medline se venden por separado. Puede comprar las bolsas para inodoro Medline en los puntos de venta de los inodoros portátiles Medline Elements™. 1-800-MEDLINE (633-5463) | medline.com 15...
- Page 16 © 2015 Medline Industries, Inc. Medline Elements is a trademark of Medline Industries, Inc. MICROBAN is a registered trademark of Microban Product Company Corp. Medline Elements es una marca registrada de Medline Industries Inc.
Need help?
Do you have a question about the ELEMENTS MDS89664ELMB and is the answer not in the manual?
Questions and answers