
Subscribe to Our Youtube Channel
Related Manuals for Medline MDS86835


Summary of Contents for Medline MDS86835
- Page 1 Supplying Hospitals for Over 90 Years User Guide MDS86835 Deluxe Rolling Walker DRW-015 (GPI171) Revised: 11/23/09...
-
Page 2: Table Of Contents
Contents Deluxe Rolling Walker Features ....................3 Walker Components ........................4 Safety Instructions ........................5 Assembly Instructions ......................... 6 Rear Wheel Assembly ........................7 Front Wheel Assembly ........................8 Brake Handle Assembly ......................9 Backrest Assembly ........................10 Cup Holder Assembly ......................... 11 Operating Instructions ...................... -
Page 3: Deluxe Rolling Walker Features
Deluxe Rolling Walker Features Congratulations on purchasing one of the most durable walkers made anywhere. With proper assembly, the walker will provide years of great performance. Hand brakes push to lock, pull to release. Includes high-end, water- proof nylon bag with snaps. Shoulder strap gives end- user more freedom. -
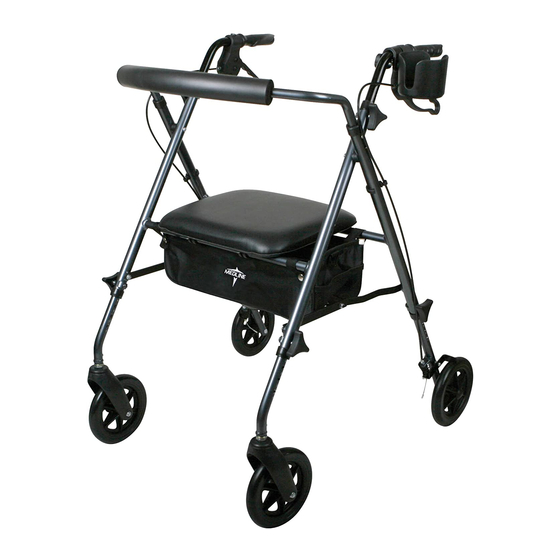
Page 4: Walker Components
Walker Components Figure 1 Assembled Deluxe Rolling Walker A. Hand Grips B. Hand Brake Lock C. Padded Seat D. Padded Backrest E. Triangular Hand Screw F. 7" (17 .8 cm) Front Wheels G. Folding Hinge H. 7" (17 .8 cm) Rear Wheels I. -
Page 5: Safety Instructions
• DO NOT perform any adjustments to the walker while it is in use. • Only use accessories and spare parts authorized by Medline Industries, Inc. • DO NOT push walker while brakes are enabled. Brakes are used to keep the wheels from rolling; but it may not prevent the walker from moving if it is pushed. -
Page 6: Assembly Instructions
3. Check all of the wheels to see that they are in good working order and roll freely. Remove plastic cover from the wheels before use. 4. Unfold the Medline walker by pushing down on the Folding Hinge (G) until the frame is in full extension. -
Page 7: Rear Wheel Assembly
Rear Wheel Assembly 1. Turn wheel so that it is facing outside of walker (see Figure A). 2. Insert wheel to desired height depicted by numeric holes (see Figure B) and use chart below for recommended height settings. 3. Insert triangular hand screw into hole on same side of wheel so that the triangular hand screw stays outside of walker frame (see Figure C). -
Page 8: Front Wheel Assembly
Front Wheel Assembly 1. When inserting front wheel, make sure FRONT sticker is pointed toward the front and away from walker (see Figure A). 2. Insert wheel to desired height depicted by numbered holes (set to the same number as rear wheels) (see Figure B). 3. -
Page 9: Brake Handle Assembly
Brake Handle Assembly 1. Insert hand grip into appropriate hole (see Figure A and chart below). Note: Keep brake cable on outside of walker. 2. Insert triangular hand screw into hole on outside of walker frame (see Figure B). (Important: Insert hand screw into one of the 4 holes provided. DO NOT put hand screw in open slot at end of hand grip!) 3. -
Page 10: Backrest Assembly
Backrest Assembly 1. Insert backrest into designated slot so that push-buttons are facing outward (see Figure A). 2. Push buttons in and continue to insert backrest until buttons securely lock into holes (see Figure B). Please note: There are 2 positions for the back rest. Adjust according to your preference, but make sure both push buttons are protruding and at the same level. -
Page 11: Cup Holder Assembly
Cup Holder Assembly 1. Make sure you have all the necessary pieces. Cup Holder with Star Knob U-Shaped Clamp 2 Scored Rubber Sleeves Figure A 2. Snap U-shaped clamp onto the tubing of your mobility devise (see Figure A). Note: Be sure the clamp is positioned in such a way that it allows the cup to sit level, NOT tilted in a direction that might allow your drink to spill (see Figure B). -
Page 12: Operating Instructions
Operating Instructions Opening the Walker Push down on the seat (C) until all four wheels are extended out and the seat is completely flat. Before using the walker make sure that all four wheels make contact with the floor and the walker is stable in the open position. -
Page 13: Operating Instructions
If the brakes have been adjusted but the rear wheels on the walker move while the brakes are in the locked position, DO NOT use the walker. Please call our toll-free customer service number at 1-800-MEDLINE for returns or repairs. -
Page 14: Maintenance
If the brakes do not lock the wheels, the brakes need to be adjusted. If adjustment does not tighten the brakes, DO NOT use the walker. Keep your receipt! Contact us at 1-800-MEDLINE, Monday – Friday 8am to 5pm CST if you encounter any problems or for information regarding repairs or maintenance. DRW-015 (GPI171) -
Page 15: Warranty
Lifetime Limited Warranty Your Medline walker frame is warranted to be free of defects in material and workmanship for a lifetime for the original consumer. This device was built to precise standards and carefully inspected prior to shipment. This Lifetime... - Page 16 Some products may not be available for sale in Mexico or Canada. Please contact your Account Representative for additional information. We reserve the right to correct any errors that may occur within this manual. ©2009 Medline Industries, Inc. Medline is a registered trademark of Medline Industries, Inc.
Need help?
Do you have a question about the MDS86835 and is the answer not in the manual?
Questions and answers
Just got your MD86850ES and LOVE IT. Still trying to figure out HOW TO LOCK THE BRAKES with the hand brake (G in the illustration). As an engineer myself, it seems the brakes cannot be applied then returned to an unlocked state. Help! Thanks.
To lock the hand brakes on the Medline MDS86835 walker, push down on the brake handles until you feel or hear them click into the locked position. To unlock the brakes, pull up on the brake handles.
This answer is automatically generated
What is the black **** the fold up bar? How is it used or mounted?