
Related Manuals for DELTA DORE PACK TYXIA 631


Summary of Contents for DELTA DORE PACK TYXIA 631
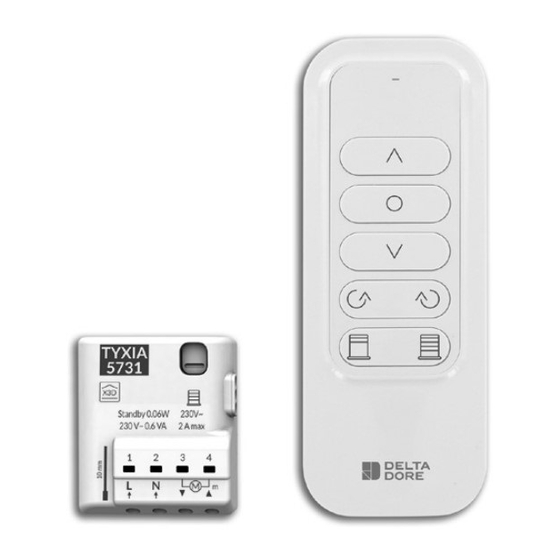
- Page 1 PACK TYXIA 631 Pack for control of blackout blind, awning and indoor venitian blinds...
-
Page 2: Table Of Contents
Contents 1/ Remote control installation ......3 1.1 Mounted on the wall ........3 1.2 Placed on a flat surface ......3 2/ Installing the receiver ........4 2.1 Connection instructions for terminals 1 2 3 4........6 2.2 Connection instructions for IN1 - COM - IN2 terminals ......7 2.3 Connection ...........8 3/ Wireless association ........9 3.1 Associating a receiver or motor ....9 3.2 Associate multiple receivers or motors ............ -
Page 3: 1/ Remote Control Installation
1/ Remote control installation 2/ Installing the receiver 1.1 Mounted on the wall Recommendations IMPORTANT: the control wires are not insulated from the mains power supply. All connected equip- ment must be marked CE and meet the require- ments of the low voltage devices as well as assembly recommendations. Local control wires can be extended up to 10 m (separate from the 230 V). The roller shutter high and low stops must be set before the receiver is installed. -
Page 4: Connection Instructions
2/ Installing the receiver 2.1 Connection instructions Ø 230V~ 0,75 - 1,5 mm Switch off the installation for terminals 1 2 3 4. power supply Strip the wires while respecting the strip length specified on the product. • • Solid wires Stranded wires You can install the receiver for roller shutter in ... -
Page 5: Connection Instructions For In1 - Com - In2 Terminals
2/ Installing the receiver 2.2 Connection instructions for 2.3 Connection IN1 - COM - IN2 terminals - Connect the motor control wires to terminals 3 - Use the wires supplied. and 4 (motor lowering control wire to terminal 3, - Push the wire fully into the raising control wire to terminal 4). -
Page 6: 3/ Wireless Association
3/ Wireless association This chapter allows you to associate a remote ❷ On the remote control press at the control with an X3D wireless motor or X3D roller same time and hold for 3 seconds, until the red shutter receiver. LED flashes. Release. You can associate up to 16 receivers (or motors). If a receiver is found, the LED will light up green briefly. 3.1 Associating a receiver or motor ❸ After a few seconds, the shutter will activate 3.1.1 A single receiver is turned on twice to confirm the association. ... -
Page 7: Associate Multiple Receivers Or Motors
3/ Wireless association 3.1.2 Several receivers or motors are in association 3.2 Associate multiple receivers standby mode or motors ❶ On the remote control press at the ❶ Set the receivers to association standby mode. same time and hold for 3 seconds, until the red ❷ On the remote control press at the LED flashes. Release. The remote control searches the different receivers same time and hold for 3 seconds, until the LED ... -
Page 8: 4/ Configuring The Receiver
4/ Configuring the receiver To modify the receiver configuration Configure the receiver according to the type of switch connected. ❶ Press the receiver’s button for 6 seconds. Mode 1: Hold switch ❷ The LED flashes, then becomes steady, release. Raise/Stop/Lower The number of flashes corresponds to the current mode. ❸ Briefly press the receiver button to select the Mode 2 (by default): mode. Raise/Lower double push-button Mode 1 Mode 2 Mode 3 Raise + Lower: Stop TYXIA TYXIA TYXIA Mode 3: Raise/Stop/Lower/Stop... -
Page 9: 5/ Learning For The Shutter Travel Time
5/ Learning for the shutter travel time 5.1 Manual adjustment for the shutter travel time Perform a complete cycle from stop to stop: ❶ Lower or raise the roller shutter completely to The learning for the shutter travel time adjusts itself automatically for each complete cycle from stop to the stop. stop. ❷ Do the reverse action until the opposite stop is If the motor has 4 wires (Live/Neutral/Raise/Lower) reached. or if the power of the connected motor is less than 45 W, this operation must be done manually. 5.1.1 Adjustment of shutter travel time - Before making this adjustment, fully raise the shutter with the local hard-wired control, a remote control or a TYDOM and press Stop. -
Page 10: 6/ Learning For The Tilt Time
5/ Learning for the shutter travel time 6/ Learning for the tilt time - Lower the shutter using the local control, a remote Do not carry out this operation, if the control or TYDOM. TYXIA 5731 controls an awning. - Press Stop once the shutter is down. ❶ Hold down the receiver button for 9 seconds, - Travel time is recorded. the LED switches off, then release. The shutter is ... -
Page 11: 7/ Save The Favourite Positions
7/ Save the favourite positions 8/ Use • Press to control the roller shutter. You can save up to 2 favourite positions: The red then green LED indicates that the receiver has correctly received the information. ❶ ❷ Set the shutter to the required position (e.g. ). ❸ Press to set the angle of the slats. ❹ Press and hold for 3 seconds to save the position. The red then green LED indicates that the receiver has correctly received the information. -
Page 12: 9/ Troubleshooting
9/ Troubleshooting • The red LED flashes • Remove all associations several times every time - Remove the front face of the remote control. a button is pressed. - Press button A. The battery is low. The red LED flashes. Change the battery. - Press the buttons at the same time and hold for 3 seconds. -
Page 13: 10/ Technical Characteristics
10/ Technical characteristics Remote control TYXIA 1705 Receiver TYXIA 5731 • Power supplied by 3V lithium battery, CR2430 • Power supply: 230 V~ 0.6 VA • Class III insulation • 2 Powered contact outputs: 2A • X3D Transmission frequency: • Stand-by consumption: 0.06 W 868.7 MHz to 869.2 MHz • Number of associated transmitters: • Maximum radio power < 10 mW 16 maximum • Receiver category II •... - Page 14 www.deltadore.com...
Need help?
Do you have a question about the PACK TYXIA 631 and is the answer not in the manual?
Questions and answers