Table of Contents
Advertisement
Quick Links
Quick Connect IoT
Quick Connect IoT is a combination of hardware and software modules that simplifies the design process of
developing system solutions. It allows you to put together systems to evaluate sensors, connectivity, and the MCU
in a full system environment with a minimal amount of set-up time or without writing the basic firmware structure.
Hardware modules are available with low-level drivers and middleware that allow you to immediately start writing
the application layer code.
This manual reviews the Quick Connect IoT with an example that uses a specific sensor, but you are encouraged
to consider other scenarios and explore all the devices available.
Contents
1.
Reference Documents . . . . . . . . . . . . . . . . . . . . . . . . . . . . . . . . . . . . . . . . . . . . . . . . . . . . . . . . . . . . . . . . . 2
2.
Hardware Example . . . . . . . . . . . . . . . . . . . . . . . . . . . . . . . . . . . . . . . . . . . . . . . . . . . . . . . . . . . . . . . . . . . 2
2.1
MCU Selection . . . . . . . . . . . . . . . . . . . . . . . . . . . . . . . . . . . . . . . . . . . . . . . . . . . . . . . . . . . . . . . . . . 2
2.2
MCU Setup . . . . . . . . . . . . . . . . . . . . . . . . . . . . . . . . . . . . . . . . . . . . . . . . . . . . . . . . . . . . . . . . . . . . . 3
2.3
Sensor Selection . . . . . . . . . . . . . . . . . . . . . . . . . . . . . . . . . . . . . . . . . . . . . . . . . . . . . . . . . . . . . . . . . 4
2.4
Connectivity Selection . . . . . . . . . . . . . . . . . . . . . . . . . . . . . . . . . . . . . . . . . . . . . . . . . . . . . . . . . . . . . 4
2.5
Complete RA Hardware Setup . . . . . . . . . . . . . . . . . . . . . . . . . . . . . . . . . . . . . . . . . . . . . . . . . . . . . . 5
2.6
Complete RX Hardware Setup . . . . . . . . . . . . . . . . . . . . . . . . . . . . . . . . . . . . . . . . . . . . . . . . . . . . . . 6
3.
RA FSP . . . . . . . . . . . . . . . . . . . . . . . . . . . . . . . . . . . . . . . . . . . . . . . . . . . . . . . . . . . . . . . . . . . . . . . . . . . . . 6
3.1
Start Project . . . . . . . . . . . . . . . . . . . . . . . . . . . . . . . . . . . . . . . . . . . . . . . . . . . . . . . . . . . . . . . . . . . . . 7
3.2
Insert Middleware . . . . . . . . . . . . . . . . . . . . . . . . . . . . . . . . . . . . . . . . . . . . . . . . . . . . . . . . . . . . . . . . 7
3.3
Resolve User Items Related to the Sensor Stack . . . . . . . . . . . . . . . . . . . . . . . . . . . . . . . . . . . . . . . . 7
3.4
Generate Code . . . . . . . . . . . . . . . . . . . . . . . . . . . . . . . . . . . . . . . . . . . . . . . . . . . . . . . . . . . . . . . . . . 9
3.5
API Examples . . . . . . . . . . . . . . . . . . . . . . . . . . . . . . . . . . . . . . . . . . . . . . . . . . . . . . . . . . . . . . . . . . 10
4.
RX Smart Configurator . . . . . . . . . . . . . . . . . . . . . . . . . . . . . . . . . . . . . . . . . . . . . . . . . . . . . . . . . . . . . . . 10
4.1
Start Project . . . . . . . . . . . . . . . . . . . . . . . . . . . . . . . . . . . . . . . . . . . . . . . . . . . . . . . . . . . . . . . . . . . . 11
4.2
Insert Component . . . . . . . . . . . . . . . . . . . . . . . . . . . . . . . . . . . . . . . . . . . . . . . . . . . . . . . . . . . . . . . 12
4.3
Resolve User Items Related to the Sensor Stack . . . . . . . . . . . . . . . . . . . . . . . . . . . . . . . . . . . . . . . 13
4.4
Generate Code . . . . . . . . . . . . . . . . . . . . . . . . . . . . . . . . . . . . . . . . . . . . . . . . . . . . . . . . . . . . . . . . . 14
4.5
API Examples . . . . . . . . . . . . . . . . . . . . . . . . . . . . . . . . . . . . . . . . . . . . . . . . . . . . . . . . . . . . . . . . . . 15
5.
Additional Information . . . . . . . . . . . . . . . . . . . . . . . . . . . . . . . . . . . . . . . . . . . . . . . . . . . . . . . . . . . . . . . 15
6.
Revision History . . . . . . . . . . . . . . . . . . . . . . . . . . . . . . . . . . . . . . . . . . . . . . . . . . . . . . . . . . . . . . . . . . . . 15
Appendix A . . . . . . . . . . . . . . . . . . . . . . . . . . . . . . . . . . . . . . . . . . . . . . . . . . . . . . . . . . . . . . . . . . . . . . . . . . . . . 16
R36UZ0008EU0100 Rev.1.0
Jul 2, 2021
Manual
Page 1
© 2021 Renesas Electronics
Advertisement
Table of Contents

Related Manuals for Renesas EK-RA2L1


Summary of Contents for Renesas EK-RA2L1
-
Page 1: Table Of Contents
Appendix A ................16 R36UZ0008EU0100 Rev.1.0 Page 1 Jul 2, 2021 © 2021 Renesas Electronics... -
Page 2: Reference Documents
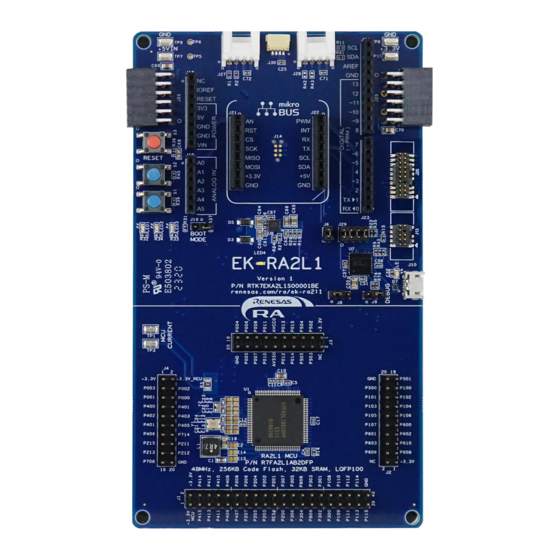
MCU boards. The majority of Renesas MCU boards have headers that support standard form factor add-on boards. Typically, this includes some combination of PMODTM, Arduino, Mikro CLICK, and Grove. For this manual, the example uses the EK-RA2L1; this device has memory footprints and is chosen based on full system requirements. R36UZ0008EU0100 Rev.1.0... -
Page 3: Mcu Setup
C) for the sensor connection. Reference the specific EK that you are using to reconfigure to the correct IO that is required. See the EK-RA2L1 User Manual for PMOD1 reconfiguration to Type6A. PMOD2 is the UART PMOD in this application. -
Page 4: Sensor Selection
ZMOD4410 Indoor Air Quality and Gas and Odor ZMOD4510 Outdoor Air Quality Note : This table is a selection of parts. Renesas continually releases new sensors, peripherals, and plug-in modules. Visit the Renesas website for more information. Connectivity Selection Renesas supports numerous connectivity choices from UART (wired) to Bluetooth and Wi-Fi. This manual focuses on a common connectivity solution for an IoT example, Wi-Fi using a PMOD. -
Page 5: Complete Ra Hardware Setup
Quick Connect IoT Manual Complete RA Hardware Setup In the hardware setup, plugged in is the selected PMODs and the USB cable for the debugger interface, and in Figure 3, a complete solution for a connected Air Quality Sensor system is shown. Wi-Fi ZMOD4410 HS3001... -
Page 6: Complete Rx Hardware Setup
Quick Connect IoT Manual Complete RX Hardware Setup Figure 4, the RX Sensor setup using the RX65N Envision Kit is an example of an RX hardware setup. Like the RA hardware setup, plug in the PMOD sensors that are used for the example solution and the USB debug cable. The example shown uses the RX65N Envision Kit. -
Page 7: Start Project
Quick Connect IoT Manual Start Project Starting a project is as simple as follows: 1. Select the correct project type. 2. Name the project. 3. Select the BSP. 4. Select the type of project (executable or Library) including RTOS support. Because this example is for non-RTOS, Bare Metal Minimal is chosen. - Page 8 Quick Connect IoT Manual Figure 7. I C Master on r_iic_master Selection Figure 8. Pop-Up Help on GPT Error Hint : The HAL/Common Stacks blocks remain red until all the configurations items are satisfied. Hovering on the red X does pop-up the error that is in the particular block. In this case, the GPT trigger for measurement is red. Figure 9 for an example of pop-up help.
-
Page 9: Generate Code
Quick Connect IoT Manual Next, this if fixed by enabling the Overflow interrupt on the GPT. The callback function and name are defined by the middleware. Figure 10. GPT Overflow Interrupt Setting Generate Code After all the stacks/HAL code is satisfied and all the user selections are made, you must Generate Project Content . -
Page 10: Api Examples
Quick Connect IoT Manual API Examples As we indicated, the function calls are now available to you so that you can start writing your application (i.e. how you will use the temperature, humidity and air quality values in you application). The data types are all defined, so you only need to instantiate buffers for you application. -
Page 11: Start Project
Quick Connect IoT Manual Start Project Starting a project is as simple as follows: 1. Select the correct project type. 2. Name the project. 3. Select the BSP. 4. Select the type of project (executable or Library) including RTOS support. Because this example is for non-RTOS, Bare Metal Minimal is chosen. -
Page 12: Insert Component
Quick Connect IoT Manual Insert Component After setting up the project, you are in the FSP Configuration View. The following example adds a single sensor, the HS3001 Humidity and Temperature sensor. For additional information, reference the Smart Configuration manuals that are available through the SmartBrowser or help facilities of e Studio. -
Page 13: Resolve User Items Related To The Sensor Stack
Quick Connect IoT Manual Resolve User Items Related to the Sensor Stack After the component is instantiated, it scans for dependencies and inserts the required I C driver to support the device. Your component list reflects this change. See Figure Figure 14. -
Page 14: Generate Code
Quick Connect IoT Manual Figure 16. I C Pin selection on RX Hint : Configuration problems are show in the Configuration Problems tab. In default layout, this is in the lower right of screen. Generate Code After all the component settings are satisfied and there are 0 items in the Configuration problems, you simply generate code with the feature, Generate Project Content . -
Page 15: Api Examples
For this case shown, it is defined by the ctrl instance for Sensor 0: HS3001 API Examples Device 0 defined by: err = g_hs300x_sensor0.p_api->measurementStart(g_hs300x_sensor0.p_ctrl); Additional Information For additional information on the Quick Connect IoT solutions and supporting documents, visit Renesas Quick Connect. Revision History Revision Date... - Page 16 Quick Connect IoT Manual Appendix A Boards that require interposer. Table 2. Kits Requiring Type 6A Interposer Family/Device Group Board Name RA/RA4W1 EK-RA4W1 RA/RA2A1 EK-RA2A1 RA/RA4M1 EK-RA2A1 RA/RA6M1 EK-RA6M1 RA/RA6M2 EK-RA6M2 RA/RAM3 EK-RA6M3 RA/RAM3G EK-RA6M3G RX/RX111 RX111-Starter-Kit RX/RX231 RX231-Starter-Kit RX/RX23W RX23W-Starter-Kit RX/RX23T RX23T-Starter-Kit...
- Page 17 Renesas' products are provided only subject to Renesas' Terms and Conditions of Sale or other applicable terms agreed to in writing. No use of any Renesas resources expands or otherwise alters any applicable warranties or warranty disclaimers for these products.
Need help?
Do you have a question about the EK-RA2L1 and is the answer not in the manual?
Questions and answers