Advertisement
Available languages
Available languages
Table of Contents
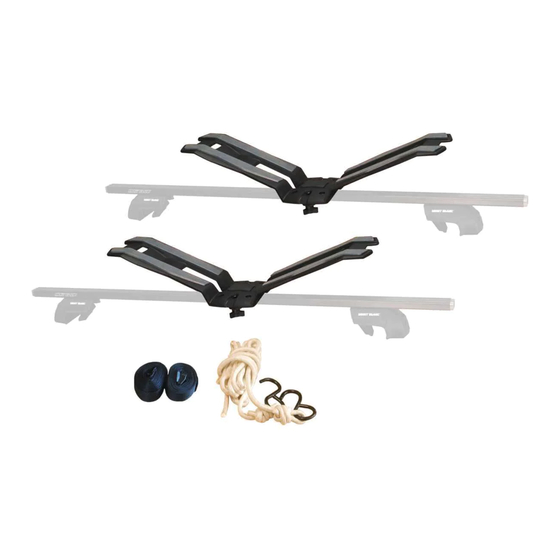
PRODUCT: 65145 EXO AERO Roof Mount Kayak Holder • Page 1 of 1
Mounting Instructions
1. Attach the metal support plate to the bottom of the EXO Aero using the 6mm x 20mm
Carriage style bolts, washers and nuts.
2. Place the Kayak Holder onto the load bars as shown in Image #2.
need to be at least 24" between the load bars.
3. Attach the bracket using the two wing style knobs. Do not tighten.
4. Position the second Kayak Holder on the load bar so that it is approximately the same
width of the Kayak. Now align each saddle and tighten the knobs on both saddles.
5. Run the end of the webbing strap through the slot as shown in Image #3. Pull the
strap until the two straps are equal in length. Repeat for the second saddle.
6. Position the straps off to the front and back of the vehicle. This will allow you to access
the straps once the Kayak is loaded. Image #4.
7. Load the Kayak and adjust so that it is evenly centered between the two Kayak
saddles. Ensure that the Kayak is in line with the vehicle.
the Kayak and the Kayak Holder are clean before loading. Any dirt or sand can cause
scratches on the underside of the Kayak when you are loading.
done from the back of the vehicle. Set the front of the Kayak on the rear Kayak
Holders, and lift the rear of the kayak and slide forward. Care must be taken to ensure
that the kayak does not contact the vehicle fi nish.
Attaching the Kayak
1. Position the webbing straps so that they are over the kayak.
2. Ensure the straps are not covering the kayak opening or any area that is not load
bearing.
3. Pull the strap so that the cam buckle is mid point on the side of the kayak. Image #5.
4. Run the free end of the strap down through the slot. Then run the strap up through
the inner slot into the cam buckle. Pull the strap to tighten. Image #6. Wrap the free
end of the strap around the cross bar so it does not fl ap in the wind
5. Attach the bow and stern tie downs to a secure point on the bumper or vehicle tow
hook. Check the lines regularly to ensure they are always tight.
6. For stability on larger Kayaks run the webbing straps under the cross bar before going
though the slot on the kayak holder.
Warnings
1. The load bars must be a minimum of 24" part and the kayak must line up with the
vehicle.
2. Make sure that the load bars or roof rack do not exceed the manufacturers limitation
for load.
3. Make sure that the straps are on a non load-bearing surface or damage can occur.
4. The rack is designed for Sea Kayaks and White Water Kayaks. It is not designed for
aluminum boats.
5. Check straps periodically to ensure they are tight
Swagman • 300 - 1880 Government St. • Penticton, B.C. Canada V2A 7J1 • Phone (250) 490-8883 • Fax (250) 490-8885 • www.swagman.net
NOTE:
Do not over-tighten. Image #1.
NOTE:
NOTE:
always ensure that
NOTE:
INSTRUCTION SHEET
The load bars
Loading can be
1
2
3
4
5
6
REV 06/03/13
Advertisement
Table of Contents

Related Manuals for Swagman 65145


Summary of Contents for Swagman 65145
- Page 1 4. The rack is designed for Sea Kayaks and White Water Kayaks. It is not designed for aluminum boats. 5. Check straps periodically to ensure they are tight REV 06/03/13 Swagman • 300 - 1880 Government St. • Penticton, B.C. Canada V2A 7J1 • Phone (250) 490-8883 • Fax (250) 490-8885 • www.swagman.net...
- Page 2 5. Vérifi ez régulièrement les sangles et les cordes pour vous assurer qu’elles sont bien serrées. REV 06/03/13 Swagman • 300 - 1880 Government St. • Penticton, B.C. Canada V2A 7J1 • Phone (250) 490-8883 • Fax (250) 490-8885 • www.swagman.net...
Need help?
Do you have a question about the 65145 and is the answer not in the manual?
Questions and answers