Table of Contents
Advertisement
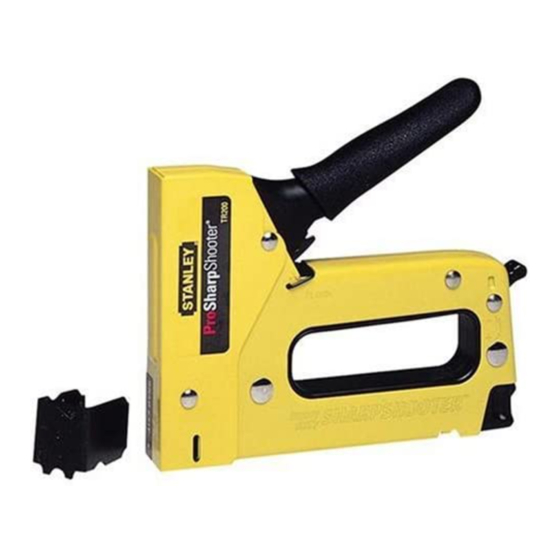
ProSharpShooter
OWNERS MANUAL
Model TR200
READ SAFETY RULES AND
INSTRUCTIONS CAREFULLY!
OPERATING INSTRUCTIONS
Your new Stanley ProSharpshooter Staple/Nail
Gun is the only tool available that has a multi-
fastener staple and nail feature coupled with
high/low driving power. The ProSharpshooter
Staple/Nail Gun operates as five distinct tools:
heavy duty staple gun, light duty staple gun, cable tacker, nail gun and
screen/canvas specialty tool.
A patented easy squeeze driving mechanism takes minimum effort for less
operator fatigue. Ergonomically designed handle provides a comfort grip.
CAUTION: Read instructions carefully before operating staple gun and save them
for future reference. DO NOT use staple/nail gun to staple high voltage wire. Use sta-
ple/nail gun only on low voltage wiring like that used for telephone and telecommuni-
cations.
Tool operator and others in work area should always wear
safety glasses to prevent serious eye injury from fasteners
and flying debris when loading, operating or unloading
this tool.
TO LOAD
1. Hold staple/nail gun
upside down as
1
shown in fig. 1 and
release loading latch.
Pull slide open.
2. Place stick of staples
in bottom channel as
shown in fig. 2, so
legs are pointing up.
3. For brads, place only
3
on left side. Be sure
nail heads are
pointing down.
4. Push slide closed
as shown in fig. 3,
making sure that
latch engages. If
you feel resistance,
check that brads
are on correct side.
STAPLE LENGTH GUIDELINES
Can be used on window screens, shades, light draperies,
1/4"
6.3mm shelf paper, signs, tags and other thin materials.
5/16"
Can be used on light upholstery and other relatively thin
7.9mm materials.
3/8"
Can be used on insulation, weather stripping, wire mesh,
9.5mm carpet pads,canvas and other materials of moderate strength
where material thickness is up to about 3/16" maximum.
1/2"
Can be used where thickness of material being stapled is
12.7mm substantial, for example, foam insulation board or heavy
folded draperies (about 1/4" (6.3mm) to 3/8" (9.5mm) thick).
9/16"
ProSharpShooter
MANUAL DEL PROPIETARIO
Modelo TR200
¡LEA LAS REGLAS DE SEGURIDAD Y
LAS INSTRUCCIONES CUIDADOSAMENTE!
INSTRUCCIONES DE OPERACIÓN
Su nueva herramienta engrapadora/clavadora Stanley es la
única que actualmente le ofrece funciones de engrapadora y
clavadora junto con impulsión de baja o alta potencia. La herramienta engrapadora/
clavadora Stanley funciona como si se tratara de 5 herramientas distintas:
Engrapadora de servicio pesado, engrapadora de servicio liviano, fijadora de cables,
clavadora y accesorio especial para aplicaciones en lona o malla. La herramienta
cuenta con un sistema de impulsión por gatillo suave patentado, el cual requiere un
esfuerzo mínimo para causarle menos fatiga al operador. La manija de diseño
ergonómico superblando ofrece comodidad en la sujeción de la herramienta, la cual
no se resbala de la mano.[Alternate translation: La manija de diseño ergonómico pro-
vee comodidad de sujeción.]
PRECAUCIÓN: Lea atentamente las instrucciones antes de operar la
herramienta engrapadora/clavadora y consérvelas para su referencia futura.
El operador de la herramienta y las demás
personas presentes en el área de trabajo siempre
deberán usar anteojos de seguridad para evitar lesiones graves en
los ojos causadas por sujetadores o residuos que vuelen al cargar,
hacer funcionar o descargar la herramienta.
Staple/Nail Gun
2
4
HIGH-LOW FEATURE
TRA704
TRA705
TRA706
TRA708
TRA709
Engrapadora/Clavadora
HIGH-LOW FEATURE
The power switch in the back of the Stapler controls the high-low drive fea-
ture. In the up position, the drive is on Low and is used for stapling into
soft woods. For High power, press down on power switch. Use high for
driving staples into hard wood such as oak. (fig. 4)
CABLE TACKER ATTACHMENT
For use on low voltage wiring only.
(Telephone / Telecommunication)
Assemble attachment to front of staple/nail gun by expanding sides
while slipping it on. Be sure to have the side stamped "wire" positioned
down. The wire has an inverted "U" shape in center. Position the wire
between the "U" shape before stapling with cable/tacker applicator.
SCREEN/CANVAS ATTACHMENT
The screen canvas attachment is on the opposite end of the specialty tool
and stamped "screen". The Screen/Canvas attachment has three small
points. Place points in screen or fabric, stretch the material, and staple.
See below, for Screen/Canvas applications. (fig. 5)
TO OPERATE
Place staple exit area where staple is to be driven. Grasp staple gun with
fingers through opening and depress handle until mechanism releases and
drives staple. For best results, hold staple/nail gun so downward pressure
keeps exit area firmly against material being stapled.
TO CLEAR OR UNLOAD
Open channel as when loading; remove jammed staple or unload; close as
when loading.
TO LOCK HANDLE DOWN FOR STORAGE
Remove staples from staple/nail gun when not in use. Be sure
staple/nail gun is unloaded. Hold handle down and engage handle lock
with notches on inner part of handle.
• KEEP OUT OF REACH OF CHILDREN.
• WEAR SAFETY GLASSES WHEN
OPERATING STAPLER.
5
• KNOW WHAT MATERIAL YOU ARE
STAPLING. WATCH OUT FOR
POTENTIAL HAZARDS SUCH AS
ELECTRICAL WIRES.
• DO NOT OVER REACH SO AS TO
CAUSE LOSS OF BALANCE OR LOSS
OF SECURE FOOTING.
LEG
LENGTH 500 BRADS RECOMMEMDED USES
5/8"
SWKBN050 picture framing,
small molding
1/2"
SWKBN625 hobby projects,
paneling
CABLE TACKER APPLICATIONS:
• Holiday lights
• Antenna Wiring
• Telephone Wiring
• Alarm System Wire
• Cable TV
• Audio System
CANVAS/SCREEN APPLICATIONS:
• Upholstering
• Decor
• Wire
• Stretching Canvas-Art
• Mesh/Screening
• Framing
• Framing Fabric
• Needlepoint
1. Sostenga la herramienta engra
PARA CARGAR:
padora/clavadora al revés como se
1
ilustra en la fig. 1 y suelte el pestillo
del cargador. Tire del mismo para
abrir el cargador.
2. Coloque barras de grapas en el
canal inferior como se ilustra en la
fig. 2, de manera que las patas de
las mismas apunten hacia arriba.
3. En caso de cargar puntillas o clavos
sin cabeza, utilice sola mente el lado
izquierdo.
3
los clavos apunten hacia abajo.
4. Oprima el costado de la herramienta
para cerrarla como se ilustra en la fig.
3, asegurándose de que el pestillo se
trabe. Si detecta cierta resistencia,
verifique que las puntillas o clavos
sin cabeza se hayan cargado en el
lado correcto.
LONGITUD DE LA GRAPA A UTILIZAR
1/4"
Puede ser usada en mosquiteros, papel de repisas,
señales, tarjetas y otrol materiales delgados.
6.3mm
5/16"
Puede ser usado en el colgado de objetos ligeros y
otros materiales relativeamente delgados.
7.9mm
Puede ser usado en aislantes, cableado, tapetes en
3/8"
9.5mm
materiales de 3/16" máximo.
1/2"
Puede ser usado en dondo el grosor del material es
12.7mm sustancioso, por ejemplo aislante de tablaroca,
9/16"
señales colgantes pesadas.
14.2mm
NOTE:
DO NOT ATTEMPT TO
DISASSEMBLE /
REASSEMBLE THIS
TOOL. REPLACEMENT
PARTS ARE NOT
AVAILABLE. THE TOOL
HAS BEEN DESIGNED
FOR PROFESSIONAL
DURABILITY IN
NORMAL
APPLICATIONS
WITHOUT THE NEED TO
REPLACE PARTS.
Verifique que la cabeza de
Función de alta y baja potencia
2
4
TRA704
TRA705
TRA706
TRA708
TRA709
Advertisement
Table of Contents

Related Manuals for Stanley Pro Sharp Shooter TR200


Summary of Contents for Stanley Pro Sharp Shooter TR200
- Page 1 La herramienta engrapadora/ verifique que las puntillas o clavos clavadora Stanley funciona como si se tratara de 5 herramientas distintas: sin cabeza se hayan cargado en el Engrapadora de servicio pesado, engrapadora de servicio liviano, fijadora de cables, lado correcto.
- Page 2 DE SES • Encadrement de tissus • Tapisserie aux petits points 12.7mm substentiel exemple: panneau isolant ou rebord de COMPOSANTES. tenture lourde (approximativement 1/4” à 3/8” d’épaisseur). TRA709 9/16” 108082REVA 11/98 Stanley Fastening Systems East Greenwich, RI 02818 USA 14.2mm...
Need help?
Do you have a question about the Pro Sharp Shooter TR200 and is the answer not in the manual?
Questions and answers
What is the hi low setting used for on a Stanley pro sharp shooter tr200
The hi-low setting on the Stanley Pro Sharp Shooter TR200 controls the driving power of the stapler. In the up position, it is set to Low, which is used for stapling into soft woods. Pressing down on the power switch sets it to High, which is used for driving staples into hard wood such as oak.
This answer is automatically generated