Table of Contents
Advertisement
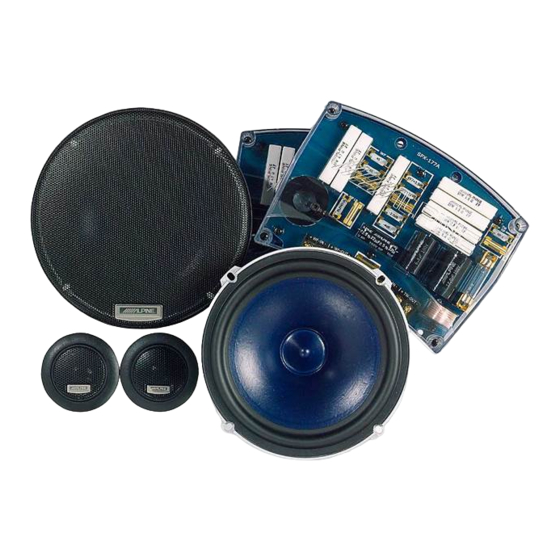
SPX-177A / SPX-137A
Component 2-way Speaker System
OWNER'S MANUAL
Please read before using this equipment
ALPINE ELECTRONICS, INC.
Tokyo office ; 1-1-8 Nishi Gotanda,
Shinagawa-ku, Tokyo 141-8501, Japan
Tel.: (03) 3494-1101
ALPINE ELECTRONICS OF AMERICA, INC.
19145 Gramercy Place, Torrance,
California 90501, U.S.A.
Tel.: 1-800-ALPINE1 (1-800-257-4631)
1-888-NAV-HELP (1-888-628-4357)
ALPINE ELECTRONICS OF CANADA, INC.
Suite 203, 7300 Warden Ave. Markham, Ontario
L3R 9Z6, Canada
Tel.: 1-800-ALPINE1 (1-800-257-4631)
MANUEL DE L'UTILISATEUR
Veuillez lire le présent manuel avant la mise en service du matériel.
ALPINE ELECTRONICS OF AUSTRALIA PTY. LTD.
6-8 Fiveways Boulevarde Keysborough Victoria 3173,
Australia
Tel.: (03) 9769-0000
ALPINE ELECTRONICS GmbH
Kreuzerkamp 7-11 40878 Ratingen, Germany
Tel.: 02102-45 50
ALPINE ITALIA S.p.A.
Via C.Colombo 8, 20090 Trezzano
Sul Naviglio MI, Itary
Tel.: 02-48 47 81
ALPINE ELECTRONICS FRANCE S.A.R.L.
98, Rue De La Belle Etoile, Z.I. Paris Nord II B.P.50016
F-95945, Roissy, Charles De Gaulle Cedex, France
Tel.: 01-48 63 89 89
ALPINE ELECTRONICS OF U.K., LTD.
13 Tanners Drive, Blakelands,
Milton keynes MK14 5BU, U.K.
Tel.: 01908-61 15 56
ALPINE ELECTRONICS DE ESPANÃ, S.A.
Portal De Gamarra 36, Pabollón 32
01013 Vitoria(Alava)-Apdo. 133, Spain
Tel.: 34-45-283588
Advertisement
Table of Contents

Related Manuals for Alpine SPX-137A


Summary of Contents for Alpine SPX-137A
- Page 1 L3R 9Z6, Canada Tel.: 1-800-ALPINE1 (1-800-257-4631) MANUEL DE L'UTILISATEUR Veuillez lire le présent manuel avant la mise en service du matériel. ALPINE ELECTRONICS OF AUSTRALIA PTY. LTD. 6-8 Fiveways Boulevarde Keysborough Victoria 3173, Australia Tel.: (03) 9769-0000 ALPINE ELECTRONICS GmbH Kreuzerkamp 7-11 40878 Ratingen, Germany Tel.: 02102-45 50...
- Page 2 Points to Observe for Safe Usage Read this manual carefully before starting opera- DO NOT CONTACT, DAMAGE OR OBSTRUCT tion and use this system safely. We cannot be PIPES, FLUID LINES OR WIRING WHEN responsible for problems resulting from failure to DRILLING HOLES.
- Page 3 17. Swivel-flush mount cup / Embase à niveau pivotante ...…. 18. Surface-angle mount cup / Embase tronquée en surface ……. 19. Fixed-flush mount cup / Embase fixe à niveau …………………… x2 (SPX-177A) (SPX-137A) 20. Mounting clip / Attache de montage ...…………………………. 21. Swivel-spacer / Swivel-spacer ...…………...
-
Page 4: Table Of Contents
Tabel of Contents Installation Woofer (SPX-177A)... 5 Woofer (SPX-137A)... 7 Tweeter... Crossover Network... 11 System Connections Single Input... 12 Bi-wire... 12 Crossover Network Settings Introduction... 13 System Type 1... 14 System Type 2... 16 Specifications General... 19 Mechanical... 19 Theil/Small parameters... 19 Table des matières... -
Page 5: Installation Woofer (Spx-177A)
Installation (SPX-177A) Woofer: Surface mount Notes: Attach gasket tape as shown. If spacer ring is used with grille, snap-fit tabs on spacer ring must be removed for proper fit. Woofer: Factory/stealth Notes: Attach gasket tape as shown. Installation (SPX-177A) Woofer : Montage en surface st4.2x25mm Remarques : Fixez le cordon isolant comme indiqué... - Page 6 Installation (SPX-177A) Woofer: Factory/OEM custom fit Notes: Attach gasket tape as shown. Use appropriate adapter pattern for OEM fit, then break away any unused tabs. Hardware: Use st4.2x25mm for adapter to vehicle Use M4x10mm for speaker to adapter (adapter only) Use M4x18mm for speaker to adapter (adapter + spacer) Use M4x20mm for speaker to adapter (adapter + spacer + grille ring) (not shown) Woofer: Factory/Size-down...
- Page 7 Installation (SPX-137A) Woofer: Surface mount Notes: Attach gasket tape as shown, then lock speaker into grille ring. If spacer ring is used with grille, snap-fit tabs on spacer ring must be removed for proper fit. Woofer: Factory/stealth Notes: Attach gasket tape as shown.
-
Page 8: Tweeter
Installation Tweeter: Swivel-surface mount Notes: Before mounting, insert swivel retention cup into housing. Then rotate until achieving a positive lock using an appropriate tool (screwdriver, etc.). Mount complete swivel-surface cup and fix swivel spacer to base. (Fig. 1) Lock swivel ring to tweeter housing and make connections, then insert tweeter (terminals first) into swivel-surface cup.(Fig. - Page 9 Installation Tweeter: Swivel-flush mount Notes: Before mounting, insert swivel retention cup into housing. Then rotate until achieving a positive lock using an appropriate tool (screwdriver, etc.). Insert complete swivel-flush cup with mounting clips first through opening. (Fig. 1) Press mounting clips at center and secure with swivel spacer and screw. (Fig. 2) Lock swivel ring to tweeter housing and make connections, then insert tweeter (terminals first) into swivel-flush cup.
- Page 10 Installation Tweeter: Fixed-flush mount Notes: Insert fixed-flush cup with mounting clips first through opening. (Fig. 1) Press mounting clips at center and secure with screw. (Fig. 2) Make connections, then insert and lock tweeter into cup. (fig. 3) Caution: If custom painting is desired, remove grille by carefully pulling on mesh to release glue without damaging diaphragm.
-
Page 11: Crossover Network
Installation Tweeter: Surface-angle mount Notes: After making connections, insert and lock tweeter into surface-angle cup with terminals as shown. Caution: If custom painting or fine logo alignment is desired, remove grille by carefully pulling on mesh to release glue without damaging diaphragm. Crossover Network Notes: Remove network cover, and mount as... -
Page 12: System Connections
System Connections Single Input Bi-wire Input Note: Signal link jumpers highlighted in black must be inserted for proper function of single input configuration. Wiring for connection of crossover network to amplifier is not included. Caution: These jumpers must be removed when using b-wire input. Connexions du système Entrée simple Entrée par bi-câblage... -
Page 13: Crossover Network Settings
It is for this reason that Alpine has designed the most versatile and complex crossover network in the history of car audio. Please read the following pages carefully to find the setting that fits your system the best. However, it is important to note that there are 60 unique and useful combinations of the jumper settings, not including the nearly infinite amplification configurations available today. -
Page 14: System Type 1
Crossover Network Settings System Type 1 (default) Speaker Placement Description: In this system type, woofer and tweeter are mounted in close proximity to each other, and are mounted in essentially the same plane. Due to positioning limitations in some applications, additional tuning may be required using the axis jumpers for both the woofer and tweeter to achieve optimum performance. -
Page 15: System Type 2
Fonction de transfert du filtre (SPX-177A) (SPX-137A) Remarque : Ces simulations n'illustrent que l'effet de chacun des filtres sur le signal d'entrée et ne représentent donc pas la réponse en fréquence accumulée réelle du système du haut- parleur. - Page 16 Crossover Network Settings System Type 2 Speaker Placement Description: In this system type, woofer and tweeter are mounted different locations and at different distances from the listener. Also of significance, is the fact that the tweeter is the nearest driver. All component locations listed below are commonly available in most vehicles, but are meant only as general placement guidelines.
- Page 17 Fonction de transfert du filtre (SPX-177A) (SPX-137A) Remarque : Ces simulations n'illustrent que l'effet de chacun des filtres sur le signal d'entrée et ne représentent donc pas la réponse en fréquence accumulée réelle du système du haut- parleur.
-
Page 19: Specifications
129 cm 0.4 mH 2.3 mm/N 11.5 g 4.6 T-m Sealed box Volume 12.5 liters (Butterworth) Specifications Systeme générale SPX-137A Type Charge nominale 200/50 W Charge nominale (Pointe/RMS) Réponse de frequence 35-35 kHz Poids net 4.5 kg Haut-parleurs Générales Dimension 5.25”... - Page 20 Designed by Alpine Electronics of America, Inc. Printed in Denmark by Team Lynderup...
Need help?
Do you have a question about the SPX-137A and is the answer not in the manual?
Questions and answers