Advertisement
Quick Links
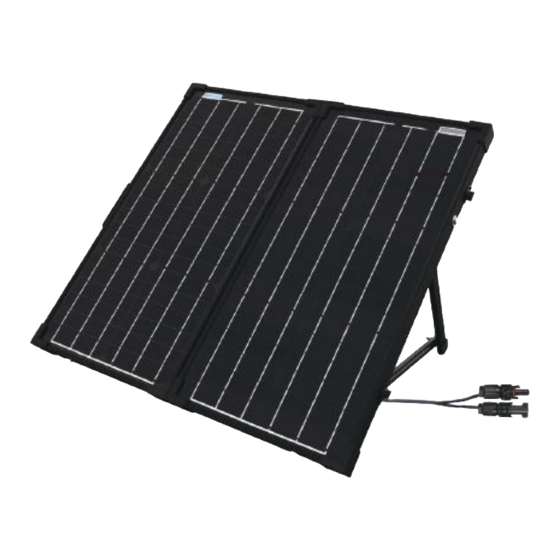
Accessories:
1. Handle
2. Latches
3. Aluminum frame
4. Aluminum support legs
5. Solar charge controller
6. Junction box
7. Label
8. Cable
9. Battery Clips
www.ACOPower.com
30m
(1.2 in)
14b
14a
14
9a
9b
9a. Red Positive Battery Clip
9b. Black Negative Battery Clip
10. Anderson Plug
11. Fuse
12. Handy carry bag
13. Corner protector
14. MC4 cables
14a. Red Positive MC4 Cable
14b. Black Negative MC4 Cable
KIT-HYS60MB
Power Your Green Life!
4120 Valley Blvd Walnut, CA 91789, USA
+1-626-737 1140
Advertisement

Subscribe to Our Youtube Channel
Related Manuals for ACOPOWER KIT-HYS60MB


Summary of Contents for ACOPOWER KIT-HYS60MB
- Page 1 KIT-HYS60MB (1.2 in) Accessories: 1. Handle 9a. Red Positive Battery Clip 2. Latches 9b. Black Negative Battery Clip 3. Aluminum frame 10. Anderson Plug 4. Aluminum support legs 11. Fuse 5. Solar charge controller 12. Handy carry bag 6. Junction box 13.
- Page 2 Charge 12V battery by alligator clamps- Sealed, Flooded, GEL, AGM, Lithium and other deep cycle batteries Charge 12V solar generator by MC4 adapter- battery with inverter, power bank/station with built-in charge controller. ACOPOWER solar generator 150wh and 220wh recommended Can be used on its own or as part of a larger solar system...
- Page 3 KIT-HYS60MB Method 2: Use your solar generator To test if the solar panel is working with a solar generator with a built-in charge controller, connect the MC4 adapters that came with your solar generator and plug it in to the MC4 cables of the solar panel directly (14a and 14b, Table 1). Turn your solar generator on and it should start charging from the solar panel.
- Page 4 KIT-HYS60MB How to change the battery type? Tip:MT-50 remote meter needs to be purchased separately To change the battery type to something other than sealed(default), a MT-50 remote meter is needed. For a more detailed guide, follow the user manual for the MT-50 remote meter. Below will be a simple explanation on how to change the battery type.
- Page 5 KIT-HYS60MB What are you going to use it for 1. Charge solar generators 1.1. Charge 12V Solar Generator with built-in Charge Controller Step 1: understand your solar generator and prepare the MC4 adapter for your solar generator Step 2: Disconnect MC4 Connectors and let it to be a solar panel with MC4 connectors Step 3: Use your MC4 Adapter to charge your solar generator 2.
-
Page 6: Specifications
KIT-HYS60MB Specifications 60w solar panel Specification Max- Max- Open- Short- Type Module Size Max-power Power Power Circuit circuit Current Voltage Voltage Current Module 645*345*30 2*30w 2*30 17.8 2*1.69 22.3 2*1.82 (25.4*13.6*1.2in) (21.2 lb) Charge Controller This solar panel module comes with a 10A solar charge controller which will look like the one shown below. (colors may vary) - Page 7 KIT-HYS60MB Wiring Figure 2 Connection diagram Installation Procedure: Connect the system in the order of battery load PV array in accordance with Figure 2”Connection diagram” and disconnect the system in the reverse order Indicators and buttons (1)Indicator Color Status Information...
-
Page 8: Troubleshooting
KIT-HYS60MB Troubleshooting Faults Possible reasons Troubleshooting Charging LED indicator off during daytime when PV array Confirm that PV and battery wire sunshine falls on disconnection connections are correct and tight PV modules properly Wire connection is Please check the voltage of battery. At... -
Page 9: Frequently Asked Questions (Faq)
KIT-HYS60MB FREQUENTLY ASKED QUESTIONS(FAQ) ACOPOWER is always open to customers with technical support, if you have any issues, please feel free to contact ACOPOWER by email at support@acopower.com Here we collected some frequently asked questions for reference: Q. What type of batteries can be used with the kit? A: 1. - Page 10 A: You will need to refer to the RV user manual and find out what kind of adapter you may need. Most adapters are sold on Amazon. Please contact support@acopower.com if you can’t find what you need. Q: The solar panel kit has the correct voltage reading but it won’t charge my generator.
-
Page 11: Warranty
Limited Warranty shall be suspended without liability for the period of delay reasonably attributable to such causes. Register your warranty with ACOPWER, please visit: https://www.acopower.com select “Warranty Registration”. Thank you for your business and support! ACOPOWER Team technical support: support@acopower.com...
Need help?
Do you have a question about the KIT-HYS60MB and is the answer not in the manual?
Questions and answers