Table of Contents
Advertisement
Quick Links
Advertisement
Table of Contents

Related Manuals for digicon Catrax clip


Summary of Contents for digicon Catrax clip
- Page 1 Product Manual clip...
- Page 3 Digicon S.A Manual code: 069.31. English - isão 06 Digicon S.A. Controle Eletrônico para mecânica This manual elabora ted by: Documentation sector - EDS “At the end of a product's life cycle dispose according with local policy” .
-
Page 4: Table Of Contents
5. Installing/Assembling ................5.1 Unboxing ................... 5.2 Floor drilling and column fixation ............5.3 Assembling arms and covers ..............5.4 Access to Catrax Clip after assembly ............ 6. Installing/Assembling optional items ............Collecting box kit ................6.1.1 Connection of collecting box kit to control board ........ -
Page 5: Important Instructions
You can see, below, the symbols that will appear in this manual, signaling important moments. It is essential to pay attention to them. TIP: Indicates something Digicon considers important. CAUTION: Indicates a moment of extreme caution when handling the equipment/product ATTENTION: Indicates a moment when your observation skills should be extremely productive. -
Page 6: Orientations
Keep this manual for future consultations. Ÿ Digicon reserves its right to alter its products at any moment to adapt them to more Ÿ recent technical advancements. Digicon maintains its right to alter the information contained in this manual without Ÿ... -
Page 7: Features Of Catrax Clip
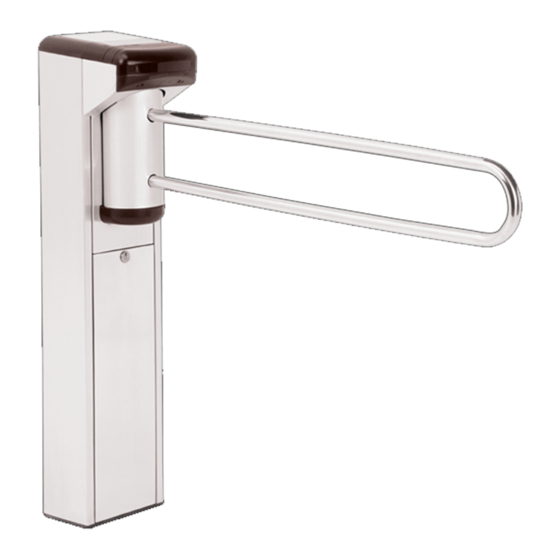
4. Features of Catrax Clip CATRAX Clip, an access controller in the model mini turnstile (column type), destined to individuals with special needs, presents one arm with brushed stainless steel (AISI 304) finishing and two-directional mechanism, with horizontal movement. -
Page 8: Catrax Clip Operation
4.1 Catrax Clip operation CATRAX Clip has a two-dimensional rotation system with two 24 V electromagnets for activating the locks. It includes a microprocessor control board where a signal enabling passage is sent through one of the inputs, depending on the passage direction. -
Page 9: Installing/Assembling
As the items inside the package can vary (depending on the client's requests), it is important to perform a cautious visual inspection before installing and assembling the turnstile. A checklist that works as a guide during inspection accompanies all Digicon packages. See below the parts that can compose... -
Page 10: Floor Drilling And Column Fixation
5.2 Floor drilling and column fixation Before installing CATRAX Clip , check: 1. The place chosen for the installation. 2. If there is a power source or electric socket nearby (ducts for connection). 3. If the place chosen is adequate for the installation of the access controller (indoors). -
Page 11: Assembling Arms And Covers
The sequence below shows the instructions to help assembling CATRAX Clip's arms. Digicon suggests that two people assemble the arms. 1. With CATRAX Clip already unboxed and installed, set the arms close to the tube's frontal holes (central axis). First, fit the arm's lower rod and press the upper rod so it reaches the respective hole. -
Page 12: Access To Catrax Clip After Assembly
- Rear cover and frontal cover: open the lock with the key at the rear of CATRAX Clip; unscrew the screws at the front of CATRAX Clip - Column door: Open the lock with the key and pull the door. -
Page 13: Installing/Assembling Optional Items
6. Installing/Assembling optional items CATRAX Clip is compatible with most access control technologies in the market today; however, Digicon offers a range of optional items that allow enhancing and matching the equipment's performance to the client's needs. See the description of each of these items: 6.1 Collecting box kit... -
Page 14: Connection Of Collecting Box Kit To Control Board
SOLENOID 12 11 10 9 8 7 6 5 4 3 2 1 12 11 10 9 8 7 6 5 4 3 2 1 SAÍDAS CN9 ENTRADAS CN8 PLACA CONTROLADORA DIGICON URNA SENSOR ELETROÍMÃS SENSORES CATRACA INFORMA TION - The box for cards is part of the kit and is positioned under the collecting kit. -
Page 15: Operational Pictogram Kit
Input: 100 A 240 Vca Ground Output: Neutral 5% / 3A Phase TIP: The power supply can be mounted to the board's support that accompanies CATRAX Clip. -
Page 16: Control Board
6.4 Control board plus CATRAX Clip's control board was designed to meet most technologies of access control terminals in the market. The controller have mechanical features and layout perfectly suited for the CATRAX Clip's needs and it is one of the best options for the equipment's operation. - Page 17 LED 1 anode Sensor 2 signal LED 2 anode INFORMATION: The cables of the optical sensors (CN6) and the electromagnets (CN5) are provided alongside CATRAX Clip. The cable of the box sensor (CN4) is provided alongside the collecting box kit (optional)
-
Page 18: Inputs
clip 6.4.1 Inputs The input signals or passage clearance (HAB1 and HAB2) can be originated by a relay contact, pushbutton contact, tension from 5 to 24 Vca/cc, from 110 to 220 Vca/cc. To enable passage through relay contact or pushbutton, make the connection as shown below: Enabling passage through tension pulse is shown in the image below. -
Page 19: 1.2 Pictogram
12 11 10 9 8 7 6 5 4 3 2 1 12 11 10 9 8 7 6 5 4 3 2 1 XXXXXX OUTPUT Cn9 INPUTS CN8 DIGICON CONTROL BOARD BOX SENSOR TURNSTILE SENSORS ELECTROMAGNETS 6.4.2 Configuration of control board - Switch Ds1... -
Page 20: Outputs 4
. The shadowed area indicates the factory plus configuration of Digicon's board. The control board also has inputs for optical controllers (Cn6), which monitor the CATRAX Clip's turning (there is no mechanical wear) and two opto-isolated inputs for liberating CATRAX Clip if necessary. -
Page 21: 3.2 Electromagnets 4
6.4.3.3 Sound alarm The sound alarm output is activated by a NPN transistor (maximum 500 mA) every time that CATRAX Clip -receives a clearance signal (two short rings) -is not cleared and is forced during 1 second (1-second rings) -is stuck mid-turn for over 2 seconds (1-second rings) Connect the outputs according to the following image: 6.4.4 Examples of some configurations... -
Page 22: Maintenance
clip 7.Maintenance 7.1 Preventive and corrective routine maintenance Sphere base – Periodicity: every 700,000 cycles The wear of the spheres' track must be checked Corrective actions: 1. In case of excessive wear (chipping, perforations, fillings or grooves where the sphere turns) replace the part. 2. - Page 23 clip Corrective actions: 1. if you spot an incorrect resistance, a short-circuit or open electromagnet, replace 2. if the electromagnet is not working, check the board or the voltage 3. if the electromagnet is moving, fasten the base screws. Electromagnets adjustments (if necessary) 1.
-
Page 24: Solving Problems
clip 7.2 Solving problems Defect Possible causes Action Will not turn on The power supply Check the cables and Ÿ Ÿ cable is not connected the fuse (fuse:3A). properly. The fuse of the power Ÿ supply is blown. Does not activate the The cable is broken or Adjust the Ÿ... -
Page 25: Technical Characteristics
clip 8. Technical characteristics 8.1 Dimensions 1130 (44,488") (31,889") INFORMATION The arm's size (clip Ÿ size) can be altered according to the client's order. Measures in the images Ÿ are given in millimeters (inches). (34,015") (6,299") -
Page 26: Other Information
Brasil www.catrax.com.br 1042 (9,566") (41,023") INFORMATION: Measures in the images are given in millimeters (inches). 8.2 Others information: CATRAX Clip Gross weight: Aproxim. 45 kg (package included) Electromagnets 12Vcc / 2A power: Power supply Input: 100 Vca a 240 Vca... -
Page 27: Cleaning
clip 9. Cleaning 9.1 Maintenance and conservation of stainless steel: Do not use chemicals, bleaches or cleaning products for household use; Routine cleaning: The best products to conserve stainless steel are water, soap, mild and neutral detergents and ammonia-based removers diluted in lukewater and applied with a soft cloth or a nylon sponge. - Page 28 clip Intense Dirt / Strong Stains: Make an application of warm or hot detergent, or a solution of an ammonia-based remover (household removers) and water. If this is not enough to soften burned foods or charred deposits, use more aggressive products, such as caustic soda removers used in household cleaning.
-
Page 29: Warranty And Technical Assistance
10.Warranty and Technical Assistance Digicon is responsible for the project, skilled labor, and quality of the materials used in the manufacturing of our products, ensuring that the equipment and all parts are free of manufacturing defects or problems. Digicon commits itself to replace or repair, as we choose, any part or equipment presenting manufacturing defects without any costs to the buyer, in our factory in Gravataí... - Page 31 Rua Nissin Castiel, 640 - Distrito Industrial. Gravataí/RS CEP 94045-420 Vendas: (0xx51) 3489.8700 / 3489.8745 Assistência técnica: (0xx51) 3489.8903 E-mail: vendas.acesso@digicon.com.br Filial/ SP Desenvolvimento, Assistência Técnica e Vendas Rua São Paulo, 82 - Alphaville. Barueri/SP CEP 06465-130 Fone: (0xx11) 3738.3500 E-mail: vendas.acesso@digicon.com.br Home page: www.digicon.com.br...
Need help?
Do you have a question about the Catrax clip and is the answer not in the manual?
Questions and answers