PARKIT360 Force 5k Manual
Hide thumbs
Also See for Force 5k:
- Instruction manual & user manual (13 pages) ,
- Instruction manual (16 pages) ,
- Manual (17 pages)

Subscribe to Our Youtube Channel
Related Manuals for PARKIT360 Force 5k


Summary of Contents for PARKIT360 Force 5k
- Page 1 5K & 10K MANUAL VERSION 4.4 READ CAREFULLY BEFORE OPERATION IMPROPER USE OF THIS DOLLY CAN CAUSE DAMAGE TO YOUR TRAILER, DANGER DANGER PERSONAL INJURY OR EVEN DEATH.
- Page 2 IN THE BOX PACKAGES INCLUDE: Force Dolly & Handle Ball Mount: 18”, 20” or 24” Tightening Bar Two Hitch Balls: 2” & 2 5/16” Thrust Washer (Puzzle) Hardware Kit: • 2 Handle Spring Clips • Allen Key & Screws • Battery Cable Battery Hardware &...
-
Page 3: Optional Parts
Drive and Neutral. (Page 4) OPTIONAL PARTS Telescopic Frame Adapter EZ Connect Adapter 1 7/8” or 50mm Hitch Ball Pintle Hitch Adapter Atwood Hitch Adapter Smart Brake U1 Battery Kit Battery Box Kit ORDER ONLINE CALL TOLL-FREE: 1-888-926-5517 PARKIT360.COM... -
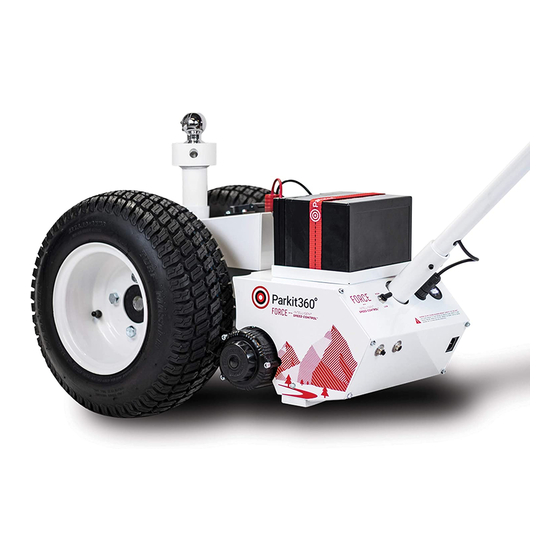
Page 4: Module Features
HANDLE PLUG MODULE Plug in and twist locking cap over FEATURES connection. Unplug cable while charging the battery. BATTERY CHARGER PLUG With the battery connected, plug into wall outlet to charge. CIRCUIT BREAKERS By default, the Brake Button protrudes more than the Motor. ISC CONTROL™... - Page 5 FREEWHEEL KNOB: SWITCHING GEARS FREEWHEEL/SPOOL NEUTRAL. MOVE THE DOLLY WITHOUT POWER WHILE IT IS NOT UNDER LOAD. Turn the knob in the direction of the Freespool arrow until it stops. Freely move the dolly to and from the trailer in this mode. This mode is intended for transportation only.
-
Page 6: Power Options
POWER OPTIONS DOLLY-MOUNTED BATTERY U1 BATTERY KIT SeAleD BATTERY Connect the 6” Cable to both battery terminals with the provided CONNECT 6” hardware. Plug the cable into the BATTERY CABLE Dolly to turn it ON. BATTERY BOX KIT GROUP 24 Install the Battery Box with the DEEP CYCLE BATTERY strap provided. - Page 7 DANGER DO NOT EXCEED DOLLY’S MAX. WEIGHT CAPACITY CAN CAUSE DAMAGE TO YOUR TRAILER, SERIOUS INJURY, OR EVEN DEATH. FORCE 5K FORCE 10K UP TO 5,000 LBS UP TO 10,000 LBS RE-TIGHTEN BALL MOUNT BEFORE OPERATION USE JACK POST CONNECTION OR TELESCOPIC...
-
Page 8: Hitch Ball
CONNECTING TO YOUR TRAILER: BALL MOUNT ADAPTER While in Freewheel Mode, move the Dolly and Accessories to the Trailer. Choose your preferred Hitch Ball Size, and assemble the Ball Mount. BALL MOUNT ASSEMBLY HITCH BALL Thread desired Hitch Ball into the Ball Mount. - Page 9 HITCH BALL PLACEMENT WELD SPOTS Insert the assembled Ball Mount into the Hitch and lock as normal. Make sure the Weld Spots on the Hitch Ball are pointed towards the rear left side of your trailer at about 10 o’clock. HITCH CONNECTION FLUSH, Turn the Ball Mount Counterclockwise...
- Page 10 PUZZLE PIECE with Space between the Ball Mount and Coupler? Install the Thrust Washer on top of the Ball Mount with the Puzzle Piece facing the Parkit360 Dolly Tighten Ball Mount as normal. STEP DOWN HITCH? THRUST WASHER Have an obstruction preventing a flat connection? Place the Thrust Washer on top of the Ball Mount with the open section facing the trailer.
-
Page 11: Connect Battery
ENGAGE MOTOR INTO DRIVE CONNECT BATTERY Plug the Battery Cable into the Dolly to turn it ON. 12v U1 Sealed Battery shown. ENGAGE MOTOR Ensure the Dolly is in Drive by turning the Freewheel Knob towards the Engaged Arrow. See page 4 for details. ALIGN THE DOLLY Using the Handle Toggle Switch, Drive the Dolly underneath the hitch. - Page 12 INSERT BALL MOUNT Reverse the Dolly to Level, then lower Ball Mount fully into the Receiver Tube. Wiggle the handle up and down to release Ball Mount friction. Ensure that the Jack Post is off of the ground. REVERSE RE-TIGHTEN BALL MOUNT Using the Toggle Switch, move the Dolly back &...
-
Page 13: Storage And Maintenance
Grease the Receiver Tube and Lubricate the Chain with Chain Lube. Can be done annually, or more often if used more frequently. CALL TOLL-FREE: OFFICE HOURS (WEEKDAYS) 1-888-926-5517 8AM-4PM EST Ext. 1 - Sales & Service sales@parkit360.com Ext. 2 - Administration admin@parkit360.com support@parkit360.com... -
Page 14: Alternative Connections
ALTERNATIVE CONNECTIONS TRAILER JACK POST Remove the Ball Mount Adapter. Lower the Trailer Jack into the Dolly’s Receiver Tube, following the standard connection process. The trailer should rest as close to the Dolly’s Tires as possible to reduce strain on the Jack Shaft. TELESCOPIC FRAME ADAPTER Remove the Ball Mount Adapter. -
Page 15: Exclusions And Limitations
2 -Year Warranty, whichever is later. 30 DAY RETURN POLICY If a material defect is found or if the Parkit360 Force Dolly has failed to perform to your expectations, return it within 30 days of the date of sale for a refund, less the flat shipping cost of $250 and 20% restocking fee. - Page 16 DANGER DO NOT EXCEED DOLLY’S MAX. WEIGHT CAPACITY RE-TIGHTEN BALL MOUNT BEFORE OPERATION DO NOT OPERATE ON MORE THAN A 6% GRADE PARKIT360 INC. 130 Industrial Ave, Unit 600 Carleton Place, ON K7C 3T2 Canada 1-888-926-5517 or PARKIT360.com...
Need help?
Do you have a question about the Force 5k and is the answer not in the manual?
Questions and answers