PARKIT360 Force 5k Instruction Manual
Hide thumbs
Also See for Force 5k:
- Instruction manual & user manual (13 pages) ,
- Manual (17 pages) ,
- Manual (17 pages)

Related Manuals for PARKIT360 Force 5k


Summary of Contents for PARKIT360 Force 5k
- Page 1 FORCE 5K & 10K INSTRUCTION MANUAL VERSION 3.8 READ CAREFULLY BEFORE OPERATION IMPROPER USE OF THIS DOLLY CAN CAUSE DAMAGE TO YOUR TRAILER, DANGER PERSONAL INJURY OR EVEN DEATH.
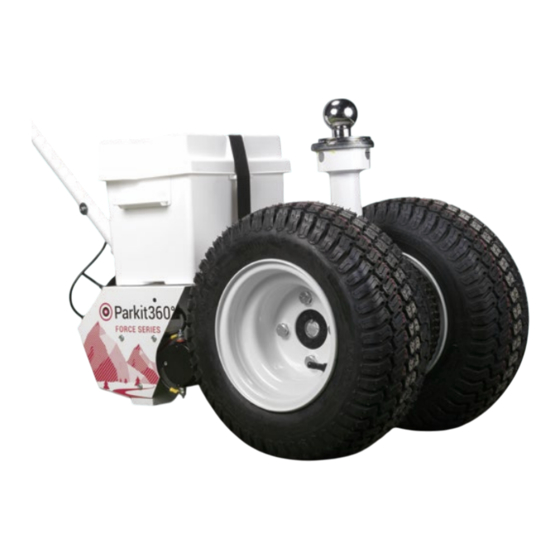
- Page 2 IN THE BOX ALL PACKAGES INCLUDE: Force Dolly Handle & Tightening Bar Ball Mount: 18”, 20” or 24” 2” & 2 5/16” Hitch Ball Thrust Washer Hardware Kit: • 2 Handle Spring Clips • Allen Key • 20” Battery Cable ASSEMBLY Insert the Handle into the Dolly and tighten both Allen Screws to secure it.
-
Page 3: Optional Parts
7-Way Power Plug that Controls the Trailer’s Electric or Surge Brakes. OPTIONAL PARTS Telescopic Frame Adapter 1 7/8” or 50mm Hitch Ball Pintle Hitch Adapter 80” Battery Cable Smart Brake U1 Battery Kit* ORDER ONLINE OR CALL TOLL-FREE: 1-888-926-5517 PARKIT360.COM... -
Page 4: Module Features
QUESTIONS? MODULE CALL TOLL-FREE: FEATURES 1-888-926-5517 CIRCUIT BREAKERS BATTERY CABLE PLUG Prevents Motors and Smart Brake Plug the 20” or 80” Battery Cable into from overheating. If a breaker trips, this port to turn on the Dolly. the Reset Button will extend up to 1/2”... - Page 5 DRIVE MODES: FREEWHEEL KNOB FREEWHEEL NEUTRAL. MOVE THE DOLLY WITHOUT POWER WHILE IT IS NOT UNDER LOAD. If you are in Engaged Mode, the wheels will be locked in the drive position. Without power, the Dolly will only move an inch forwards or backwards before stopping.
-
Page 6: Power Options
POWER OPTIONS DOLLY-MOUNTED BATTERY SINGLE 12V BATTERY Connect the 20” Cable to one of the following battery types: • Group 24 Deep Cycle • Marine • U1 Sealed Batteries can be purchased GROUP 24 MARINE U1 SEALED at a local Hardware Store. TRAILER BATTERY TWO 12V BATTERIES TWO 6V BATTERIES... - Page 7 DANGER DO NOT EXCEED DOLLY’S MAX. WEIGHT CAPACITY CAN CAUSE DAMAGE TO YOUR TRAILER, SERIOUS INJURY, OR EVEN DEATH. FORCE 5K FORCE 10K UP TO 5,000 LBS UP TO 10,000 LBS RE-TIGHTEN BALL MOUNT BEFORE OPERATION USE JACK POST CONNECTION OR TELESCOPIC...
- Page 8 CONNECTING TO YOUR TRAILER: BALL MOUNT ADAPTER While in Freewheel Mode, move the Dolly and Accessories to the Trailer. Choose your preferred Hitch Ball Size, and assemble the Ball Mount. BALL MOUNT ASSEMBLY HITCH BALL Thread desired Hitch Ball into the Ball Mount.
- Page 9 HITCH BALL PLACEMENT WELD SPOTS Insert the assembled Ball Mount into the Hitch and lock as normal. Make sure the Weld Spots on the Hitch Ball are pointed towards the rear left side of your trailer at about 10 o’clock. The hitch may not lock if they are not positioned properly! HITCH CONNECTION...
- Page 10 CONNECTION GAP? THRUST WASHER Remove the Hitch Ball and place the Thrust Washer on top of the Ball Mount with the open section facing the trailer. Reinstall the Hitch Ball and continue Hitch Connection as normal. While tightening, hold the Thrust Washer in place to prevent it from spinning.
- Page 11 ENGAGE MOTOR INTO DRIVE CONNECT BATTERY Plug the Battery Cable into the Dolly to turn it ON. FREEWHEEL KNOB Ensure the Dolly is in parking position and ready to connect to the Hitch. Engage the Motor. ALIGN THE DOLLY Using the Handle Toggle Switch, Drive the Dolly underneath the hitch.
- Page 12 INSERT BALL MOUNT Reverse the Dolly to Level, then lower Ball Mount fully into the Receiver Tube. Ensure that the Jack Post is off of the ground. REVERSE RE-TIGHTEN BALL MOUNT Using the Toggle Switch, move the Dolly back & forth slightly.
-
Page 13: Maintenance
PARKING YOUR TRAILER Use the Forward and Reverse Toggle Switch to steer into tight spaces that are nearly impossible for vehicles. DISCONNECTING THE HITCH Chock Trailer Wheels to prevent a runaway trailer. Unplug the Battery Cable from the Dolly. Raise the Trailer to withdraw the Ball Mount. The Ball Mount can be removed or left on the hitch for later use. - Page 14 Lower the Telescoping Pipe into the Dolly, following the standard connection process. Slide the Adapter’s locking pin into place. CALL TOLL-FREE: OFFICE HOURS (WEEKDAYS) 1-888-926-5517 8AM-6PM EST Ext. 1 - Sales sales@parkit360.com Ext. 2 - Administration admin@parkit360.com Ext. 4 - Technical Support support@parkit360.com...
- Page 15 2 -Year Warranty, whichever is later. 30 DAY RETURN POLICY If a material defect is found or if the Parkit360 has failed to perform to your expectations, return it within 30 days of the date of sale for a refund, less the flat shipping cost of $250 and 20% restocking fee.
- Page 16 DANGER DO NOT EXCEED DOLLY’S MAX. WEIGHT CAPACITY RE-TIGHTEN BALL MOUNT BEFORE OPERATION DO NOT OPERATE ON MORE THAN A 6% GRADE PARKIT360 INC. 130 Industrial Ave, Unit 600 Carleton Place, ON K7C 3T2 Canada 1-888-926-5517 or PARKIT360.com...
Need help?
Do you have a question about the Force 5k and is the answer not in the manual?
Questions and answers