Grainfather CONICAL FERMENTER PRO Quick Start Manual
Hide thumbs
Also See for CONICAL FERMENTER PRO:
- Instructions for installing (2 pages) ,
- Instructions manual (12 pages) ,
- Instructions manual (12 pages)
Advertisement
Advertisement
Table of Contents

Related Manuals for Grainfather CONICAL FERMENTER PRO


Summary of Contents for Grainfather CONICAL FERMENTER PRO
- Page 1 CONICAL FERMENTER PRO QUICK START GUIDE...
- Page 2 Get your equipment ready by following these quick and easy steps, and you’ll be ready to ferment 30L of beer in no time. NOTE: These are shortened instructions which show you how to assemble the product and setup wireless control. The full online instructions provide more detail on the fermentation process using your Grainfather Conical Fermenter Pro: www.grainfather.com/instructions SAFETY INFORMATION Read all instructions before use.
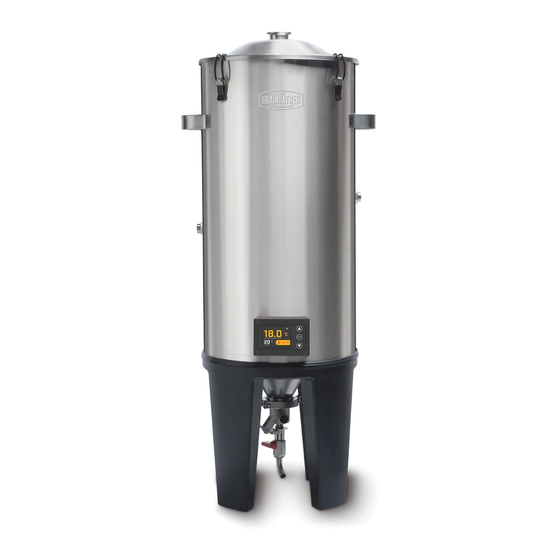
- Page 3 ANATOMY DIAGRAM & PARTS LIST 1. Airlock 2. Rubber Bung 3. Fermenter Lid 4. Fermenter Body 5. 5 Cm (2”) Tri Clamp 6. Cone Plug Seal 7. Liquid Inlet 8. Dual Valve Tap 9. Silicone Transfer Hose (10 mm (0.4”) inner diameter) 10 Conical Fermenter Pro Controller ALSO: Power adapter and wall plug 2 m (6.5 ft) m12-3pin power cord...
- Page 4 ASSEMBLY 2. Attach the valve to the bottom of the fermenter INSTALL THE DUAL VALVE TAP by inserting the cone plug seal. Then use the tri 1. Unpack the fermenter and all its parts. Remove clamp to tighten it and secure it in place. all the protective packaging and then assemble the dual valve tap. SCREW ON BALL VALVE CONNECT THE POWER CORD 3. Plug the 2 m (6.6 ft) power cord into the back of the fermenter. ATTACH LIQUID INLET 4. Then plug the other end of this cord, into the power adapter. Do not plug this into a wall and switch on the power until you are ready to heat the fermenter.
- Page 5 If you do not see this screen, then you can press the ‘set’ button on the controller and go to Network Config > Add New Network. Once on the connection setup screen, you will need to open the Grainfather Community App on your mobile device. 2. Within the app, navigate to the equipment screen. The equipment screen shows all the brewing and fermenting equipment that you have already set up on your account. 3. To add a new device, tap on the + icon on the bottom right of the screen and select fermentation tracking equipment. 4. Select ‘Grainfather Conical Fermenter Pro’ on the list of equipment and once on the device setup screen, tap ‘ready’. 5. Depending on your mobile device, you may be asked to request certain permission(s) required to connect with the controller. Accept all requests. NOTE: The following steps vary for Android and iOS users. Please follow the relevant steps for your mobile device.
- Page 6 WIRELESS CONTROL AND APP INTEGRATION CONT. ANDROID 6. If setting up the controller via an Android device, 7. If setting up using an iOS mobile device, follow choose your controller in the list. the instructions on the screen and connect (See step 8 next) your mobile device to the controller. Once the connection is established, you will receive a notification on your mobile device. Tap the notification to return to the Grainfather Community App. You will automatically return to the device setup screen.
- Page 7 HOW TO USE 8. After your phone has successfully connected • Fill your fermenter by syphon or a counter to the controller (Android and iOS), select your flow wort chiller if using a Grainfather wireless network from the list and enter in your brewing system. Ensure that the volume is network password and then tap ‘connect’. Once at least 15L. completed, your Grainfather Conical Fermenter • Secure the lid. Ensure that the rubber bung Pro is connected to the internet. and airlock are still tightly in place. • Plug the fermenter into a power socket and turn on (heating only). For cooling capabilities, purchase either the Grainfather Glycol Chiller or Cooling Pump Kit. Please refer to the full instructions for more information on this. • You can now use the controller manually or via the connection on the Grainfather App on your mobile device. By using the app...
- Page 8 • Reassemble, dry and store. IMPORTANT SAFEGUARDS: READ AND FOLLOW ALL INSTRUCTIONS CAUTION – Risk of fires and electric shock. – Replace only with genuine Grainfather cord set. – Do not immerse in water. SAVE ALL WARNINGS AND INSTRUCTIONS FOR FUTURE REFERENCE FOR COMMERCIAL AND INDOOR USE ONLY WA R N IN G AV E RTIS S E ME N T RISK OF ELECTRIC SHOCK .
Need help?
Do you have a question about the CONICAL FERMENTER PRO and is the answer not in the manual?
Questions and answers