Epcom XMR Series User Manual
Hide thumbs
Also See for XMR Series:
- User manual (14 pages) ,
- User manual (12 pages) ,
- User manual (9 pages)
Advertisement
Quick Links
Advertisement

Related Manuals for Epcom XMR Series


Summary of Contents for Epcom XMR Series
- Page 1 XMRX8 User manual...
-
Page 2: Table Of Contents
Content 1. Introduction...........................1 2. Structure design..........................2 2.1 Front view..........................2 2.2 Back view..........................3 3. Basic Operations ...........................4 3.1 Live view window.........................4 3.2 Main menu..........................4 4. Device using..........................10... -
Page 3: Introduction
1. Introduction BWC-R1 is an intelligent body worn camera specifically designed for Law Enforcement. The camera features real time HD video, 1080P recording, support built-in 4G, WIFI and GPS function, and a high resolution still image capture visible on the LCD screen for instant playback, with wide angle;... -
Page 4: Structure Design
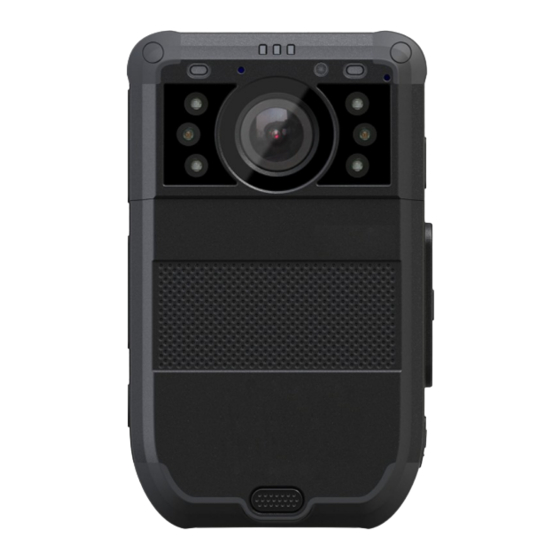
2. Structure design 2.1 Front view Item Name Description The sensor will detect the brightness of the environment, and IR sensor then activate the IR light and switch to night vision mode. Camera Lens Full HD wide angle camera lens Record clear image in HD in low light situations. -
Page 5: Back View
2.2 Back view Item Name Description Speaker It’s the speaker to audio playback and voice report. When the sensor detected, it will turn off the screen Screen off sensor automatically Touch screen It’s a touch screen for operation When you do the operation, press this icon to return to the Return key previous interface Press this icon to make the operation back to the home... -
Page 6: Live View Window
3.1 Live view window The body worn camera LCD screen is a small monitor to display various camera information and operation status. Item Name Description Video recording icon Yellow icon means video recording is working. Snapshot icon Yellow icon means snapshot success. Date/Time The current date/time Display the capacity and remaining size of the... -
Page 7: Main Menu
3.2 Main menu In preview mode, press home key to enter into main menu interface, you will see the interface as follow: Camera Enter into the live view of the camera Play Playback the local video, audio and images. Setup Setup all the parameters of the camera Start the intercom function with other camera or center server, Talk... - Page 8 1. Video resolution The body worn camera offers five different recording resolutions. Resolution and frame rate options feature a proper balance between video quality and maximizing amount of video stored. Options Display resolution Images per second 720P30 1280*720 1080P30 1920*1080 2.
- Page 9 SETUP>>DEVICE Select the “Setup”, you will enter into all the parameters configurations, the all items are as follow: Menu Options Brightness Drag the icon to adjust Screen off 30sec,1min,3min,5min,OFF Screen sensor ON,OFF Vibration ON,OFF Infrared ON, OFF Infrared Power High, Low F button Flash, sound, laser light, IR manually, playback, setup Indicator light...
- Page 10 Media : Menu Options Post-recording 10sec, 30sec, 1min, 2min, 5min, 10min, 30min, OFF Pre-recording OFF, ON Motion detect ON, OFF Security password ON/OFF, default is 000000 GPS watermark OFF, ON Communication tone Voice, beep Media Volume Drag the icon to adjust Warn tone Beep, Voice Hourly notice...
- Page 11 6. Communication tone The is option means when the two-way audio communication function is enabled, the tone is vibration or use the incall tone, and adjust the volume. 7. Media Volume Select volume level option to increase or decrease all the volume of camera, including playback, key sound, indicate sound and so on.
- Page 12 SETUP>>>>SEVER Menu Options Sever Configure the server IP, port and user number. Bitrate Select different resolution and bitrate for streaming Upload frequency 0~999 seconds optional 1. Server Setup the server IP, port, and user number, make sure the camera can connect to the center server. 2.
- Page 13 SETUP>>>>SYSTEM Menu Options OFF,ON Mobile data OFF,ON Bluetooth OFF,ON Location GPS, GPS+Beidou, Beidou Offline connection OFF,ON About Voice, beep Default setting Drag the icon to adjust 1. WAN Enable it, so the camera can connect to WIFI network. 2. Mobile data Only when this option is on, the 4G network can transmit the live video to center server.
-
Page 14: Device Using
4. Device using 1. Turning On the Camera In power off status, long press for 3 seconds, the camera will be turn on and enter into preview mode automatically. Meanwhile, the status indicator will turn green. 2. Turning off the camera In preview mode, long press for 3 seconds, the camera will save the current status and power off. - Page 15 7 Make a flag for the file In video/audio recording mode, short press flag button to mark it as important file, the icon will display on the top of screen. Short press key mark button again to cancel the mark. When playback the file, short press key mark button to mark it as important file or cancel the mark.
- Page 16 13 Reset If the system crash and the operation is no respond, long press power button for about 10 seconds, the camera will be forced to reset Remark: Reset operation will not cause data loss or damage, and it will not change the system settings.
- Page 17 1. Charge the battery Connect the battery charger to the power supply to charge the battery. In charging status, the status indicator will turn red. Once the battery is fully charged, the status indicator will turn green. ★ As we are committed to constantly improving our products, some details may not be in conformity with the actual products.
Need help?
Do you have a question about the XMR Series and is the answer not in the manual?
Questions and answers