Epcom XMR Series User Manual
Fhd dual lens dash cam with gps
Hide thumbs
Also See for XMR Series:
- User manual (14 pages) ,
- User manual (17 pages) ,
- User manual (9 pages)
Table of Contents
Advertisement
Quick Links
Advertisement
Table of Contents

Related Manuals for Epcom XMR Series


Summary of Contents for Epcom XMR Series
- Page 1 XMRDASHCAMT12 FHD Dual Lens DASH CAM With GPS User’s Guide...
- Page 2 CAUTIONS ● Set up correct time in system setup before first use. ● Please insert micro SD card in the right direction to avoid damage to the card or DVR. If DVR shows error message, please format the micro SD card from DVR menu. Please reset DVR or change micro SD card if similar error continues.
-
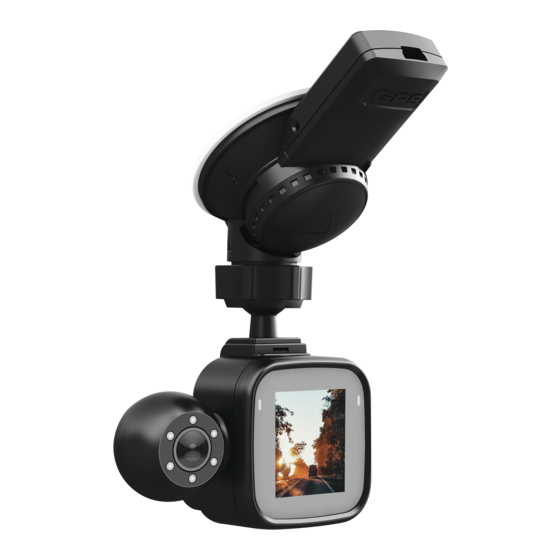
Page 3: Key Definition
Key Definition 1. IR Light. 6. Suction Cup Mount 11. OK/REC 2. Rearview Lens 7. Front Lens 12. Reset 3. USB Port 8. Turn on/off Rearview Lens 13. USB Port 4. Indicator Light 9. UP/Mute key 14. Power/Mode Key 5. LCD Screen 10. -
Page 4: Operation
Operation Mode Number Key Action Power/Mode Key Long press to power on/off Short press to switch mode Video Reset Reset DVR UP/Mute Key Turn on/off sound recording Down/Lens Switch Key Switch between front and rearview lens OK/REC Start/pause recording Turn on/off Rearview Lens Turn on/off Rearview Lens Power/Mode Key Long press to power on/off Short press to switch mode... -
Page 5: Battery Charging
Function A. On/Off Power On In OFF state, long press power key, DVR enters into video mode and starts recording automatically. Or DVR is connected with car charger to enter video mode and start recording. When unplug the charger, DVR will automatically save the current file and shut down. -
Page 6: Parking Monitor
E. Playback and Delete In standby mode, short press Power/Mode Key twice to enter into playback mode. Press UP/DOWN key to select the file and OK/REC key to start or pause play. F. G-Sensor When car brakes suddenly or being hit heavily, G-sensor will be activated to save and protect the current video clip from being overwritten automatically. - Page 7 setup. Press UP/ DOWN key to select the item and press OK/REC to confirm. Press Power/Mode key again to exit. K. GXPlayer Download and Guide A. Download Please download from http://www.sunningsoft.com/en/pcgps.html and directly click download button on the right. Operating System Requirements 1.
- Page 8 Step 3. click Next Step 4. Browse disk to install and please don’t install in system disk. No Chinese in software installation path.
- Page 9 Step 5. Click ‘Next’ to start the installation. Step 6. GXPlayer will be on desktop after installation completed. Step 7. Double click GXPlayer on desktop to get below interface.
- Page 10 Note: please install VC redist based on PC system type if a pop-up window writes ‘no xxx.dll or run-time-support library’ in installation. 64-bit Operating System to install vc_redist.x64.exe 32-bit Operating System to install vc_redist.x32.exe C. Guide Playback window Volume ① ②...
-
Page 11: Cabling Diagram
L. Cabling Diagram Note: GPS module is built-in car charger and please put it on the window shield without any obstacle. M. Accessories 1xcar charger with GPS module 1xsuction cup mount 1xuser’s guide 1xcable fixer 1xcabling stick N. Trouble Shooting Q1. - Page 12 Go to settings, Format ,delete all data. If road conditions are too bumpy, this many also cause locked files, lower the G-Sensor to Low. c. Rest the device by sticking in a sharp object(paper clip) into the reset hole. Q3. "No Card"Error Massage a.
Need help?
Do you have a question about the XMR Series and is the answer not in the manual?
Questions and answers