Table of Contents
Advertisement
OWNER'S GUIDE
T
HE
SHOP-TOUGH
AND GARAGE
WORTHY
Thank you for your purchase! Question or problem? Let us solve it
with a single phone call, email or online chat! We'll save you a trip
back to the store!
Cadet Customer Service
Phone:
email:
Live chat:
For how-to videos or more information, please visit:
http://cadetheat.com/rcp
cadetheat.com
855.CADET.US
Vancouver, Washington
H
855.CADET.US (855.223.3887)
customerservice@cadetheat.com
cadetheat.com (contact us)
OT
O
NE
tested to UL standards
USA
Advertisement
Table of Contents

Related Manuals for Cadet THE HOT ONE


Summary of Contents for Cadet THE HOT ONE
- Page 1 AND GARAGE WORTHY Thank you for your purchase! Question or problem? Let us solve it with a single phone call, email or online chat! We’ll save you a trip back to the store! Cadet Customer Service Phone: 855.CADET.US (855.223.3887) email: customerservice@cadetheat.com Live chat: cadetheat.com (contact us)
-
Page 2: Important Instructions
IMPORTANT INSTRUCTIONS When using electrical appliances, basic precautions should always be followed to reduce the risk of fire, electric shock, and injury to persons, including the following: 1. Read all instructions before using Arrange cord away from traffic area this heater. and where it will not be tripped over. -
Page 3: Installation Instructions
This heater is for use with 240 volts. The cord has a 20 amp or 30 amp plug as shown in Figure 1. No adapter is available for these blade configurations, and none should be used. The Hot One requires a 240 volt grounded receptacle. When properly installed, it provides a ground connection through the cord to the heater to protect the operator from electric shock. -
Page 4: Tips Before You Begin
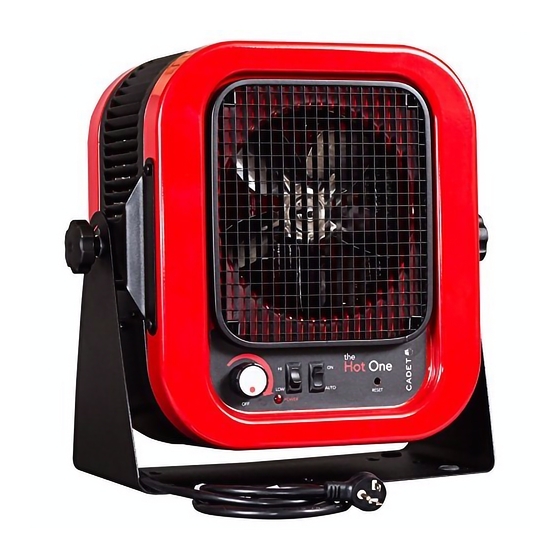
INSTALLATION INSTRUCTIONS TIPS BEFORE YOU BEGIN • The Hot One may sit on a floor surface or be mounted to the wall, or on the ceiling, using the universal stand provided. • If mounted on the wall, maintain 6 inch minimum clearance from the top of the unit to the ceiling (See Figure 2). -
Page 5: Ceiling Mount
INSTALLATION INSTRUCTIONS CEILING MOUNT 1. Securely fasten a piece of plywood (not provided) across two of your ceiling rafters that is a minimum of ½ inch thick, 8 inches wide and long enough to span the distance across the two rafters (See Figure 6). -
Page 6: How To Operate Your Heater
OPERATING INSTRUCTIONS 1. The heater must be properly 5. Clean heater at least every six installed before it is used. Be months or as required. See sure the plug fits tightly into the “MAINTAINING YOUR HEATER”. receptacle. The red light indicates 6. -
Page 7: Maintaining Your Heater
4. Cadet’s warranty is limited to repair or replacement. life of the heater, read the Owner’s Guide and follow the 5. In the event Cadet elects to replace any part of your instructions. Failure to properly maintain the heater will... -
Page 8: Troubleshooting
MAINTAINING YOUR HEATER TROUBLESHOOTING Symptom Problem Solution The plug does 1. Heater is 240 volt requiring 1. DO NOT alter cord. Install the proper 240 volt not fit recep- a 20 amp or 30 amp 240 receptacle (see Figure 1 in “INSTALLATION tacle. -
Page 9: Parts List
MAINTAINING YOUR HEATER PARTS LIST Note: Only the items listed below are available for purchase. Front Diffuser Grill Assembly with 001601 Fan Blade 410102 clips 051424 Fan Motor 040019 Thermostat Knob 400202 Mounting Stand 050524 Pilot Light 10 040023 Mounting Knob 051226 Thermostat 051901...
Need help?
Do you have a question about the THE HOT ONE and is the answer not in the manual?
Questions and answers