
Related Manuals for AQUAMAXX Puratek Deluxe


Summary of Contents for AQUAMAXX Puratek Deluxe
- Page 1 Puratek Deluxe Aquarium Reverse Osmosis / Deionization System User’s Manual www.aquamaxxaquariums.com info@aquamaxxaquariums.com...
-
Page 2: Important Reminders
Congratulations! You are now the proud owner of a new Puratek Deluxe System by AquaMaxx. With proper installation and maintenance, this system will provide you with high quality water for years to come. All Puratek products are rigorously tested for safety, efficiency, and reliability. Please take a moment to read these instructions to ensure optimal performance. -
Page 3: System Specifications
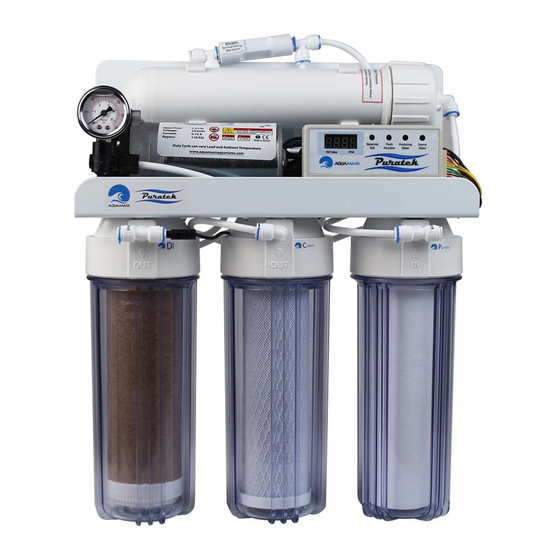
Approximately 1:1 SYSTEM DESCRIPTION The Aquamaxx Puratek Reverse Osmosis / Deionization System is a high-quality water purifier with a booster pump designed to provide maximum purity and minimum waste. This unit utilizes 4 stages of filtration and is fully automated with a Microprocessor Controller. - Page 4 Stage 4: Deionization Cartridge The fourth stage moves water through a Deionization Cartridge. As water passes through a bed of ion exchange resins, these resins attract and absorb ionic contaminants: cation resins absorb positively charged ions, and anion resins absorb negatively charged ions. Deionization cartridges are designed to reduce silica, nitrates and phosphate levels in the low ppb range and are capable of producing 18 megohm-cm resistivity water.
- Page 5 DO NOT expose unit to direct sunlight or freezing conditions! The Aquamaxx Puratek System can be mounted to any secure location using hardware screws. Because the system will weigh more when filled with water, it is important to chose a mounting location with strong backing.
- Page 6 Steps 3-4 Connect the remaining supplied tubing to the “Product” output, which is located at the top of the “DI” canister housing. Place the product line, along with the blue waste line (attached to top bracket housing) into your drain. Slowly open the cold water supply valve and allow the first two housings to fill.
-
Page 7: Filter Change Instructions
Step 6 Unwrap the DI Cartridge from its packaging and install it into the far-left canister. Discard the first 2 gallons of water produced after installing the DI Cartridge. You may now start collecting pure RO/DI water for use. Filter Change Instructions Step 1 Turn off the unit, disconnect from power, and shut off incoming water supply. -
Page 8: Shelf Life
Step 4 Check the system for any possible leaks, and then turn on your water supply. Dispose of all product water for the first half hour. Membrane & Filter Care Guide Shelf Life Filter Changing Guidelines Change when visibly dirty (4-8 months), or Indefinite when stored in when system pressure drops by more than 5 original packaging away from... - Page 9 Microprocessor Controller Operation Reservoir Producing Flush Source Full Water Function Water TDS Value FLUSH FUNCTION The Microprocessor is programmed for a 10 second delay. After the delay, the unit will flush itself for a period of 15 seconds, allowing for efficient operation of the unit. The Microprocessor’s “Flush Function”...
-
Page 10: Troubleshooting Guide
Troubleshooting Guide Problem Possible Causes Solutions - missing flow restrictor - install flow restrictor Zero product water - dried-up or damaged TFC membrane - install new TFC membrane - clogged pre-filters - install new pre-filters Slow water production - replace booster pump or use higher - low water pressure (<...
Need help?
Do you have a question about the Puratek Deluxe and is the answer not in the manual?
Questions and answers