Charge Amps Amp Guard Installation Manual
Hide thumbs
Also See for Amp Guard:
- Quickmanual installation (57 pages) ,
- Quick manual (56 pages) ,
- Installation manual (31 pages)
Table of Contents
Advertisement
Quick Links
Advertisement
Table of Contents

Related Manuals for Charge Amps Amp Guard


Summary of Contents for Charge Amps Amp Guard
- Page 1 Charge Amps Amp Guard Installation Manual Installation may only be carried out by authorized personnel who follows basic safety precautions for safe and correct installation according to local, regional, and national installation regulations.
-
Page 2: Table Of Contents
WiFi Installation ..................10 Configuration in the Cloud ................11 Importing Amp Guard ................11 Add Amp Guard to a Load Balancer Group for Chargers ....12 Maximum Current Per Phase – Settings ..........13 Rights ......................14 © 2021 Charge Amps AB... -
Page 3: Amp Guard
Amp Guard Amp Guard is a smart power monitor which enables dynamic load balancing for Charge Amps chargers. Amp Guard logs the total power consumption to the Charge Amps cloud service https://my.charge.space/ which automatically reduces or increases the available power to the chargers, enabling charging at maximum capacity without worry about blowing fuses. -
Page 4: Contents Of The Package
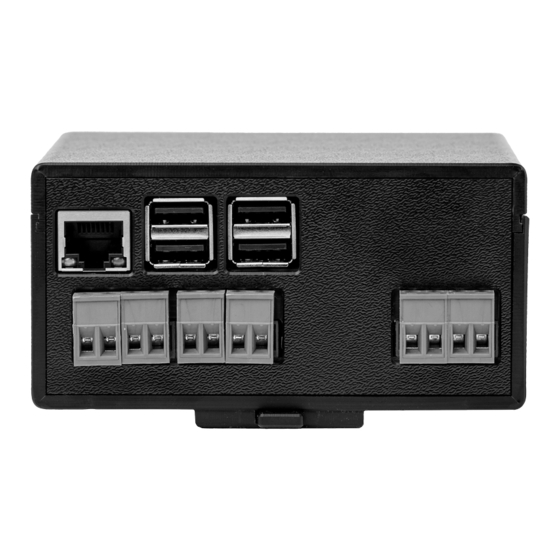
N are connected. USB port for programming USB port for programming Micro USB for powering the Amp Guard. Requires a 5V AC/DC converter too. HDMI port for display connection AUX to connect an audio unit ©... -
Page 5: Preparations (Read And Prepare Before Installation)
Installation) Customer Needs to Provide LAN or WiFi Amp Guard must be connected to the internet to supply data to the load balancer which in turn communicates with the charging station(s). The customer must provide an internet connection via a network cable (LAN) or WiFi (2.4 Ghz). -
Page 6: Installation Instructions
Installation Instructions Electrical Installation For one-phase systems, L2 and L3 shall not be used. In order to monitor all power usage, install the Amp Guard directly after the main switch of the building. © 2021 Charge Amps AB Address: Contact: Org. -
Page 7: Connect The Current Sensors
IMPORTANT: It is extremely important for the sensors to be connected to the correct phase, the clamps to be in the right direction and connected the correct way into the Amp Guard terminals. The sensors must be positioned correctly around the main power cables according to the indicators on the clamps. -
Page 8: Connect The Main
IMPORTANT: Each phase must be connected to the right terminal connector position for current measurement and load balancing to function correctly. The mains are used to power the Amp Guard and are used to measure voltage. The inputs for power supply are located on the bottom right and shall be connected in the right order according to N, L3, L2, L1 as shown in the illustration. -
Page 9: Network Installation
Final Result of the Electrical Installation Figure 7. Overview of the installation of Amp Guard Home Figure 8. Overview of the installation of Amp Guard Public Network Installation LAN Installation Connect a (Cat 6) network cable to the ethernet port (LAN) on the rear side of the Amp Guard: ©... -
Page 10: Wifi Installation
2. Go to mobile settings > WiFi and select the WiFi network “Amp Guard_*****” (* = Specific to Amp Guard’s serial number). 3. Connect using the password that is specific to your Amp Guard. 4. Enter the following address from a web browser: http://192.168.251.1 5. -
Page 11: Configuration In The Cloud
4. Click “Search” to find the newly imported Amp Guard. 5. Click the serial number to go to the information page. 6. Click “User” and select user as the owner of the Amp Guard. If the user is not selectable, ask the customer to create a user account. -
Page 12: Add Amp Guard To A Load Balancer Group For Chargers
3. Edit the group (the load balancer group must be deactivated to do this). 4. Select the newly imported Amp Guard and enter the correct values for the installation, see information below. 5. Click Save and activate the load balancer group. -
Page 13: Maximum Current Per Phase - Settings
Maximum Current Per Phase – Settings A higher total current per phase is permitted when an Amp Guard is installed, since the Load Balancer automatically reduces the charging output if required. There is, however, always a risk that Amp Guard will stop sending data (network problems, current switched off, etc.). -
Page 14: Rights
Charge Amps AB reserves all rights to this document, as well as the information and illustrations therein. It is strictly forbidden to – in whole or in part – copy, adapt or translate the information without prior written permission from Charge Amps AB.
Need help?
Do you have a question about the Amp Guard and is the answer not in the manual?
Questions and answers