Table of Contents
Advertisement
Quick Links
Revise Date: 1/12/2016
n:\amtryke\manuals and instructions\models\hp-1000\hp1000 w-tilt steering assembly.doc
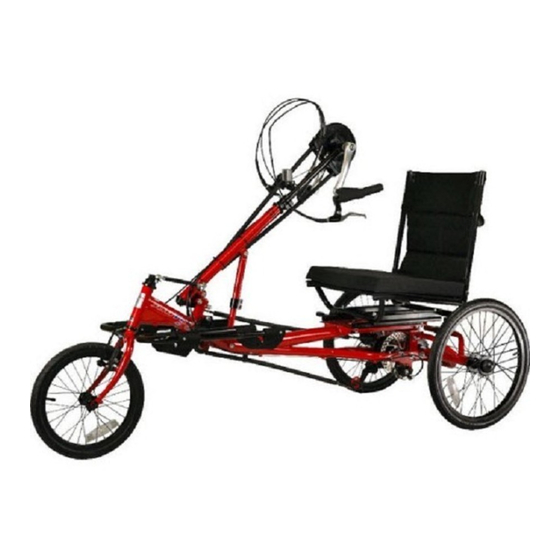
AmTryke Adult Recumbent Model HP1000
TOOLS Needed for Assembly
8 mm Socket or Wrench
10 mm Socket or Wrench
14 mm Socket or Wrench
15 mm Socket or Wrench
22 mm Socket or Adjustable Wrench
Needle Nose Pliers W/ Side Cutters
#50-HC-1000
5 mm Allen Wrench
Phillips Screw Driver
1 of 25
Advertisement
Table of Contents

Related Manuals for AmTryke HP1000


Summary of Contents for AmTryke HP1000
- Page 1 10 mm Socket or Wrench 14 mm Socket or Wrench 15 mm Socket or Wrench 22 mm Socket or Adjustable Wrench Needle Nose Pliers W/ Side Cutters Phillips Screw Driver Revise Date: 1/12/2016 1 of 25 n:\amtryke\manuals and instructions\models\hp-1000\hp1000 w-tilt steering assembly.doc...
-
Page 2: Table Of Contents
Attaching Seat Frame to Main Frame Page 10 Front Brake Page 12 Front Reflector Page 11 Cable Retainer Page 14 Wheel Reflectors Page 16 Maintenance Page 17 Parts Breakdown Page 20 Revise Date: 1/12/2016 2 of 25 n:\amtryke\manuals and instructions\models\hp-1000\hp1000 w-tilt steering assembly.doc... -
Page 3: Rear Deck Assembly
2) Slide flat washer over each side and then thread a 22mm nut on each side. Tighten using a 22mm socket or adjustable wrench, do not over tighten as wheel bearing we be damaged. 3) Install black round caps on each side, lightly tap to secure in place. Revise Date: 1/12/2016 3 of 25 n:\amtryke\manuals and instructions\models\hp-1000\hp1000 w-tilt steering assembly.doc... -
Page 4: Front Tire Installation
2) Using the thin black quick release axle, remove the thumb nut from one side and the spring. 3) Place front tire in front fork. Revise Date: 1/12/2016 4 of 25 n:\amtryke\manuals and instructions\models\hp-1000\hp1000 w-tilt steering assembly.doc... - Page 5 4) Slide shaft of quick release axle through center of rim. 5) Install spring on other side with narrow end pointing inwards, thread thumb nut back on and tighten. Revise Date: 1/12/2016 5 of 25 n:\amtryke\manuals and instructions\models\hp-1000\hp1000 w-tilt steering assembly.doc...
-
Page 6: Attaching Rear Deck To Main Frame
6) Install two upper support Allen bolts, washers and nuts using a 5mm Allen wrench & 13mm wrench. There is one on each side of the rear deck. Revise Date: 1/12/2016 6 of 25 n:\amtryke\manuals and instructions\models\hp-1000\hp1000 w-tilt steering assembly.doc... -
Page 7: Leg Supports
3) The left side will need to be pivoted to stick out like the right side & tightened down, do this after installing the main steering. Pivot Downward Remove Initial Appearance Insert Tube Tube Tighten Revise Date: 1/12/2016 7 of 25 n:\amtryke\manuals and instructions\models\hp-1000\hp1000 w-tilt steering assembly.doc... -
Page 8: Main Steering Installation
Install the Allen bolt and nut and tighten. 3) The angle of the steering/crank can be adjusted to fit the rider by loosening up the two Allen head bolts located on the collar. Revise Date: 1/12/2016 8 of 25 n:\amtryke\manuals and instructions\models\hp-1000\hp1000 w-tilt steering assembly.doc... - Page 9 13mm nut and flat Steering Linkage washer 7) Slide flat washer over front screw and thread 13mm nut, use a 5mm Allen wrench and 13mm wrench or socket to tighten. Revise Date: 1/12/2016 9 of 25 n:\amtryke\manuals and instructions\models\hp-1000\hp1000 w-tilt steering assembly.doc...
-
Page 10: Attaching Seat Frame To Main Frame
3) Move seat forward as far as it will go to expose to rear mounting holes. Repeat same process as in previous step and tighten nuts. 4) Insert seat back into seat bottom frame, use two black long Allen head bolts and two nuts to attach seat back to seat bottom. Revise Date: 1/12/2016 10 of 25 n:\amtryke\manuals and instructions\models\hp-1000\hp1000 w-tilt steering assembly.doc... - Page 11 1) Attach reflector to bracket, use Phillips head screw. Phillips head screw Bracket Reflector 2) Remove clamp screw, open clamp and place over steering stem tube. Clamp Screw Steering stem Reflector tube bracket Revise Date: 1/12/2016 11 of 25 n:\amtryke\manuals and instructions\models\hp-1000\hp1000 w-tilt steering assembly.doc...
-
Page 12: Front Brake
(i.e. 6 mm and 3 mm) so that dimension A is kept at boss, and then secure the brake body to the frame 39 mm or more. with the link fixing bolt. Revise Date: 1/12/2016 12 of 25 n:\amtryke\manuals and instructions\models\hp-1000\hp1000 w-tilt steering assembly.doc... - Page 13 1mm between each brake pad grip to check that everything is operating correctly and that the shoe clearance is correct before using the and the rim, tighten the cable fixing bolt. brakes. Revise Date: 1/12/2016 13 of 25 n:\amtryke\manuals and instructions\models\hp-1000\hp1000 w-tilt steering assembly.doc...
-
Page 14: Cable Retainer
3) Attach the cable retainer to upper chain guard bracket using a zip tie. Clip off excess zip tie. Cable retainer attached to upper chain guard bracket with zip tie. Revise Date: 1/12/2016 14 of 25 n:\amtryke\manuals and instructions\models\hp-1000\hp1000 w-tilt steering assembly.doc... - Page 15 Cable retainer attached to Rear brake, Front brake and Gear upper chain guard bracket shift cables attached to the cable with zip tie. retainer with zip tie. Revise Date: 1/12/2016 15 of 25 n:\amtryke\manuals and instructions\models\hp-1000\hp1000 w-tilt steering assembly.doc...
-
Page 16: Wheel Reflectors
Remove Phillips head screw and 8mm nut located behind it. (not Shown the 8mm nut) Revise Date: 1/12/2016 16 of 25 n:\amtryke\manuals and instructions\models\hp-1000\hp1000 w-tilt steering assembly.doc... - Page 17 4) Use a screwdriver to lift the chain up in the front and turn the hand crank counter clockwise while doing so until it grabs the chain and pulls it outwards. Insert screw driver here and lift up on chain. Revise Date: 1/12/2016 17 of 25 n:\amtryke\manuals and instructions\models\hp-1000\hp1000 w-tilt steering assembly.doc...
- Page 18 5) Place chain on front side of sprocket and rotate crank arm counter clockwise until chain is on sprocket completely. Front of Sprocket 6) Repeat steps 1, 2 & 3 in reverse to finish reinstalling the chain. Seating Assembly Seat back frame and covering. Revise Date: 1/12/2016 18 of 25 n:\amtryke\manuals and instructions\models\hp-1000\hp1000 w-tilt steering assembly.doc...
- Page 19 Front Tire Front tire and quick release axle (Page 5) Quick release axle Revise Date: 1/12/2016 19 of 25 n:\amtryke\manuals and instructions\models\hp-1000\hp1000 w-tilt steering assembly.doc...
- Page 20 Rear Deck Assembly Rear deck frame Rear deck frame to main frame mounting hardware Black round nut caps Chain and master link Rear deck and mounting hardware Revise Date: 1/12/2016 20 of 25 n:\amtryke\manuals and instructions\models\hp-1000\hp1000 w-tilt steering assembly.doc...
- Page 21 Rear Tires Tire direction must be followed Revise Date: 1/12/2016 21 of 25 n:\amtryke\manuals and instructions\models\hp-1000\hp1000 w-tilt steering assembly.doc...
- Page 22 Main Frame Hand cranks Main Steering Tube Front Fork Leg Supports Main hub Revise Date: 1/12/2016 22 of 25 n:\amtryke\manuals and instructions\models\hp-1000\hp1000 w-tilt steering assembly.doc...
- Page 23 Hardware Leg support Center steering Upper support Allen bolts, Brake noodle and cable cover bolt, washers stem bolt and washers and nuts and nut washer Cable Retainer Revise Date: 1/12/2016 23 of 25 n:\amtryke\manuals and instructions\models\hp-1000\hp1000 w-tilt steering assembly.doc...
- Page 24 Steering Linkage Steering Linkage Revise Date: 1/12/2016 24 of 25 n:\amtryke\manuals and instructions\models\hp-1000\hp1000 w-tilt steering assembly.doc...
- Page 25 Rear reflector and bracket Front reflector and bracket Wheel reflectors and spoke securing pins Questions or Concerns Regarding your Build? No problem! Please Contact Derek Shaw, AmTryke Technical and Customer Support Coordinator @ 1-800-838-1845 x114 or dereks@ambucs.org Revise Date: 1/12/2016 25 of 25 n:\amtryke\manuals and instructions\models\hp-1000\hp1000 w-tilt steering assembly.doc...
Need help?
Do you have a question about the HP1000 and is the answer not in the manual?
Questions and answers