Table of Contents
Advertisement
Quick Links
Advertisement
Table of Contents

Subscribe to Our Youtube Channel
Related Manuals for Taga Harmony HTR-1000CD


Summary of Contents for Taga Harmony HTR-1000CD
- Page 1 HTR-1000CD v.2 HYBRID STEREO CD-RECEIVER Instruction Manual Edition 04-2021...
- Page 2 Introduction Thank you for purchasing this TAGA Harmony hybrid CD-Receiver. TAGA Harmony HTR-1000CD v.2 is a high-fidelity, stereo hybrid FM/DAB+ receiver with a built-in CD player. Key features: • Compact size and sleek aluminum front panel design is suitable for most interiors.
-
Page 3: Table Of Contents
Contents Safety Instructions Remote controller Front and Rear Panel Hooking Up Speaker Cables Hooking Up the CD-Receiver Hooking Up a Subwoofer Operation ECO-Power/Standby features Setting the Clock INPUT selection Sound Control Headphone connection Dimmer DAB radio operation FM radio operation CD player operation Play from a USB Flash Drive Bluetooth... -
Page 4: Safety Instructions
NOT EQUIPPED WITH A USER REPLACEABLE FUSE - REFER REPLACEMENT TO QUALIFIED SERVICE PERSONNEL. WARNING: THE UNIT MAY BECOME HOT. ALWAYS PROVIDE ADEQUATE VENTILATION TO ALLOW FOR COOLING. DO NOT PLACE THE UNIT NEAR A HEAT SOURCE, OR IN SPACES THAT CAN RESTRICT VENTILATION. EN_safety_02-20_1 HTR-1000CD v.1... - Page 5 Safety Instructions 1. Read Instructions - All the safety and operating instructions 13. Overloading - Do not overload wall outlets, extension cords or should be read before the product is operated. integral convenience receptacles as this can result in a risk of fire 2.
-
Page 6: Remote Controller
Remote Controller • Always use 2025 battery and do not use the rechargeable batteries. • If the battery runs out, remove the old battery and replace it with a new one within several minutes. • If the battery is placed incorrectly, it can cause explosion. •... - Page 7 Remote Controller 1. Standby Button ( ) 2. CD function Button ( 3. Tuner / DAB function Button ( 4. Mode Button (MODE) 5. AUDIO IN function Button (AUDIO IN) OPTICAL function Button (OPTICAL) 6. Loudness Button (LOUDNESS) 7. Preset Equalizer Button (P-EQ) 8.
-
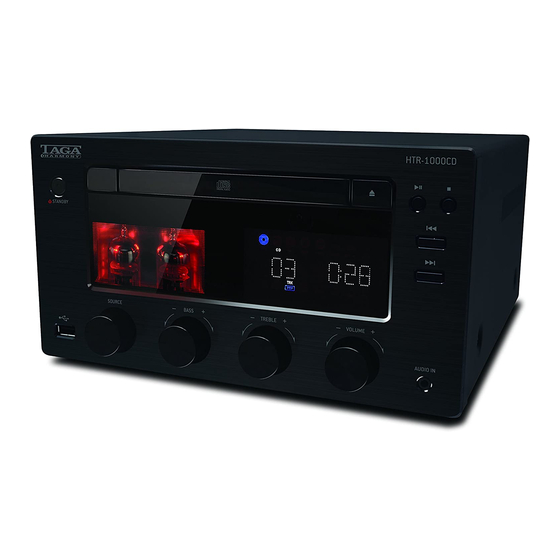
Page 8: Front And Rear Panel
Front and Rear Panel Front Panel: 1. Standby Button 2. Disc Tray Door 3. Bluetooth Input Indicator ® 4. Remote Controller Sensor 5. Open/Close Button 6. Play/Pause Button 7. Stop Button 8. Previous Button Search Backward Button Tuning Backward Button 9. - Page 9 Front and Rear Panel Rear Panel: 18. Digital Input OPTICAL 19. AUX Stereo RCA Input 20. Subwoofer RCA Output 21. Speaker Connectors: Right and Left Channel Output 22. DAB/FM Antenna Socket 23. Power Cable Input...
-
Page 10: Hooking Up Speaker Cables
Hooking Up Speaker Cables The Speaker Connectors can accommodate up to 10AWG speaker cables as well as most of popular plugs (banana etc.). It is recommended to leave about 150 cm (5 feet) of extra cable at the CD-Receiver end to facilitate positioning and installation of the CD-Receiver. -
Page 11: Hooking Up The Cd-Receiver
Hooking Up the CD-Receiver 1. Make sure that the Power Cable is disconnected from the CD-Receiver and the wall outlet. 2. Connect the supplied DAB/FM antenna to the DAB/FM antenna socket on the rear panel. For better DAB/FM reception, we recommend using an outdoor DAB/FM antenna (not supplied with this product). - Page 12 Hooking Up the CD-Receiver 5. If you want to play music from audio source devices (CD player, satellite or TV tuner, smartphone etc.): a. equipped with an analog RCA output - using an RCA interconnect cable connect it to the analog input on the rear panel (AUX IN).
- Page 13 Hooking Up the CD-Receiver 7. If you want to play digital audio files connect a USB Flash Drive (no supplied with this product) to the USB Port on the front panel. Make sure that this CD-Receiver supports the files you want to play.
-
Page 14: Operation
Operation Plug the Power Cable to the CD-Receiver and into the electrical outlet. Note! Check “Additional Information” for other useful operating instructions. ECO-Power/Standby features Switching ON / OFF When you connect the CD-Receiver to the electrical outlet for the first time, it will be in the Stand- by mode. -
Page 15: Setting The Clock
Operation Setting the Clock Setting the Clock Manually Note! You can set the Clock in the Standby mode only. 1. In the Standby mode, press and hold the CLOCK button to activate the Clock setting mode, [24] begins to blink on the Display. 2. -
Page 16: Sound Control
Operation Sound Control High volume levels can damage this CD-Receiver and / or speakers. This may void your warranty. VOLUME Regulator: Using the VOLUME Regulator on the front panel or the VOL + and VOL - buttons on the remote controller, you can adjust the sound volume from minimum to maximum. -
Page 17: Headphone Connection
Operation S-BASS super bass: The S-BASS function is used to reinforce the quality and strength of the bass output - it is inten- ded only to be used at low listening levels. The function is controlled by the S-BASS button. S-BASS ON –... -
Page 18: Dab Radio Operation
Operation DAB radio operation Note! • Make sure that you have correctly connected and fully extended the antenna. • You can program up to 30 DAB radio stations. Program DAB radio stations automatically 1. Rotate the INPUT knob on the front panel or repeatedly press the button on the remote controller to select the DAB input. -
Page 19: Fm Radio Operation
Operation DAB Information Display Depending on the DAB radio station you are tuning to, some information may be unavailable. Repeatedly press the INFO button to display the following information. • Station Name When an DAB station is received, the name of that station will be displayed. •... -
Page 20: Cd Player Operation
Operation Program radio stations • Automatically Press and hold the PROG button for 2 seconds or more to activate the automatic Program mode. ◦ [SCANING] is displayed. ◦ All available stations are programmed and stored. ◦ The first programmed radio station is broadcasted automatically. •... - Page 21 Operation Programme Play You can programme up to 20 tracks to play in any desired order. The player must be in the Stop mode only with a CD disc inserted. 1. Insert a disc and press the ■ button when it starts playing. 2.
- Page 22 Operation To Select Album • Press the ALB+/- buttons to select the next/previous album, and play the first track of this album. • If the playing has ended, press the ALB+/- buttons to select the next/previous album. Playing Repeatedly (MP3/WMA disc) •...
-
Page 23: Play From A Usb Flash Drive
Play from a USB Flash Drive This CD-Receiver can play music from some USB Flash Drives and supports MP3 and WMA audio files. 1. Insert the USB Flash Drive into the USB port on the front panel. 2. Rotate the INPUT knob on the front panel or press the button on the remote controller to select the USB input. -
Page 24: Bluetooth Connection
Note! For elder audio source devices, you may need to input “0000” as a pairing password. 5. HTR-1000CD v.2 will now be ready to play your music wirelessly within a range of approxima- tely 5 meters. Start playback on your audio source device. -
Page 25: Setting The Sleep Timer
Setting the Sleep Timer When the CD-Receiver is turned on, repeatedly press the SLEEP button to select a set period of time (in minutes): 120, 90, 60, 45, 30, 15. When the Sleep Timer is activated, the [SLEEP] is displayed on the Display. To deactivate the Sleep Timer Press the SLEEP button repeatedly until [SLEEP OFF] is displayed on the Display. -
Page 26: Additional Information
Additional Information Break-In Your TAGA Harmony CD-Receiver sounds great immediately after it is taken out of the carton but as all hybrid devices, this CD-Receiver requires a “break-in” period to reach its full sonic capabi- lities. During the “break-in” period it is recommended to operate the CD-Receiver at moderate volume levels. - Page 27 Additional Information Handling of CD discs Playback side • Do not touch the playback side of the disc. • Do not attach paper or tape to the disc. Cleaning Discs • Fingerprints and dust on the disc cause picture and sound deterioration. Wipe the disc from the centre outwards with a soft cloth.
-
Page 28: Specifications
Specifications Vacuum tubes 2 x ECC83 PSVANE Classic Series Power output / impedance 2 x 75W RMS 4Ω, Class D Compatibile CD formats CD-Audio, CD-R/RW (audio files MP3, WMA) Tuner: FM (87.5 - 108MHz) RDS Radio section DAB+ (174.928 - 239.200 MHz) Preset: 20 FM / 30 DAB+ Wireless connectivity Bluetooth... - Page 29 Notes...
- Page 30 Notes...
- Page 31 Notes...
-
Page 32: Kit Content
We strongly advise to contact a professional installer or dealer in order to install TAGA Harmony products. We recommend using high quality TAGA Harmony cables and other installation accessories. Kit Content: CD-Receiver 1 EA Remote Controller 1 EA DAB/FM Antenna...
Need help?
Do you have a question about the HTR-1000CD and is the answer not in the manual?
Questions and answers