Advertisement
Quick Links
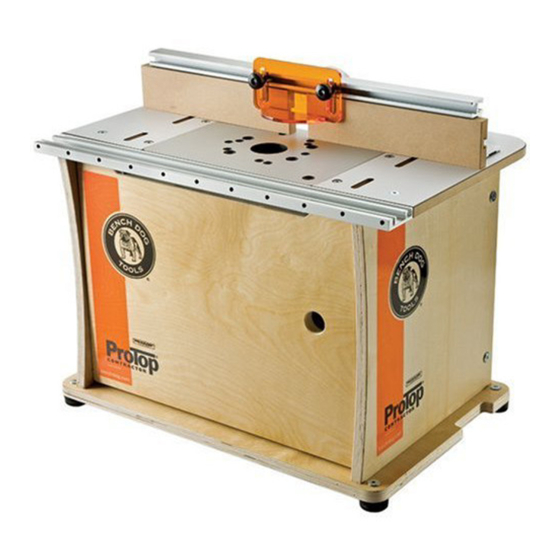
Thank you for purchasing our ProTop
Contractor router table! We are certain this
made in USA router table, with its many
exclusive features, will become one of your
favorite tools.
Bench Dog offers a full line of tools and
accessories that continue Bench Dog's
commitment to solve common problems
and ensure safe operation of a variety of
woodworking and other tools.
If you have questions, please feel free to
contact us at any time. Your comments are
always welcome.
QUESTIONS?
1-800-786-8902
Be sure to check out our web site for all the
latest and greatest accessories and tools.
www.benchdog.com
Bench Dog, Inc.
3310 5th St. NE
Minneapolis, MN 55418
612.782.8205 main
612.788.2518 fax
800.786.8902 toll free
info@benchdog.com
benchdog.com
Tools Required
1/8" hex wrench (supplied)
5/32" hex wrench (supplied)
3/16" hex wrench (supplied)
7/16" wrench
7/16" socket wrench
Phillips screwdriver
Read and understand the entire contents
of this manual before attempting assembly
or operation of this tool! Inspect contents
for shipping damage and shortages. Report
problems directly to Bench Dog, Inc.
Owner's Manual
Keep this manual handy for
quick reference
Stock No. 40-001
82-0036-08 1204
2004 Bench Dog, Inc.
Advertisement

Related Manuals for Bench Dog Tools Pro-Builder Series


Summary of Contents for Bench Dog Tools Pro-Builder Series
- Page 1 Owner's Manual Keep this manual handy for quick reference Stock No. 40-001 Thank you for purchasing our ProTop Contractor router table! We are certain this made in USA router table, with its many exclusive features, will become one of your favorite tools.
- Page 2 General Conditions / Limited Two Year Warranty LIMITED TWO-YEAR WARRANTY We make every effort to assure that our products meet quality and durability standards, and warrant to the original retail purchaser that this product is free from defects in materials and workmanship for two years. Remedy shall be limited to Bench Dog’s choice of repair, replacement or refund.
- Page 3 Contents of Box Cabinet Panels Fence Hardware/Accessories Item Quantity Part Number Description Item Quantity Part Number Description FP0054 Bit guard FP0100-01 Router top FP0059 Dust port FP0100-02 Base panel R0001 Aluminum fence FP0100-03 Door FP0053 Subfences FP0100-04 Side panel, left R0009 Jointer bars FP0100-05...
- Page 4 Hardware bag #1 Item Quantity Part Number Description H0168 Bolt, 3/8-16 x 2-3/4" Carriage H0004 Bolt, 1/4-20 x 3/4" Hex head H0006 Bolt, 1/4-20 x 50mm (2") Round head H0005 Bolt, 1/4-20 x 40mm (1-1/2") Round head shoulder H0173 Cap screw, 1/4-20 x 1-1/4" Button head socket Contents H0017 Cross Dowel, 1/4-20...
- Page 5 Assembly Instructions 1. Attach the (2) hinges to the door. Press the hinge "cups" into the large bore in the door. With a Phillips screwdriver tighten the integral hinge cams clockwise approximately 1/4 turn. Do not over tighten the cams. 2a.
- Page 6 4. Attach the (4) rubber feet to base panel. Insert the "T" nuts into the four large holes in the base panel. Locate the head of the "T" nut on the top side of the base panel. The bottom of the base panel has countersinks, the top does not. Insert a 1/4-20 x 3/4"...
- Page 7 7. Install the (8) leveling screws. Fully thread a 1/4" hex nut on each of the (8) 1/4-20 x 3/4" socket head cap screws. Install these bolt assemblies into the (8) leveling holes in the insert brackets. DO NOT use the two insert plate attachment holes.
- Page 8 11. Fully tighten all bolts and screws. Correct any misalignments at this time. 12. Adjust miter gauge track to fit your miter gauge. First test fit your miter gauge into the track. If it's too tight, squeeze the gib against the front wall of the miter track with a pair of Channel Locks, use a shop towel to prevent marring.
- Page 9 14. Attach door. first hook Clip on door by "hooking" front of hinge onto hinge mounting hinge to plate first. Then push on back edge of hinge until it locks into plate here place. If door does not clip on, check hinge mounting plates for proper installation.
- Page 10 18. Attaching fence to routertop (reverse mounting). For more workpiece support, the fence can be reversed and positioned on the "front" of router table, as shown. Install the bolts from inside the cabinet. 19. Attach the dual position bit guard to fence. Pre-assemble the guard with the (2) 1/4-20 x 3/4"...
- Page 11 Operational Tips Securing the router table The base has rubber feet to reduce vibration and slippage of the base on a smooth surface. For permanent mounting, the base can be bolted through the rubber feet to a workstation or bench. For a secure yet portable mounting, the base is equipped with two special recesses that accept scrap 2 x 4 dimensional lumber.
- Page 12 Feed Direction Always feed the workpiece against the cutter A typical set-up. Here, the fence is rotation, as shown. Feeding the workpiece with partially covering the router bit. the cutter rotation is called "climb cutting". Climb cutting is very dangerous, because the cutter will grab the workpiece and thrust it the same direction routertop (top view) as the cutter rotation.
- Page 13 Adjusting the Subfences The (2) MDF (medium density fiberboard) subfences are designed to slide along the fence approximately 2". This results in a router bit opening from 0 to 4". A. "Close" Setting Many applications require adjusting the subfences close to the router bit.
- Page 14 Jointing Jointing is the process of making flat, square and straight mating edges. Jointing is necessary when two boards are edge glued to create a larger panel. It is also used to "fit" pieces together, as well as to trim stock to size.
Need help?
Do you have a question about the Pro-Builder Series and is the answer not in the manual?
Questions and answers