Advertisement
Quick Links
Advertisement

Related Manuals for Vivotek Stainless Steel Housing Series


Summary of Contents for Vivotek Stainless Steel Housing Series
- Page 1 Stainless Steel Housing Series Quick Installation Guide Rev. 1.0...
- Page 2 UNPACKING: Unpack carefully. Electronic components can be damaged if improperly handled or dropped. If an item appears damaged in shipment, place it properly in its carton and notify the shipper. IMPORTANT!: 1. Read and follow Instructions: All operating and user instructions should be read and followed before the unit is to be operated.
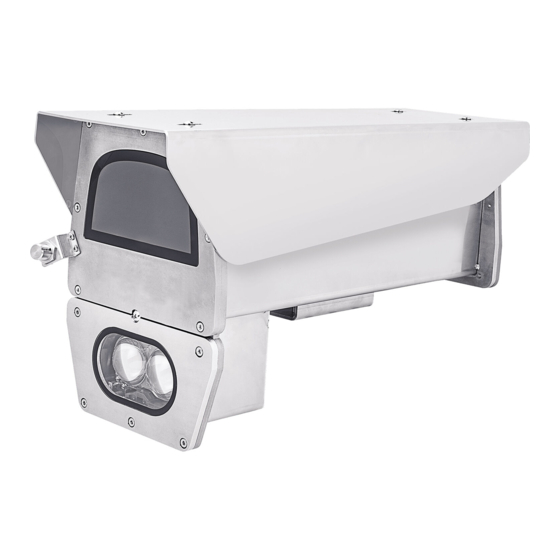
- Page 3 Swivel Positions and Directions Dimensions 460.0 mm(18.11") 370.0 mm (14.56") 172.0 mm (6.77") 401.1 mm (15.79") 88.0 mm (3.46") (9.64") 245.0 mm 130.4 mm(5.13") 460.0 mm(18.11") 119.9 mm (4.72") 29.9 mm 370.0 mm (14.56") (1.17") 401.1 mm (15.79") 172.0 mm (6.77") 245.0 mm (9.64")
-
Page 4: Component Description
Dimensions with the IR unit and wiper 130.4 mm(5.13") 460.0 mm(18.11") 119.9 mm (4.72") 29.9 mm 370.0 mm (14.56") (1.17") 401.1 mm (15.79") 172.0 mm (6.77") Component Description AE-510 24VAC Power distribution board Camera Mounting Platform... - Page 5 AE-510-I 24VAC Power distribution board Terminal block Camera Mounting Platform VAIR module Wiper...
-
Page 6: Installation Suggestions
Installation Suggestions WARNING: • When install a housing with an IR illuminator: Please avoid eye exposure or apply appropriate protection, such as wearing a pair of Infrared protection glasses, when working with the product. Always use camera live view to oberve IR lighting effects. - Page 7 Prepare power wires, a ground wire, and a CAT5e Ethernet cable. Pass them through the PG16 waterproof connectors and its waterproof components. Ethernet cable Ø4 ~ 6.5mm Power wires Note that some cables are connected when shipped. You do not need to connect heater, blower, and the front IR powere wires.
- Page 8 Assemble the camera components, e.g., the CS ring and lens module. Secure the mounting plate to the bottom of the camera (the label side) using the included screw. Connect 24V power source to the power input terminal. Connect power wires from the DC 12V output to the camera.
-
Page 9: I/O Terminal Block
AE-510-I I/O terminal block 24V AC OUT Heater Power LED Blower 12V DC OUT 24V AC IN IR angle selector Connectors to the front IR Below is the pinouts for the DI/DO terminal block: Facing the rear side of the housing, from left to right: Connect to tank water pump. - Page 10 DIP Switch : beam angle for different effective illumination range. VAIR no. of LEDs Beam 10° 20° 30° 40° 10° 20° 30° 40° angle Distance 140m 110m 80m 100m 80m (meter)
- Page 11 Connection for IR control by IR light sensor, RS485 and camera digital output (AE-510-I) 1. IR control by IR Light sensor The below connection enables the synchronization of IR light sensor and auto day/night switch on the camera Camera Terminal Block Enclosure Terminal Block AWG26 AWG20...
- Page 12 3. IR control by Camera DO Camera will automatically trigger IR light on/off via DO. Camera Terminal Block Enclosure Terminal Block AWG26 Below is a diagram for water tank and wiper control. The wiper can be started by manually triggering the Digital Output from the camera user interface. Camera Terminal Block Enclosure Terminal Block AWG26...
- Page 13 Before closing the housing reinsert the bottom orientating the slide according to the installation required, on the wall bracket or on the Pan & tilt head, for the right camera The front end of the slider is about 70mm from the window. Please install the camera in the appropriate position.
- Page 14 Sunshield mounting: The housing can also be installed using the pole-mount or corner-mount. Stainless Steel Camera Housing Pole Mount Corner Mount Stainless Steel Camera Housing...
- Page 15 Open a web console with the camera. Use the Media > Focus function to tune for a best image focus on your target area. If preferred, e.g., shooting fast moving vehicles, select the 60fps frame rate.
- Page 16 synchronized with the digital input you connected. In the night mode, check if the input signals are correctly detected. You may simulate the night mode by blocking the IR unit's light sensor. Change the triggering parameters when necessary.
- Page 17 Appendix: RS485 Commands For housings that come with IR illuminators, wiper, and washer, commands can be delivered via the RS485 protocol. The RS485 connection uses the Pelco D protocol. Baud rate 2400 Data bits Parity None Stop bit Command format: Byte1 Byte2 Byte3...
- Page 18 For example, IRmode_Auto FF 01 00 18 02 02 1D IRmode_DI FF 01 00 18 02 03 1E IRmode_CMD FF 01 00 18 02 04 1F LightSensorGate FF 01 00 18 03 LL CKSM When the IR Mode Light Sensor Auto, the Lux value to turn IR LED can be LL: Lux, changes is made by every10Lux...
- Page 19 You can create custom command buttons by entering the Button name and the command itself: VaIR: The VAIR control include those on the IR Led and VaIR Lens. There are 3 IR mode commands IRMode = Light Sensor Auto (Default) sensor lux reading <...
- Page 20 This page is intentionally left blank.
Need help?
Do you have a question about the Stainless Steel Housing Series and is the answer not in the manual?
Questions and answers