
Subscribe to Our Youtube Channel
Related Manuals for Greenlee 776


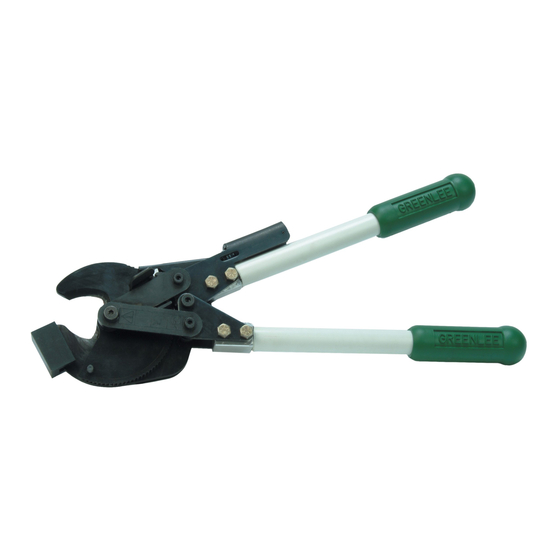
Summary of Contents for Greenlee 776
- Page 1 INSTRUCTION MANUAL Ratchet ACSR Cutter Read and understand all of the instructions and safety information in this manual before operating or servicing this tool. 99949598 REV 4 © 2019 Greenlee Tools, Inc. 2/19...
-
Page 2: Table Of Contents
All specifications are nominal and may change as design improve- • 605.0 kcmil – Peacock ments occur. Greenlee Tools, Inc. shall not be liable for damages • 636.0 kcmil – Kingbird, Swift, Rook resulting from misapplication or misuse of its products. -
Page 3: Important Safety Instructions
776 Ratchet ACSR Cutter IMPORTANT SAFETY INFORMATION SAFETY ALERT Keep hands away from closing SYMBOL blades. This symbol is used to call your attention to hazards or unsafe practices which could result in an injury or property damage. The signal word, defined below, indicates the severity of the hazard. -
Page 4: Identification
776 Ratchet ACSR Cutter Identification Movable Grips handle Link Speed pawl Movable blade Stationary blade Stationary handle Keeper Release knob Specifications Mass/Weight ....................2.8 kg (6.2 lb) Length ....................505 mm (19.87") Width at blades .................... 127 mm (5.0") at handles ..................159 mm (6.25") Thickness .................... -
Page 5: Operation
776 Ratchet ACSR Cutter Operation 1. Check to see that the release knob is against the link. release knob Electric shock hazard: link This is not an insulated tool. engage Contact with live circuits could result in severe injury or death. -
Page 6: Maintenance
776 Ratchet ACSR Cutter Maintenance General Lubricating the cutter Maintain the tool with care. Keep the blades sharp and the tool clean for better and safer performance. Follow instructions for lubricating the cutter; lubrication prolongs the tool life and enables the tool to cut with less force. -
Page 7: Disassembly
776 Ratchet ACSR Cutter Disassembly Cutter head This tool consists of three subassemblies: the cutter head, stationary handle, and movable handle sub- 1. Open the movable blade to release tension on the assemblies (see figure). blade return spring (36). 1. Cutter head assembly: movable blade (1), 2. -
Page 8: Cutter Head
776 Ratchet ACSR Cutter Assembly 4. Install end of spring (36) over roll pin (14) and Refer to the Exploded View and Parts List for correct orientation and placement of parts. Inspect and replace assemble spacer (25), and cover (10). Apply Loctite any worn or damaged parts. -
Page 9: Stationary Handle
776 Ratchet ACSR Cutter Assembly (continued) Stationary handle Movable handle 8. Assemble handle plates (5) to handle unit (39), 10. Assemble right and left handle plates (8 and 9) to but do not tighten hex screws (30). handle unit (38), but do not tighten hex screws (31). -
Page 10: Movable Handle To Stationary Handle
776 Ratchet ACSR Cutter Assembly (continued) Movable handle to stationary handle Cutter head to stationary handle 16. Install movable handle assembly between the 19. Install torsion spring (40) onto holding pawl (6) stationary handle plates and align 3/8" pivot holes. -
Page 11: Cutter Head To Movable Handle
776 Ratchet ACSR Cutter Assembly (continued) Cutter head to movable handle 23. Lubricate the ID and teeth on drive pawl unit (7). Install drive pawl unit between right and left handle plate (8 and 9) with teeth toward speed pawl. Install a 5/16 x 1-1/4"... -
Page 12: Illustration
776 Ratchet ACSR Cutter Illustration Greenlee Tools, Inc. 4455 Boeing Dr. • Rockford, IL 61109-2988 USA • 815-397-7070... -
Page 13: Parts Lists
776 Ratchet ACSR Cutter Parts List Part No. Description Blade assembly, movable (includes key 32) ........1 Blade, stationary .................1 50105213 Lever, release ..................1 50105248 Link .....................3 50105264 Plate, stationary handle ..............2 50105280 Pawl, holding ..................1 50106317 Pawl unit, drive (includes key 42) ............1 50105310 Plate, right handle ................1... - Page 14 Guide, 5/16 screw ................1 4455 Boeing Drive • Rockford, IL 61109-2988 • USA • 815-397-7070 USA Tel: 800-435-0786 Canada Tel: 800-435-0786 International Tel: +1-815-397-7070 ©2019 Greenlee Tools, Inc. • An ISO 9001 Company Fax: 800-451-2632 Fax: 800-524-2853 Fax: +1-815-397-9247 www.greenlee.com Greenlee Tools, Inc.
Need help?
Do you have a question about the 776 and is the answer not in the manual?
Questions and answers