Hive Active Heating Installation Manual
Hide thumbs
Also See for Active Heating:
- User manual ,
- Installation manual (37 pages) ,
- Install manual (28 pages)
Advertisement
Quick Links
Advertisement

Related Manuals for Hive Active Heating


Summary of Contents for Hive Active Heating
- Page 1 Hive Active Heatin Thermostat installation uide...
- Page 2 • An existin broadband connection with a spare Ethernet port • An Android or Apple smartphone to control your heatin via the app or an up to date web browser. Installation order For quick and e cient setup install Hive Active Heatin in this order: Central water heating...
-
Page 3: Table Of Contents
Please remember that for your own safety Hive Active Heatin should always be installed by a qualified professional. Contents The hub pa e 3 The receiver pa e 7 The thermostat pa e 23 Controllin your thermostat remotely pa e 30... -
Page 4: The Hub
The Hive Hub If you already have a Hive Hub just put it into pairin mode. To do this press the button at the rear of the hub for second and release it. The middle li ht should now flash AMBER showin it is in pairin mode. - Page 5 1a – Installin your hub To install the hub, there must be a broadband connection with a spare network port and a power socket must be nearby. Once this has been located, connect the hub as follows: Connect the hub to the household’s broadband router usin the network cable provided.
- Page 6 Once the AMBER li ht is flashin , the hub is set up and you can move onto installin the receiver. If no li hts are displayed immediately after the hub has been turned on, check all cables are connected and the power socket works. If the problem still persists contact Hive Technical Support.
- Page 7 Installation and start-up. Do not disconnect the hub. The hub is attemptin to If flashin continues after 15 minutes, connect to the Hive contact Hive Technical Support to servers and update itself. confirm that it has connected. Installation. The hub AMBER...
-
Page 8: The Receiver
BS7671 (The IET Wirin Re ulations), and the appropriate Buildin Re ulations or Standards in place. • The Hive receiver is double insulated so doesn’t need an earth connection. You’ll find a tether on the backplate to secure an earth wire if needed. •... - Page 9 Installin the correct receiver Hive Active Heatin has two types of receiver: Sin le channel receiver for combi boilers and additional plumbed heatin zones Dual channel receiver for conventional boilers with hot water tanks...
- Page 10 Wirin labels Use the labels provided and attach them to the wires to help you remember which one is which durin the installation. Sticker here...
- Page 11 2a – Installin the receiver You should fit the receiver in a convenient location close to the boiler or central heatin system. Make sure it’s at least cm away from lar e metal objects, such as a boiler or hot water cylinder, to avoid interference with radio si nals.
- Page 12 Fix the backplate to the wall with the terminals at the top. Run cable from the boiler or wirin centre (if required), then continue on to the next section to wire up the backplate.
- Page 13 2b – Sin le channel 2b – Dual channel receiver wirin receiver wirin Permanent neutral Permanent neutral Permanent live Permanent live Common Hot water o (NC) Heatin o (NC) Heatin o (NC) Heatin on (NO) Hot water on (NO) (unused) Heatin on (NO) Earth Earth...
- Page 14 2c – Testin the boiler To test the receiver to boiler connection follow these steps: Visually check the wirin to confirm that the connections have been carried out correctly, referrin to the labels on the wires and any photo raphs taken before replacement be an Confirm that the receiver’s front panel is in place and that it is safe to commission the boiler Check the middle li ht on the Hub is flashin Amber –...
- Page 15 If the existin controller doesn’t have a compatible backplate, remove it completely and wire in the Hive receiver in its place. If needed you can use a stand-off plate (SP, supplied separately) to create space to accommodate existin wirin , or use a decoration plate (DP) when replacin a lar er controller.
- Page 16 . If you are installin into a ravity-fed or part pumped system, complete the wirin and then switch the Hive receiver to ‘ ravity-fed’ mode as follows:...
- Page 17 Important information: Multizone receiver installation If you’ r e installin Hive Multizone, you’ll need to install all the receivers before proceedin to the next step. Note: Hive Multizone can support up to six heating zones and one hot water zone. Each Multizone installation should include a maximum of: Six sin le channel receivers One dual channel and five sin le channel receivers...
- Page 18 Hot tips: See pa e 13 (section 2c) on how to confirm receivers are installed and operatin the heatin system correctly. Label the receivers once you have installed them so that it’s clear which receiver controls which zone. See pa e 31 on how to set-up Multizone.
- Page 19 Important information: Stand-alone installation For Hive Active Heatin a hub, a receiver and a thermostat are installed. When this service hasn’t been bou ht, the thermostat and receiver can also be installed without a hub. This is known as ‘stand-alone’ mode.
- Page 20 Activatin stand-alone mode Remove the batteries from the thermostat Switch off the boiler and receiver Wait at least 5 seconds, then turn the boiler and receiver back on. The receiver’s status li ht will be in to flash AMBER Press and hold the heatin button for at least 10 seconds – until the status li ht be ins to flash WHITE.
- Page 21 At any time you can check what mode the receiver is set to by switchin it off then on. When power is restored the status li ht will flash for 5 seconds – AMBER for Hive Active Heatin , WHITE for ‘stand-alone’ mode.
- Page 22 Heatin is on. heatin Central GREEN Flashin Commands queued. The Hive receiver protects heatin The receiver has received the boiler from dama e that 2 or more commands to may occur if it’ s switched on switch the boiler on or off and off very quickly.
- Page 23 Pattern Meanin Notes Status GREEN Solid Normal operation. The receiver is connected to the rest of the Hive system and operatin normally. Status BLUE Solid The system is in See ravity-fed mode section of ravity-fed mode and is this manual on pa e 15.
-
Page 24: The Thermostat
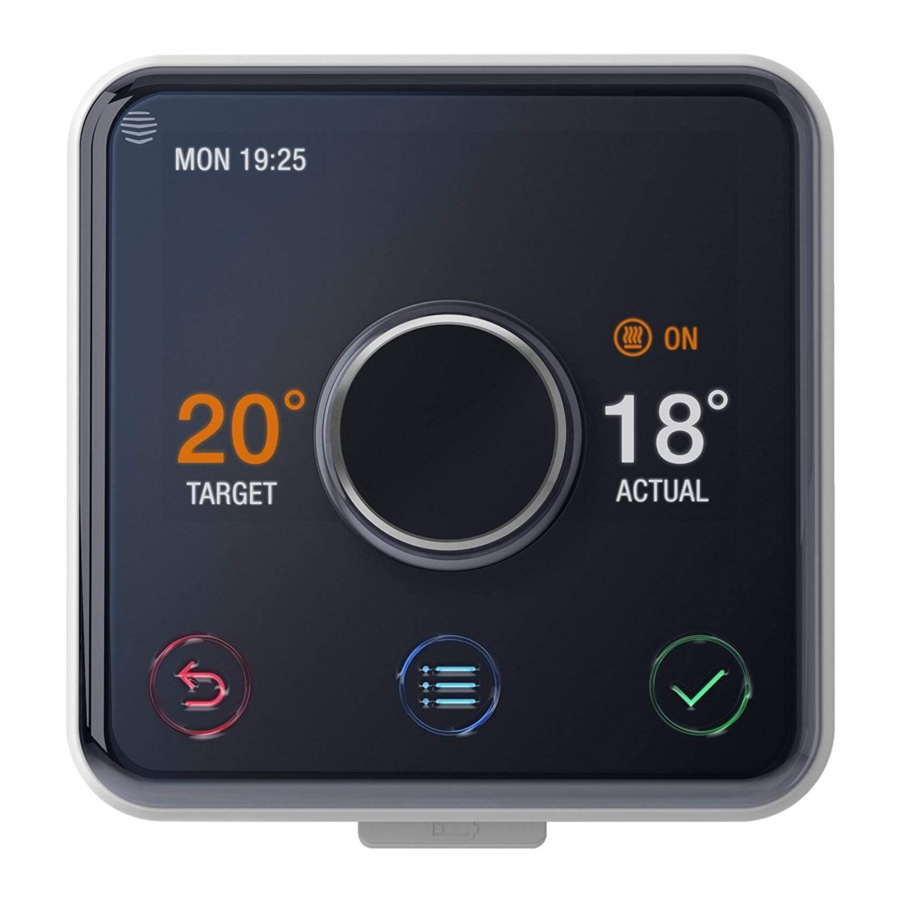
The thermostat Hot Water Heatin Boost Boost Screen Dial Back Confirm Menu For the thermostat to work accurately, it’s important that you install it in the ri ht location. - Page 25 3a – Selectin a location for the thermostat The thermostat should be fixed to an internal wall, 1.5m from the floor and away from heat sources that could a ect its operation, such as radiators and areas in direct sunli ht. To make accurate temperature readin s, the thermostat needs a free flow of air, so make sure it’s installed in an area not covered by curtains or similar objects.
- Page 26 3b – Wall mountin the thermostat Remove the backplate of the thermostat by pressin the lever at the bottom and pullin away from the front of the device. Once you’ve found a suitable location, fix the backplate to the wall usin the appropriate fixin s.
- Page 27 3c – Confirmin the hub is ready to connect Before insertin the batteries into the thermostat, check the hub is flashin AMBER – this means it’s ready to connect. If it is showin a solid AMBER li ht, turn it o then on, and then switch the receiver and boiler o and then on a ain too.
- Page 28 The battery compartment is located at the back of the thermostat and is only accessible when the front of the thermostat is removed from the backplate. Insert the 4 x AA batteries provided. If you are installin Hive Multizone only insert batteries into one thermostat at a time.
- Page 29 The receiver will display a solid GREEN status li ht or a BLUE li ht if it’s in ravity-fed mode. If installin Hive Multizone the status li ht will o GREEN on one receiver only. This is correct as the batteries should only be inserted into one thermostat at a time.
- Page 30 3e – Final steps Installation is almost complete. All that’s left to do is: Hook the thermostat onto the backplate and click it in place Remove the screen protector from the front of the thermostat Confirm the system is properly confi ured by checkin : •...
-
Page 31: Controllin Your Thermostat Remotely
Controllin your thermostat remotely Hive Active Heatin is now installed, there is one final step to link your thermostat to your Hive account. Download the Hive app Lo in usin the email address and password you re istered with OR If you haven’t already ot a Hive account, tap ‘Create Account’ on the app Lo in screen or create one at hivehome.com/re ister. -
Page 32: Multizone
Multizone Important note: Hive Multizone is not compatible with Nano 1 hubs. Addin additional heatin zones If you’ve not done so already, install all additional receivers and power them up. For new receivers, their status li hts should be double flashin AMBER. - Page 33 To complete installation of the remainin heatin zone(s) use either the hub or the Hive app or online dashboard: 5a – Usin the hub Press the button at the rear of the hub for 1 second and release it. The middle...
- Page 34 Please note, if installin Hive Active Heatin to a hub that is already connected to other Hive products, you must use the button on the back of the hub to install the first zone. Any additional zones can be added throu h the Hive app or online dashboard usin the steps below.
- Page 35 You can view our handy how-to-use videos alon with hints and tips hivehome.com/support If for any reason you need to return your Hive Active Heatin , simply return your box and its contents to the retailer. Any return is subject to the retailer’ s...
- Page 36 Need help? If you’re a qualified professional installin Hive Active Heatin yourself and need any help durin the installation process, just visit our technical support pa e at hivehome.com/installation If you need further help, you can email our support team at help@hivehome.com...
Need help?
Do you have a question about the Active Heating and is the answer not in the manual?
Questions and answers