
Related Manuals for CORNING LSE 6755


Summary of Contents for CORNING LSE 6755
- Page 1 INSTRUCTION MANUAL Models: 6755 – 120V 6756 – 100V 6758 – 230V UK 6759 – 230V EU CLS-EQ-104 October 2013 , Document 01, Revision 02...
-
Page 2: Table Of Contents
CONTENTS 1 PRODUCT DESCRIPTION 1.1 Usage in accordance with safety standards 1.1.1 General Information 1.1.1.1 Hazards and precautions 1.1.1.2 Brief description 1.1.1.3 Safety Standards 1.1.1.4 Extent of supply 1.1.1.5 Warranty 1.2 Installation 1.2.1 Installation of the centrifuge 1.2.1.1 Unpacking the centrifuge 1.2.1.2 Space requirements 1.2.1.3 Installation 1.3 Technical Data... -
Page 3: Product Description
Always, use the original accessories only! For your personal safety, please pay attention to following precautions: The Corning LSE™ Compact Centrifuge is not explosion-proof and must therefore not be • operated in explosion-endangered areas or locations. During centrifugation, it is prohibited to stay within the safety zone of 30 cm around the centrifuge or deposit hazardous substances within this area. -
Page 4: Brief Description
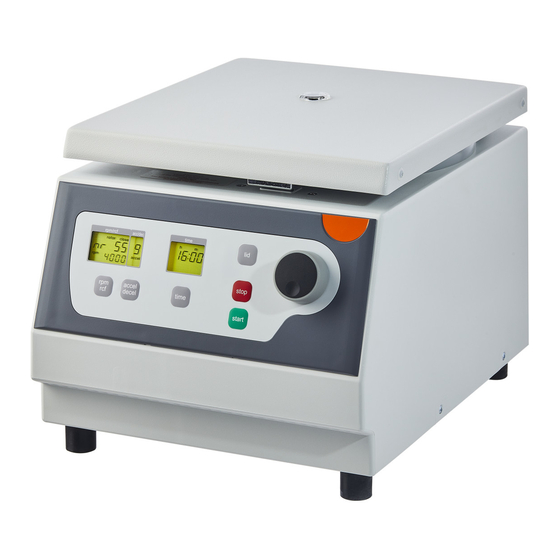
IEC-regulations. 1.1.1.2 Brief description Corning LSE™ Compact Centrifuge is a small centrifuge. You can use swing out and angle rotors in this centrifuge. Rotors are not included with the centrifuge and can be purchased separately. All relevant run parameters can easily be set with keys and be pre-selected with the main adjusting knob. -
Page 5: Extent Of Supply
1.2.1 Installation of the centrifuge 1.2.1.1 Unpacking the centrifuge The Corning LSE™ Compact Centrifuge is supplied in a carton. Remove the strap retainer, open the carton and remove the centrifuge. Remove all material inside unit. The instruction manual must always be kept with the centrifuge. -
Page 6: Technical Data
Remove the transport spacer blocks from the motor shaft (see chapter 2.2.2) • The socket for the power cord must be easy to reach respectively easy to disconnect! 1 PRODUCT DESCRIPTION 1.3 Technical Data Type / Model Corning LSE™ Compact Centrifuge Dimensions 28 cm Width 37 cm... -
Page 7: Conformity Declaration
Class A digital device, pursuant to both Part 15 of the FCC Corning Life Sciences hereby confirms that the product Rules and the radio interference regulation of the Corning LSE ... -
Page 8: Basic Adjustments
Before the first operation and after each rotor change, you have to enter the respective rotor type. Rotor Part # Description Code 480136 Corning® LSE™ 6 x 50 mL Fixed Angle Rotor 480137 Corning® LSE 12 x 15 mL Fixed Angle Rotor 480138 Corning® LSE 6 x 5 mL Swing-Out Rotor 480139 Corning®... -
Page 9: Access To Mode "Operating Data
1 PRODUCT DESCRIPTION 1.5.1 Access to mode “Operating Data“ In this mode you can check the following points: These are in detaill: 1. Number of starts 2. Operating hours of the centrifuge 3. Software-version 4. Error list 5. Operation of imbalance sensor 6. -
Page 10: Call Up Of Operating Data
Photo 2 ATTENTION: Please notice that you must enter the program as described under point 1.5.1 to change the adjustments of the points 1.5.2. After you have stored the settings you change to the normal program mode again by switch off the centrifuge for a short while. 1 PRODUCT DESCRIPTION 1.5.2 Call up of operating data In the mode “Basic Adjustments”... -
Page 11: Operation
Photo 3a Photo 3b 2 OPERATION 2.1 Installation of rotors 2.1.1 Mounting and loading angle rotors Clean the drive shaft as well as the location hole of the rotor with a clean, grease-free piece of cloth. Place the rotor onto the drive shaft. (see photo 4) Take care that the motor shaft is plugged completely in the rotor nut. - Page 12 Photo 5 ATTENTION: For reasons of safety you should check the fixing screw before each run!! (see photo 5) 2 OPERATION Hold the rotor with one hand and secure the rotor to the shaft by turning the fixing screw (1) clockwise. (see photo 6).
-
Page 13: Mounting And Loading Swing Out Rotors
ATTENTION: For reasons of safety you should check the fixing screw before each run!! (see photo 6) It is allowed to operate e.g. a 12-place-rotor with 2 or 4 loaded tubes only. But the loaded borings must be opposite each other. Photo 7: wrong Photo 8: correct 2 OPERATION... -
Page 14: Overloading Of Rotors
Swing out rotors may be taken in operation only if all places are filled in with four buckets!! Photo 9: wrong Photo 10: right 2 OPERATION 2.1.3 Overloading of rotors The maximum load permitted for a rotor, which is determined by the manufacturer, as well as the maximum speed allowed for this rotor (see label on rotor), must not be exceeded. -
Page 15: Removing The Rotors
x 4.000 = 3.360 rpm In case of any questions, please contact the manufacturer! 2.1.4 Removing the rotor Untighten the rotor fixing screw and lift the rotor vertical out of the centrifuge. ATTENTION: Do not operate the centrifuge with rotors or buckets which show any signs of corrosion or mechanical damage. -
Page 16: Lid Lock
Photo 12 2.2.3 Lid lock Attention: Before closing the lid please check if the rotor is tighten, and that all 6 buckets have been put in the swing out rotor. The lid must only be pressed slightly to its lock. After the lock is closed, at the same time disappears the word “open”... - Page 17 It is the same with the pre-selection of the RCF-value. The setting range is between 20 x g and the maximum permissible centrifugal force of the rotor. The maximum speed of the CORNING COMPACT is 6000 rpm resp. 4180 x g. Photo 13 Max.
-
Page 18: Pre-Selection Of Running Time
2.2.5 Pre-selection of running time The running time can be pre-selected in three different ranges from 10 seconds up to 99 hours 59 minutes. 1. Range from 10 seconds up to 59 minutes 50 seconds in steps of 10 seconds 2. -
Page 19: Pre-Selection Of Brake Intensity And Acceleration
(7). The value 9 is equivalent to the shortest and the value 0 to longest possible brake time. Photo 15 Acceleration- and deceleration times Corning LSE™ Compact Centrifuge (120 V / 230 V) in seconds Acceleration values Deceleration values... -
Page 20: Starting The Centrifuge
2 OPERATION 2.2.7 Starting the centrifuge After closing the lid you can start the centrifuge with the key “start” (3). By the key “start’ (3) you can start runs with manually pre-selected parameters. When the respective pre-selected running time has ended then the centrifuge will stop automatically or you can interrupt the run in the mode “cont”... -
Page 21: Safety Features
2 OPERATION 2.3 Safety features 2.3.1 Imbalance detection In case of the rotor not being equally loaded, the drive will turn off during acceleration. The rotor decelerates to stand still. When in the display “time” the word “error” together with the number “01” (18) appear, the weight difference of the samples is too huge. -
Page 22: Maintenance
3 MAINTENANCE 3.1 Service and maintenance 3.1.1 Maintenance and cleaning Maintenance: Maintenance of the centrifuge is confined to keeping the rotor, the rotor chamber and the rotor accessories clean as well as to regularly lubricating the rotor insert bolts of a swing out rotor (if available). -
Page 23: Glass Breakage
3 MAINTENANCE 3.1.2 Glass breakage With high g-values, the rate of glass tube breakage increases. Glass splinters have to be removed immediately from rotor, buckets, adapters and the rotor chamber itself. Fine glass splinters will scratch and therefore damage the protective surface coating of a rotor. If glass splinters remain in the rotor chamber, fine metal dust will build up due to air circulation. -
Page 24: Cold Room Removal
Bottles, boxes and rotors may be treated with the usual liquid disinfectants. 3.1.5 Cold room removal Prior to removing centrifuge from a cold room, place unit inside a plastic bag. Once removed from cold room place unit on a level surface and allow it to return to room temperature inside the bag. TROUBLE SHOOTING 4.1 Error messages: cause / solution Preface:... -
Page 25: Description Of The Error Message System
4 TROUBLE SHOOTING 4.2.2 Description of the error message system The error message is shown in the "time" display through a two-digit number (19). At the same time the word “error” (20) is indicated in the display (see photo 20). Photo 20 4.2.3 Error messages Errors that may be indicated in the LCD display:... -
Page 26: Receipt Of Centrifuges To Repair And Disposal
It is the product user’s responsibility to decontaminate waste equipment from biological, chemical, and/or radiological hazards prior to disposal. Additional information pertaining to the disposal of Corning equipment per the WEEE Directive can be obtained at www.corning.com/weee. - Page 27 Decontamination certificate at goods return delivery Enclose at all returns of equipment and assemblies absolutely! The completely full declaration about the decontamination is prerequisite for the assumption and further processing of the return. If no corresponding explanation is enclosed, we carry out decontamination with costs at your expense. Please fill out in block capitals: Surname;...
- Page 28 Company / dept.: _____________________ place and date: ____________________________ Signature of the authorized person: ________________________________________ Please register your warranty online at http://www.corning.com/lifesciences/warranty Corning Incorporated Worldwide EUROPE Life Sciences Support Offices 836 North Street, Suite 3401 ASIA France Tewksbury, MA 01876 Australia/New Zealand...
- Page 29 CLS-EQ-104 October 2013 , Document 01, Revision 02...
Need help?
Do you have a question about the LSE 6755 and is the answer not in the manual?
Questions and answers