Table of Contents
Advertisement
Advertisement
Table of Contents

Related Manuals for Huion INSPIROY HS611


Summary of Contents for Huion INSPIROY HS611
- Page 1 INSPIROY HS611 User Manual...
-
Page 2: Table Of Contents
HS611 Contents 1 / Precautions ......................3 2 / Product Overview ....................4 2.1 Tablet Introduction ........................4 2.2 Product and Accessories ......................4 2.3 Tablet Connection........................5 2.4 Introduction to LED Indicator ....................7 2.5 Install Driver ..........................8 3 / Pen Basic Operation .................... -
Page 3: Precautions
HS611 / Precautions 【 Please read this manual carefully before using, and keep it well for future reference.】 --Before cleaning the tablet please unplug the power cord and wipe with a soft damp cloth, do not use any kind of detergents. --Don't expose this product to water or other liquids. -
Page 4: Product Overview
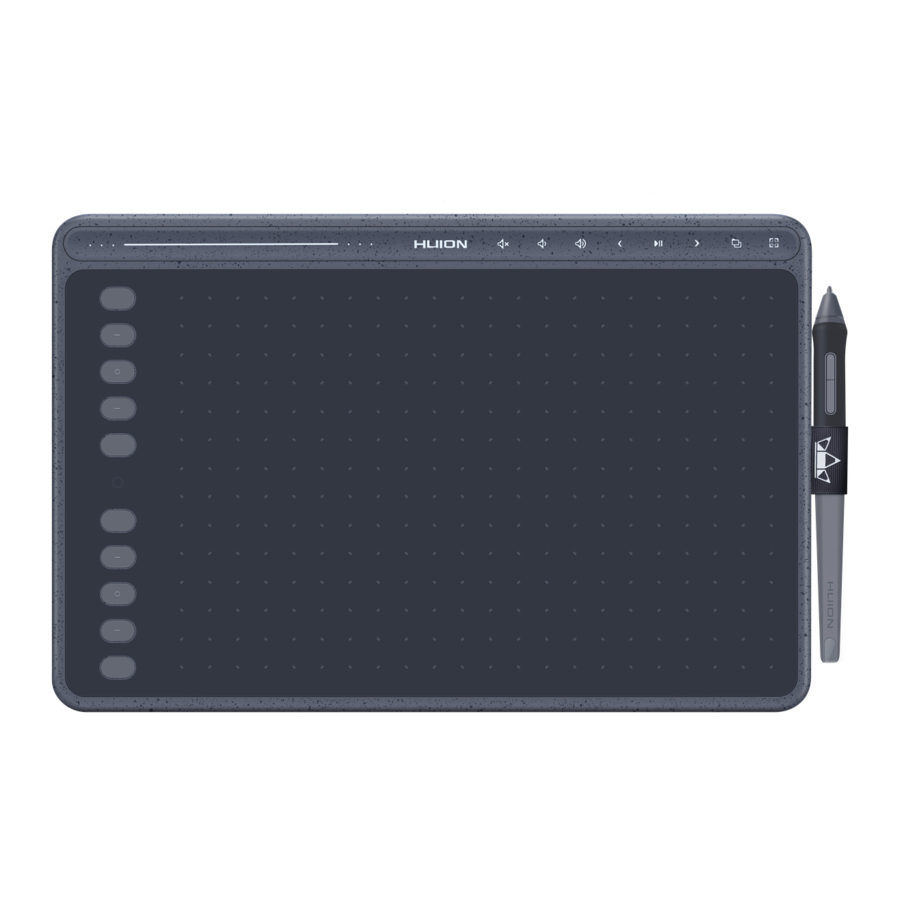
HS611 / Product Overview 2.1 Tablet Introduction Thanks for choosing HUION ® INSPIROY ® HS611 creative pen tablet. This is a new generation of professional battery-free drawing tablet, which can greatly improve your work efficiency of painting and creation, and full of fun. You can freely painting and writing, depicting different lines and colors, just as the pen writes on the paper, which brings you a real shock experience. -
Page 5: Tablet Connection
HS611 2.2.2 Accessories Battery-free pen Replacement Nibs Pen Holder (inside the pen holder) Quick Start Guide USB-C Cable Warranty Card 2.3 Tablet Connection 2.3.1 Connecting to Computer Connect the tablet to your computer with USB cable. [1] Take out the Usb cable from the package, then connect tablet to your computer. [2] Open the driver interface, the lower corner shows device connected, indicating that the tablet is successfully connected to the computer. -
Page 6: Introduction To Led Indicator
HS611 2.3.2 Connecting to Android Phone & Tablet [1] Please make sure your phone & pad OS is as following: Android OS 6.0 or later. [2] For some models, you need to go phone or pad "Settings" then enable "OTG" function. -
Page 7: Install Driver
2.4.1 OS Support Windows 7 or later, macOS 10.12 or later. 2.4.2 Install Driver Please download the driver from our website: www.huion.com/download. After finishing installation, you can find the driver icon " " in the system tray area, which means the driver was installed successfully; when you connect the tablet to computer, the icon will change to color "... -
Page 8: Pen Basic Operation
HS611 / Pen Basic Operation 3.1 Hold the pen Hold the pen as you hold a normal pen or pencil. Adjust your grip so that you can toggle the side switch easily with your thumb or forefinger. Be careful not to accidentally press the switch while drawing or positioning with the pen. -
Page 9: Click
HS611 3.3 Click Use the pen tip to tap once on the screen to register a click. Tap to highlight or select an item on the screen and double-click to open it. 3.4 Move Select the object, then slide the pen tip across the screen to move it. 3.5 Use the side buttons The buttons on the pen can be set to two different customizable functions. -
Page 10: Pen Nib Replacement
HS611 3.6 Pen Nib Replacement The nib will be wear off after using for a long time, then you need to replace a new nib. [1] Anticlockwise rotate the pen holder to open the cover, take a new nib out. [2] Insert the pen nib into the hole on the bottom of the holder and tilt the pen to pull out the old nib. -
Page 11: Function Setting
HS611 / Function Setting 4.1 Working Area Setting 4.1.1 Using Multiple Monitors Select the Working Area tab to define the relationship between pen movement on the tablet and cursor movement on the monitor screen. By default the entire active area of tablet maps to the entire monitor. If more than one monitor is in use and you are in extended mode, you need to choose the related monitor on the driver interface which you are going to map to. -
Page 12: Tablet Setting
HS611 ① ② ③ 4.1.3 Rotate Working Area By changing the direction of the tablet to adapt to the left and right hand operation. You can rotate the tablet by 0° , 90° , 180° or 270° . 4.2 Tablet Setting Click the "... - Page 13 HS611 4.2.1 General settings Add App: Shortcut key function can be set by adding different programs. When opening different programs, the driver will automatically recognize that the shortcut function is the corresponding function set. 4.2.2 Hotkeys settings Set the shortcut key to quickly open the driver interface. The default value is Ctrl+Alt+H, which can be set according to usage habits.
-
Page 14: Press Keys Function Setting
HS611 4.2.3 Updates You can view the driver version number, click "Check for Update", view the latest driver version, and update according to the system prompt. 4.3 Press Keys Function Setting Default Setting:Place the cursor on the press key or click the press key to find the default values. - Page 15 HS611 The following shortcut key customization interface is displayed, with a total of 5 Settings. ① Custom: according to the use of custom or professional terms to set. ② Key combination function keys: Ctrl, Shift, Alt, Win+ any letter or other. Ctrl, Shift, Alt, Win, you can select one or more of them, and you can arrange them in any combination.
-
Page 16: Pen Buttons Function Setting
HS611 4.4 Pen Buttons Function Setting Select the function to be achieved on the pop-up dialog box, then click "Apply" or "OK" to take effect. 4.5 Enable the Windows Ink feature Microsoft Windows provides extensive support for pen input. Pen features are supported in such as Microsoft Office, Windows Whiteboard, Adobe Photoshop CC, SketchBook 6 and so on. -
Page 17: Pressure Sensitivity Setting
HS611 4.6 Pressure Sensitivity Setting The pressure sensitivity will be changed by dragging the slider up and down, the smaller the value, the more pressure sensitive. Drag upward (left): the pressure change is more obvious, small pressure produces a great pressure. Drag down (right): pressure change is weak, a lot of pressure produces less pressure. -
Page 18: Pen Pressure Testing
HS611 4.7 Pen Pressure Testing You can gradually apply pressure to the stylus on the screen to test the pressure level. Click " " button to clear all the ink. 4.8 Pen Nib Activity Setting The pen nibs can be set to be Active/Inactive as needed.Click the drop-down option to select, and click OK again to save the Settings. -
Page 19: Data Export And Import
HS611 4.9 Data Export and Import The driver supports exporting and importing your custom configuration data of the product, which is convenient for you to use different software and avoid the trouble of repeated settings. -
Page 20: Specifications
HS611 / Specifications Tablet Model HS611 Touch Technology Battery-Free Electromagnetic Resonance Computer:258.4*161.5mm Working Area Android:90.1 x 161.5mm Dimension 333.4 x 218.4 x 7.3mm Net Weight 550g Touch Resolution 5080LPI Report Rate 266PPS Pen Sensing Height 10mm Interface USB-C Press Keys 10 Programmable Press Keys+8 Multimedia Keys Windows 7 or later,... -
Page 21: Trouble Shooting
There is no pressure in drawing software when installing the driver. Please uninstall all the graphics software drivers and close the drawing software, then reinstall the Huion but the cursor moves driver. It's better to restart your computer after finishing the installation.'...
Need help?
Do you have a question about the INSPIROY HS611 and is the answer not in the manual?
Questions and answers