Datavideo DAC-2 Installation Manual
Digital video converter
Hide thumbs
Also See for DAC-2:
- Quick setup manual (6 pages) ,
- Supplementary manual (5 pages) ,
- Supplementary manual (13 pages)
Advertisement
Table of Contents
- 1 Important Notice
- 2 Product Support
- 3 Service, Support and Warranty
- 4 Radio and Television Interference
- 5 Declaration of Conformity
- 6 Table of Contents
- 7 Key Features
- 8 Introduction and Features
- 9 Front Panel Controls
- 10 Rear Panel Connection
- 11 Typical Installation
- 12 Recommended 1394 Driver for PC/MAC Editing System
- 13 Specifications
- Download this manual
Advertisement
Table of Contents

Subscribe to Our Youtube Channel
Related Manuals for Datavideo DAC-2


Summary of Contents for Datavideo DAC-2
- Page 1 Digital Video Converter Installation Guide http://www.datavideo-tek.com...
-
Page 2: Important Notice
Regarding Safety Instructions and Radio/TV Read all of these instructions and save them for later reference. Follow all warnings and instructions marked on the products. Unplug this product from the wall outlet before cleaning. Do not use liquid or aerosol cleaners. Use a damp cloth for cleaning. -
Page 3: Product Support
If necessary, please feel free to call the Datavideo Help Desk above: From Monday through Friday, 9:00 am through 5:00 PM Local time You may also see our International web site at (http://www.datavideo-tek.com) or email our international service department at service@datavideo.com.tw. -
Page 4: Declaration Of Conformity
Peripheral used in conjunction with this equipment must be connected via shielded interface cables. Use of unshielded interface cables may result in interference to radio and TV reception, and may void the user’s right to operate this equipment. Model Number: DAC-1 / DAC-2 Trade Name: Datavideo Responsible: Datavideo Corporation (USA) Address: 12300-U East Washington Blvd., Whittier, CA 90606 USA... -
Page 5: Table Of Contents
Introduction and Features Front Panel controls Rear Panel connection Typical Installation DV camcorder connection DV to Component connection Component to DV connection IMAC & PC Editing System connection Recommended 1394 driver for PC/MAC Editing System Specifications CONTENTS... -
Page 6: Key Features
DV. The DAC-2 incorporates a new component Y.U.V input for the broadcasting market. Now, it is completely bi-directional either from Betacam Y.U.V. to DV or DV to Y.U.V. with an additional composite sync input and output for gen-locking of your video sources. -
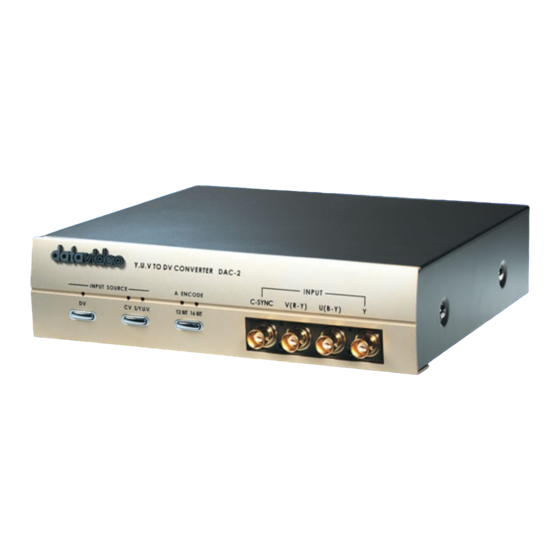
Page 7: Front Panel Controls
Mode 1 Default is the Windows 2000 mode (This mode is primarily for Windows 2000 users.) Please Note: The DAC-2 will always default to this mode on power up. Mode 2 is a secondary mode that works well with MACs... - Page 8 CV and S/YUV LED's will alternate as a confirmation. If the encode button is pressed and held again the DAC-2 will go back into its initial “default mode”. This is confirmed with the 12bit and 16 bit encode LED's staying light for about 2 seconds.
-
Page 9: Rear Panel Connection
REAR PANEL CONNECTION: Note: The DAC-2 can't provide Component Y.U.V. and S (Y/C) output at the same time. To select the Component Y.U.V signal output, disconnect the "S" cable from the S (Y/C) output jack on the rear panel. If you plug in the S (Y/C) cable at the S (Y/C) output jack, you will only enable the S (Y/C) signal output. -
Page 10: Typical Installation
TYPICAL INSTALLATION Now you can import your analog video into your PC in DV formats! The DAC-2 converts the analog video and audio signals into DV formats so that you can use your computer to edit your video. When you are finished, simply send the DV files back through the DAC-2, where they are converted to analog signals and then can be recorded onto tape. - Page 11 You can convert your DV tapes to a Betacam format for high quality broadcast capable copies Now, you can convert your Betacam Video to DV for high quality Video Storage or Editing DAC-2 is the bridge between digital video and analog video editing systems...
-
Page 12: Recommended 1394 Driver For Pc/Mac Editing System
In Xpress DV 3, go to “Settings”, “Deck Configuration” and select “FireWire on OHCI” and connect it to “Generic DV Device Basic NTSC” Currently, the DAC-2 is not functioning correctly when the DAC-2 is selected in the deck configuration menu. -
Page 13: Specifications
SPECIFICATIONS: @INPUTS *S-VHS sources *Composite *Component *C-Sync *DV (iLink) Source @OUTPUTS *S-VHS Source *Composite Video Source *Component *C-Sync *Frequency Response (DV input) *DG, DP *Audio Sampling Rate @GENERAL Power Ambient Temperature Ambient Humidity Dimensions Weight Accessories Y/C in: 4—pin 75 ohm DIN connector 1.0Vp-p 75 ohm RCA connector Y, R-Y, B-Y 75 ohm BNC connector Composite Sync signal in for Gen-lock...
Need help?
Do you have a question about the DAC-2 and is the answer not in the manual?
Questions and answers