Datavideo DAC-100 Getting Started
Hide thumbs
Also See for DAC-100:
- Getting started (13 pages) ,
- Supplementary manual (13 pages) ,
- Installation manual (25 pages)
Advertisement
Quick Links
Download this manual
See also:
Installation Manual
1
DAC-100
1
AC ADAPTER
3
RCA VIDEO & AUDIO CABLE
GETTING STARTED
What's in the Box?
DAC-100
AC ADAPTER
S-VIDEO CABLE
(REQUIRES RED & WHITE RCA
AUDIO CABLE)
RCA VIDEO & AUDIO CABLE
FIREWIRE
(
6 PIN MALE TO 6 PIN MALE)
INSTALLATION GUIDE
MANUAL
REGISTRATION CARD
SUPPORT INFO
2
S-VIDEO CABLE
4
FIREWIRE CABLE
6 PIN MALE TO 6 PIN MALE
Advertisement

Related Manuals for Datavideo DAC-100


Summary of Contents for Datavideo DAC-100
- Page 1 GETTING STARTED DAC-100 What’s in the Box? DAC-100 AC ADAPTER S-VIDEO CABLE (REQUIRES RED & WHITE RCA AUDIO CABLE) RCA VIDEO & AUDIO CABLE FIREWIRE 6 PIN MALE TO 6 PIN MALE) INSTALLATION GUIDE MANUAL REGISTRATION CARD SUPPORT INFO AC ADAPTER...
-
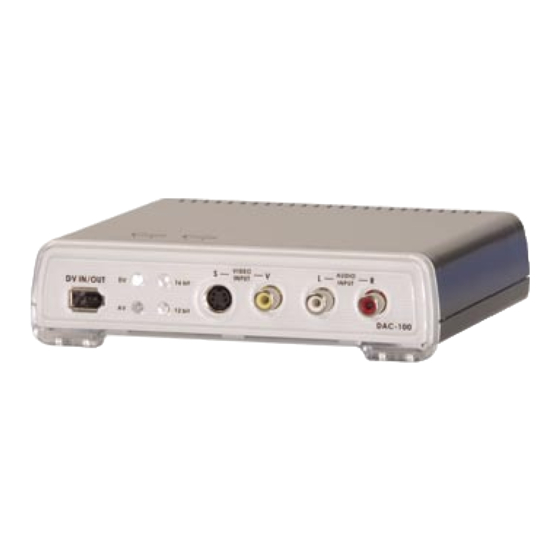
Page 2: Input Side
MEET THE DAC-100 INPUT SIDE Input Selector Audio Bit Rate Selector FireWire Input/Output Source Indicator Right Audio Input S-Video Left Audio Input Audio Input Bit Rate Indicator Composite Video Input OUTPUT SIDE Right Audio Output Left Audio Output Composite Video Output... - Page 3 4. Start the Editing Software. (Not Supplied) 5. Press the DAC-100’s Source Button to switch it to “AV” and the A Encode Button to “16 bit”. 6. Go to the “Capture or Import” mode on the Editing software to begin capturing video to a PC or a MAC...
- Page 4 CAPTURING 1. Connect the S-Video cable and RCA audio cables from the VCR’s Line output to the input on the DAC-100. 2. Connect the FireWire cable to the DAC-100, connect the opposite end to the PC or Mac’s FireWire Port.
- Page 5 1. Connect the RCA Video/audio cables from the VCR’s Line input to the output on the DAC-100. 2. Connect the FireWire cable to the DAC-100, connect the opposite end to the PC or Mac’s FireWire Port. 3. Power on the DAC-100 and the VCR.
- Page 6 EXPORTING TO 1. Connect the S-Video and RCA audio cables from the VCR’s Line input to the output on the DAC-100. 2. Connect the FireWire cable to the DAC-100, connect the opposite end to the PC or Mac’s FireWire Port.
- Page 7 Configuring a DAC-100 with Adobe Premiere 6.5 for Macintosh users Open Adobe Premiere 6.5 go to file and click on New Project, which brings you to the following window screen1 On the right hand side of the menu click “Custom”...
- Page 8 screen 2 The Custom button will take you to New Project Settings. Here, click Playback settings, which will take you to the next window Screen3...
- Page 9 In the Playback Settings, is an Audio section. Make sure the box that says “Play Audio on the output device only” is un-checked. This allows you to hear the audio through the computer speakers when editing on your timeline. The sample rate should match the quality of your video source.
- Page 10 continue to Click next until you reach the audio settings screen5 The DAC is compatible with all Rate and Format settings. Rate: As previously stated, the rate should match the quality of your video source. Analog/VCR: 32000 Hz CD quality: 44100 Hz DV quality: 48000 Hz Format: 16 bit stereo is the best quality, but will use more disk space Compressor: leave Uncompressed...
- Page 11 click Next to access your Capture settings screen 6 The capture format must match the editing mode, therefore your Capture format should be QuickTime Capture. -Make sure the box that reads “Capture Video”is checked. -Make sure the box that reads “Capture Audio” is checked. If these boxes are not checked, Adobe Premiere will not capture from the DAC onto your drive.
- Page 12 Screen7 This Main screen includes the three major parts of Premiere. 1) Your Bin is where you store clips after they have been captured. This is on the upper left part of your screen 2) Your Monitor allows you to play and scan through clips. This is on your upper right side of the screen 3) Your Timeline shows the order and transitions of your clips, and is located on the bottom half of the screen.
- Page 13 screen 8 In the capture screen, the DAC’s video and audio will immediately start playing once you open this window. Make sure your sources are cued and ready to be recorded. To actually begin recording, simple click the record button at the bottom of the window. To stop recording, press the Esc.
- Page 14 Screen 9 Every time you capture a new clip, it will appear in this box.
- Page 15 Screen 10 The Clip is now ready to be dragged and dropped onto the timeline and edited...
Need help?
Do you have a question about the DAC-100 and is the answer not in the manual?
Questions and answers