Table of Contents
Advertisement
Quick Links
Installation Instructions
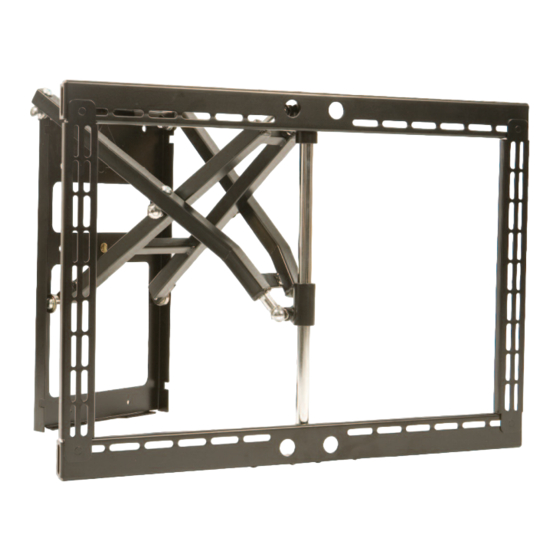
PS42-50 - Plasma Swivel Bracket
Design Highlights
-Unique Scissor Design Allows Easy One Handed Operation
-Solid Steel Construction Holds Screen Securely
-Bi-Directional Swivel up to 60 Degrees in Either Direction
Thank you for choosing
futureautomation
email info@futureautomation.co.uk tel: +44 (0) 1438 833577 fax: +44 (0) 1438 833565
ISSUE 003
Advertisement
Table of Contents

Related Manuals for Future Automation PS42


Summary of Contents for Future Automation PS42
- Page 1 Installation Instructions PS42-50 - Plasma Swivel Bracket Design Highlights -Unique Scissor Design Allows Easy One Handed Operation -Solid Steel Construction Holds Screen Securely -Bi-Directional Swivel up to 60 Degrees in Either Direction Thank you for choosing futureautomation email info@futureautomation.co.uk tel: +44 (0) 1438 833577 fax: +44 (0) 1438 833565...
-
Page 2: Safety Information
Exceeding the weight capacity can result in serious personal injury or damage to equipment. Future Sound & Vision trading as Future Automation intend to make this and all documentation as accurate as possible. However, Future Automation makes no claim that the information contained herein covers all details, conditions or variations, nor does it provide for every possible contingency in connection with the installation or use of this product. -
Page 3: Table Of Contents
PS42-50 - Plasma Swivel Bracket Contents Page Introduction Safety Information Contents Contents Tool Indicator Icons Installation Parts List Package Contents Stage 1 Before You Start Check Removing the Uprights From the Frame Stage 2 Upright Adjustment & Mounting Stage 3... -
Page 4: Contents
Any damage to products during transit that is not checked and notified as “unchecked” or “damaged” upon receipt of delivery. Any part of your system that needs to be replaced during a warranty repair becomes the property of Future Automation. -
Page 5: Parts List
1.3 - Cross Members 1.4 - Uprights PS42 Plasma Swivel Bracket for 37” - 46” Screens PS50 Plasma Swivel Bracket for 46” - 55” Screens Page 4 of 12 // email info@futureautomation.co.uk tel: +44 (0) 1438 833577 fax: +44 (0) 1438 833565... -
Page 6: Before You Start Check
PS42-50 - Plasma Swivel Bracket Before You Start Prior to installation check the following: -The product is in good condition -No damage to any parts -The bracket is in the closed position Removing the Uprights From the Bracket The product is supplied with the uprights attached to the bracket. -
Page 7: Upright Adjustment & Mounting
PS42-50 - Plasma Swivel Bracket Upright adjustment and mounting Firstly, place the screen face down on a flat suitable surface, such as carpeted floor. Take care not to damage the screen. Flat Surface The uprights are designed with two rows of slots. One row is 7mm wide, for smaller bolts. -
Page 8: Mounting The Uprights To The Screen
PS42-50 - Plasma Swivel Bracket Mounting the uprights to the screen If the screen has mounting points which are recessed, it will be necessary to use some of the provided spacers, in order to attach the uprights to the screen. -
Page 9: Mounting The Screen To The Bracket
PS42-50 - Plasma Swivel Bracket Mounting the frame to the screen With the screen still face down, lower the bracket down on to the uprights and locate the slots on the studs. Page 8 of 12 // email info@futureautomation.co.uk tel: +44 (0) 1438 833577 fax: +44 (0) 1438 833565... -
Page 10: Screen Positioning
PS42-50 - Plasma Swivel Bracket Screen positioning If when the frame is placed on the back of the screen, the overlaying slots don't appear to locate with the bolts on the uprights, it may be necessary to re-position the uprights. -
Page 11: Fitting The Bracket To The Wall
PS42-50 - Plasma Swivel Bracket Fitting the Bracket to the Wall Firstly, remove the bracket from the rear of the screen. Make sure that the up- rights are still left connected to the rear of the plasma screen. Bearing in mind the... -
Page 12: Fixing The Screen & Uprights To The Bracket
PS42-50 - Plasma Swivel Bracket Fixing the Screen & Uprights to the Frame With the bracket sitting flat against the wall,place the screen against it, keeping the bolts and corresponding slots properly alligned. Once in place, secure the uprights Usage-... - Page 13 PS42-50 - Plasma Swivel Bracket A general technical overview of the PS42-50 Plasma Swivel Bracket PS42 PS50 Product Dimensions 700x70x527mm 700x70x617mm (W,D,H) [27.6x2.8x20.7"] [27.6x2.8x24.3"] Weight (Kg) 9Kg [19.8lb] 10Kg [22lb] Movement Extention From Wall 420mm [16.3"] 530mm [20.9"] Angle Right...
- Page 14 Future Automation Unit 2 Kimpton Enterprise Park Claggy Road Kimpton Hertfordshire SG4 8HP United Kingdom Tel: +44 (0) 1438 833 577 Fax: +44 (0) 1438 833 565 Email: info@futureautomation.co.uk www.futureautomation.co.uk...
Need help?
Do you have a question about the PS42 and is the answer not in the manual?
Questions and answers