Table of Contents
Advertisement
Quick Links
Advertisement
Table of Contents
Troubleshooting

Subscribe to Our Youtube Channel
Related Manuals for Lighthouse SOLAIR 3350


Summary of Contents for Lighthouse SOLAIR 3350
- Page 3 Lighthouse Worldwide Solutions SOLAIR 3350/5350 Gen E Airborne Particle Counters Operating Manual...
- Page 4 Copyright © 2012 - 2017 by Lighthouse Worldwide Solutions. All rights reserved. No part of this document may be reproduced by any means except as permitted in writing by Lighthouse Worldwide Solutions. The information contained herein constitutes valuable trade secrets of Lighthouse Worldwide Solutions.
- Page 5 Medford, OR 97501 USA Declares that the product: Product Name: Portable Airborne Particle Counter Model Number(s): SOLAIR 3350 / 5350 Conforms to the following Product Specifications: SAFETY EN61010-1:2001 Safety Requirements for Electrical Equipment for Measurement, Control, and Laboratory Use Part 1:...
-
Page 7: Table Of Contents
Electrostatic Safety Information ..................1-1 Port-Connect Warning ....................1-2 Chapter 2 Introduction Overview ........................2-1 Description ........................2-1 SOLAIR 3350 Specifications ..................2-2 SOLAIR 5350 Specifications ..................2-3 Chapter 3 Unpack, Inspect and Install Initial Inspection ......................3-1 Unpacking ........................3-1 Verify Package Contents .................... - Page 8 Lighthouse SOLAIR 3350, 5350 Gen E Operating Manual Chapter 4 Set up the Counter Overview ........................4-1 Analog Sensors ......................4-1 Analog Setup ...................... 4-2 Peripheral Interface Connector ..................4-6 Using Report Parameters ....................4-6 Basic Requirements ....................... 4-7 Fed Std ft3 ......................4-7 ISO 14644-1 .......................
- Page 9 Table of Contents LOCATION Selection ..................6-8 Changing Locations ................6-8 Locations in AUTO Mode ..............6-8 Zoomed Data View .................... 6-9 Viewing Two Columns of Data ............6-11 CONFIG (Configuration) Screen ................. 6-14 DATA SETUP ......................6-15 Particle Channels ..................... 6-15 Analog Channels ....................
- Page 10 Safety ..........................8-1 Maintenance ........................8-1 Calibration ......................8-1 Purge Count Test ....................8-1 Troubleshooting ....................8-2 Appendix A Default Settings Default Settings for SOLAIR Particle Counters ............A-1 Appendix B SOLAIR 3350, 5350 MODBUS Register Map v1.48 t-iv 248083387-1 Rev 10...
- Page 11 Table of Contents COMM Settings ......................B-1 Supported MODBUS Commands .................. B-1 Sensor Settings Registers ................... B-2 Device Status ..................... B-6 Data Registers ........................ B-8 Data Status Byte (30007 - 30008) ..............B-9 Alarm Flags in Channels (30076) ..............B-10 Data Type Registers ..................
- Page 12 Lighthouse SOLAIR 3350, 5350 Gen E Operating Manual t-vi 248083387-1 Rev 10...
-
Page 13: About This Manual
About this Manual This manual describes the operation and use of the Lighthouse SOLAIR 3350 and 5350 Gen E Airborne Particle Counters. Text The following typefaces have the following meanings: Conventions Note: Represents information not to be typed or italics A note appears in interpreted literally. - Page 14 Lighthouse SOLAIR 3350, 5350 Gen E Operating Manual 248083387-1 Rev 10...
-
Page 15: Chapter 1 General Safety
General Safety Safety Warnings and cautions are used throughout this manual and the reader Considerations should become familiar with the meaning of a warning before operating the particle counter. Most warnings will appear in the left margin of the page next to the subject or step to which it applies. Take care when performing any procedures preceded by or containing a warning. -
Page 16: Port-Connect Warning
Lighthouse SOLAIR 3350, 5350 Gen E Operating Manual WARNING: The use of controls, adjustments or procedures other than those specified within this manual may result in personal injury and/or damage to this instrument. Attempts by untrained personnel to disassemble, alter, modify or adjust the electronics or optics may result in personal injury and damage to the instrument and will void its warranty. -
Page 17: Chapter 2 Introduction
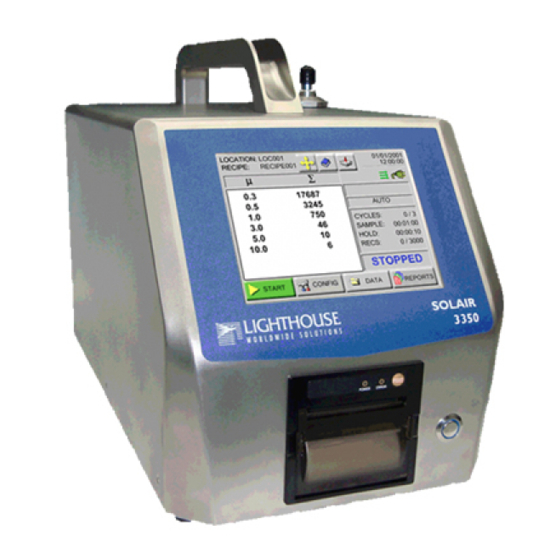
Description The large color touch screen makes them easy to configure and operate. The SOLAIR 3350 and 5350 store up to 3000 data records from up to 8 particle count channels. All data can be quickly and reliably downloaded to a computer or printed to the optional printer. -
Page 18: Solair 3350 Specifications
Lighthouse SOLAIR 3350, 5350 Gen E Operating Manual • Save data for historical data review. • Print graphs and data tables using the included data transfer software. SOLAIR 3350 Specifications 0.3 - 25.0 m Size Range 0.3, 0.5, 1.0, 3.0, 5.0, 10.0 m... -
Page 19: Solair 5350 Specifications
Introduction Historical data review, password protection Key Software Features 316L Stainless steel Enclosure Internally filtered to HEPA standards Sample Output (>99.97% @ 0.3 m) Internally-controlled Clean Pump echnology Vacuum Source 100-240 VAC, 50-60Hz Power Li-ion, removable & rechargeable* Battery * Average recharge time - 7.5 hours 14.65"(L) x 8.0"(W) x 10.4"... - Page 20 14° F to 122° F (-10° C to 50° C) / Up to 98% Storage Temp/RH non-condensing Table 2-2 5350 Specifications The manufacturer recommends that the Lighthouse instrument be calibrated annually by a Certified Lighthouse Service Provider to ensure it continues to perform within specifications. 248083387-1 Rev 10...
- Page 21 Introduction For information about returning instruments for calibration or service, please visit our RMA website, www.golighthouse.com/RMA. Side Dimensions Top Dimensions Figure 2-1 SOLAIR Dimensions 248083387-1 Rev 10...
- Page 22 Lighthouse SOLAIR 3350, 5350 Gen E Operating Manual 248083387-1 Rev 10...
-
Page 23: Chapter 3 Unpack, Inspect And Install
Any damage was immediately reported to Lighthouse. Damaged cartons may be replaced by calling Lighthouse Sales. Keep an undamaged carton for reshipment of the instrument for its annual factory calibration. -
Page 24: Shipping Instructions
3. Seal container or carton securely. Mark “FRAGILE” and write the Return Merchandise Authorization (RMA) number on any unmarked corner. 4. Return the instrument to the address provided by the Lighthouse representative or the RMA website. Figure 3-1 Examples of SOLAIR 3350 and 5350... -
Page 25: Accessories
Unpack, Inspect and Install Accessories Several accessories may be ordered to tailor the instrument to the user needs and should be readied for use at this point. • Temp/RH Wand (optional) - plugs into the instrument’s rear panel. The 4-20mA probe monitors temperature (0° to 150° F or -17.8° to 65.6°... - Page 26 Lighthouse SOLAIR 3350, 5350 Gen E Operating Manual DB-9 to RJ-45, RS-232 Serial Adapter (optional) • Wireless Adapter (optional) • • LMS Express software (standard), an analysis tool that allows the user to: 1. Manually download data from the instrument 2.
-
Page 27: Installation
Unpack, Inspect and Install Installation Install the Optional Batteries If the SOLAIR 3350 or 5350 was ordered with the optional Li-ion rechargeable batteries, they need to be installed and charged before the instrument can be used for portable operation. An external battery charger is available from Lighthouse as an option. - Page 28 Lighthouse SOLAIR 3350, 5350 Gen E Operating Manual 3. Push the battery all the way into the compartment until it snaps into place.See Figure 3-4. Close the door and tighten the screw lock by turning it clockwise. Figure 3-4 Battery Engaging Connector 4.
-
Page 29: Connect The Solair To Ac Power
The power input is 100-240VAC, 50-60Hz. A ’region-specific’ power cable is included with the SOLAIR. Lighthouse recommends using protected power to prevent exposing the instrument to voltage spikes. Using an uninterruptible power supply when the SOLAIR is kept in a stationary location will help prevent damage to the instrument or loss of data in the event of a power outage. -
Page 30: Removing The Battery
Lighthouse SOLAIR 3350, 5350 Gen E Operating Manual Removing the Battery WARNING: 1. To remove the battery, turn the power switch OFF. Always remove the battery prior 2. Gently place the SOLAIR on its side and open the battery door. -
Page 31: Connecting The Isokinetic Probe
Unpack, Inspect and Install Connecting the Isokinetic Probe The SOLAIR comes with an isokinetic sample probe, tripod stand and a length of sample tubing that is lined with an electrostatic reduction material to eliminate particle adhesion. The probe with tubing connects to the sample inlet. -
Page 32: Loading Printer Paper
Lighthouse SOLAIR 3350, 5350 Gen E Operating Manual Loading Printer Paper If the SOLAIR 3350 or 5350 is equipped with the optional built-in thermal printer, please read the following instructions to set it up. Note: 1. Grasp each side of the printer door, depress the side latches and pull Thermal paper carefully away from the SOLAIR to open. - Page 33 Lighthouse SOLAIR 3350, 5350 Gen E Operating Manual 2. Unroll about two inches of paper and place the roll into the printer as shown in Figure 3-12. Figure 3-12 Placing Paper Into the Printer 3. Make sure that the paper is lined up straight with the cutting edge as shown in Figure 3-13.
-
Page 34: Connecting To An External Computer Or Facility Management System
Figure 3-14 Trimming Off Extra Paper Connecting to an External Computer or Facility Management System Note: The SOLAIR 3350 and 5350 instruments have three ports available for LMS Express flexible external data retrieval. It can connect to the Lighthouse allows download of data from the instrument;... -
Page 35: Chapter 4 Set Up The Counter
SOLAIR. Otherwise, only the data buffer. one single-channel or one dual-channel device may be used at a time on each port. Please contact Lighthouse for additional information about converters and wiring. 248083387-1 Rev 10... -
Page 36: Analog Setup
For example, the Calibration Certificate for the Lighthouse TRH Wand will provide temperature in both Celsius (C) and Fahrenheit (F) and relative humidity in percent (PCT). Make sure the data is entered appropriately;... - Page 37 A1. If it is wired to operate on the second channel, its data will be displayed on A2. If a dual-channel sensor, such as the Lighthouse TRH (temperature, relative humidity) probe, is connected to port 1, its temperature data will show up on A1 and its relative humidity data will be displayed on...
- Page 38 Lighthouse SOLAIR 3350, 5350 Gen E Operating Manual 5. Press the blank TYPE button next to the enabled analog channel to enter the label tag. See Figure 4-3. Figure 4-3 Analog Type Edit Screen 6. Type in the desired label tag for the analog channel; tag can be up to four characters.
- Page 39 Set up the Counter 12. Press the UNITS button associated with the analog channel. 13. Enter the UNIT of measure (i.e., F for Fahrenheit, PCT for percent humidity, etc.) for the analog channel and press ENTER. See Figure 4-5. Figure 4-5 Analog Units Edit Screen 14.
-
Page 40: Peripheral Interface Connector
Lighthouse SOLAIR 3350, 5350 Gen E Operating Manual Peripheral The back of the SOLAIR also contains a round, Peripheral Interface Interface Connector (PIC) that can be used to connect an external peripheral device such as an alarm buzzer, alarm light or a remote start/stop Connector controller. -
Page 41: Basic Requirements
Set up the Counter Basic Each of the reports has some basic requirements that, if not met, will Requirements cause the report to FAIL the classification immediately. Fed Std ft This report requires a minimum of 2 locations measured. At least 1 sample per location must be taken. At least 5 samples in total must be taken in the cleanroom. -
Page 42: Iso 14644-1
Lighthouse SOLAIR 3350, 5350 Gen E Operating Manual ISO 14644-1 For this report, a sufficient sample volume of air must be sampled at each sampling location. The sample volume must be sufficient enough to detect a minimum of 20 particles if the particle concentration for the largest considered particle size were at the class limit for the designated ISO class. -
Page 43: Eu Gmp 2009
Set up the Counter EU GMP 2009 Note: The SOLAIR supports the EU GMP 2009. This standard applies only The EU GMP 2009 report does not apply to 0.5μ and 5.0μ channel sizes. to the Boulder Counter - it does not support a particle If either one of these channel sizes is not present, the report cannot size of 0.5μm. -
Page 44: Lantronix Setup
Lighthouse SOLAIR 3350, 5350 Gen E Operating Manual The Lighthouse Worldwide Solutions SOLAIR family of instruments incorporates MODBUS TCP/IP communications over Ethernet. Connecting a SOLAIR particle counter directly to an Ethernet network should only be done with the permission and guidance of the network administrator. - Page 45 Set up the Counter 2. Select and double-click the XPort for the RS485 Ethernet Adapter to open the Device Details tab. • Select the Web Configuration tab and then press the green arrow. The Windows Security Login window will open. •...
- Page 46 Lighthouse SOLAIR 3350, 5350 Gen E Operating Manual 4. Select Network Settings and choose the Use the following IP configuration: radio button. • Enter the IP Address: “XXX.XX.X.XX” and the Subnet Mask: “255.255.255.0”. • Leave the Default Gateway: blank unless the IT department indicates one is needed.
- Page 47 Set up the Counter • Parity: None • Stop Bits: 1. • Press the OK button to save the settings. Serial Settings will display Done! See Figure 4-10. Figure 4-10 Serial Settings 248083387-1 Rev 10 4-13...
- Page 48 Lighthouse SOLAIR 3350, 5350 Gen E Operating Manual 6. Select Connections and verify that Connect Protocol and Connection settings are set to the following: • Protocol: Modbus • Local Port: 502 • Accept Incoming: Yes. • Under Modbus Mode, set the Message Timeout to “1000ms” if not already set.
- Page 49 Lantronix method. They are more difficult in that they use DOS techniques to access the instrument at the hardware level. If this section fails to resolve the issues, contact Lighthouse Technical Support, 1-800-945-5905 (541-770-5905 outside of USA) or techsupport@golighthouse.com.
-
Page 50: Definitions Of Terms Used
Lighthouse SOLAIR 3350, 5350 Gen E Operating Manual Definitions of This list is provided for the convenience of the user or technician. Terms Used • ARP - Address Resolution Protocol, a program that can change the ARP Cache of a host by adding or removing IP addresses. -
Page 51: Preparing For Network Installation
PC that Software Required: will be used to retrieve the data from the instruments. Contact Lighthouse Contact the network administrator if any of the following are not Technical Support for installed or not functional: additional information. -
Page 52: Configure Device
Lighthouse SOLAIR 3350, 5350 Gen E Operating Manual Configure Ethernet Port Configuration Device This section is organized based on the cable used to perform the SOLAIR programming. Straight-through Cat5 requires a hub or switch and two straight-through Cat5 cables. Cross-over Cat5 connects the PC directly to the instrument with no hub. -
Page 53: Cross-Over Cat5 Setup
Set up the Counter Cross-over Cat5 Setup: Attach one end of the cross-over cable to the RJ45 receptacle on the PC. Attach the other end of the cable to the SOLAIR Ethernet Port. Apply power to the SOLAIR. Apply power to the PC if it is not already running. - Page 54 Lighthouse SOLAIR 3350, 5350 Gen E Operating Manual A command prompt window will open. Clear the ARP Cache by typing arp -d * at the command line and press Enter. Ignore any error messages that indicate the address table doesn’t exist or has no entries.
- Page 55 Set up the Counter 10. Type telnet xx.xx.xx.xx 9999 and press Enter. This command accesses the telnet port of the instrument. The expected error message from Step 9. is shown in Figure 4-18. Figure 4-18 Command - Send “Telnet 9999" The user will have 4 seconds to respond in the next step.
- Page 56 Lighthouse SOLAIR 3350, 5350 Gen E Operating Manual 12. Type to set the IP address. Type the desired IP address and press Enter. See Figure 4-20. Figure 4-20 Assigning IP Address 13. Type to set the Gateway IP address. Type the Gateway IP address and press Enter.
- Page 57 Changing the telnet password or providing one is discouraged, except for absolute security requirements. If a password is applied and forgotten, the instrument will have to be returned to Lighthouse to get the password cleared. Figure 4-23 Telnet Config Password Screen 16. Type...
-
Page 58: Connect Solair To Ethernet Lan
Lighthouse SOLAIR 3350, 5350 Gen E Operating Manual Connect Connect Ethernet Cable to Instrument SOLAIR to Power the SOLAIR OFF before connecting the instrument to a network Ethernet LAN then attach the network cable to the SOLAIR and the other end to the network receptacle. -
Page 59: Chapter 5 Communications
Communications SOLAIR This chapter contains information on how to set up the SOLAIR 3350 or 5350 to program it and communicate with it. Communication Mode Communicate with the Instrument WARNING: The communication ports are labeled as in Figure 5-1. The Ethernet Please port is used to connect the instrument to an Ethernet LAN;... -
Page 60: Ethernet Communications
Lighthouse SOLAIR 3350, 5350 Gen E Operating Manual Ethernet Communications WARNING: The Ethernet RJ45 connector provides Ethernet connectivity, over Connect which the instrument uses the MODBUS over TCP/IP communication the Ethernet port ONLY to an Ethernet LAN. protocol. Communicating with the instrument on an Ethernet LAN... -
Page 61: Rs485 Communication
Communications RS485 Communication WARNING: The instrument uses RS485 as one of its communication modes. This Attaching the instrument to an RS485 network requires special instrument will be damaged and its warranty voided if attention to topology (wiring scheme of network) before and after the the design of the RS485 design phase to make sure the SOLAIR 1.0 CFM and other instruments port is defeated to allow... - Page 62 Lighthouse SOLAIR 3350, 5350 Gen E Operating Manual 2. Connect Side B of a standard “A to B” USB cable to the instrument (only Side B will fit). See Figure 5-2. Figure 5-2 “A to B” USB Cable 3. Connect Side A to any available USB port on the PC.
-
Page 63: Usb Flash Drive
If the drive is not detected, try swapping it out for another flash drive. If the flash drive is still not detected after attaching a known good drive, contact Lighthouse Technical Support at 800-945- 5905 (USA Toll Free), 541-770-5905 (Outside of USA). - Page 64 Lighthouse SOLAIR 3350, 5350 Gen E Operating Manual 248083387-1 Rev 10...
-
Page 65: Chapter 6 Operate Counter
Operate Counter Using the This chapter describes how to use the SOLAIR 3350 or 5350 Airborne Instrument for Particle Counter. The SOLAIR is ready to use out of the box. To start using the instrument, proceed as follows: the First Time... - Page 66 Lighthouse SOLAIR 3350, 5350 Gen E Operating Manual WARNING: To prevent damage to the instrument, water, solvents or other liquids of any type should never be allowed to enter the instrument via the inlet tube. Failure to heed this warning will void the warranty.
-
Page 67: Touch Screen Overview
Operate Counter Touch Screen The SOLAIR incorporates a unique touch screen interface to control Overview and configure the instrument. This interface allows the user to easily view and configure the instrument to specific needs and applications. Figure 6-1 illustrates the menu tree. -
Page 68: Main Screen
Lighthouse SOLAIR 3350, 5350 Gen E Operating Manual MAIN Screen The MAIN screen provides the user a snapshot view of the status of the instrument. The instrument can be powered by AC power or an internal, removable battery. When the instrument is using battery power, the battery indicator will show the level of the battery charge remaining. - Page 69 Operate Counter before sampling. RECIPE button: Allows the user to view, load and unload recipes • that have been configured and saved in the recipe data base. Note: • Hard copy PRINT LAST RECORD/SAVE LAST RECORD TO FLASH DRIVE: Prints the last recorded sample using the current printouts are available only when the optional thermal configuration to determine the type of data printed (i.e.
- Page 70 Lighthouse SOLAIR 3350, 5350 Gen E Operating Manual • AC Indicator: Indicates that the instrument is being powered with its AC power cord. If the battery is installed, the instrument will charge the battery when the instrument is plugged in.
- Page 71 Operate Counter • SAMPLE: The Sample Time (hh:mm:ss) is the duration of one counting cycle. The Sample Time will count down on the MAIN screen when the instrument is in AUTO or Manual mode so the user can see how much time is remaining in the sample period. In Concentration mode, the Sample Time will count up to 6 seconds per cycle.
-
Page 72: Location Selection
Lighthouse SOLAIR 3350, 5350 Gen E Operating Manual LOCATION Selection Changing Locations The location number for the environment to be measured can be changed by pressing the LOCATION button at the top of the MAIN screen. Figure 6-6 displays the Select Location screen. -
Page 73: Zoomed Data View
Operate Counter Zoomed Data View There are 2 different Zoom views. A single column can be viewed as data (differential or cumulative) in a larger font or both differential and cumulative data can viewed on the same screen in a smaller font. Tap anywhere in the Particle Data area to display the Zoomed Data View. - Page 74 Lighthouse SOLAIR 3350, 5350 Gen E Operating Manual In the Zoomed Data View, functions can be performed using the toggle buttons on the right side bar. See Figure 6-8. START or STOP counting Display Particle data or Analog data Display Cumulative / Differential data...
-
Page 75: Viewing Two Columns Of Data
Operate Counter Viewing Two Columns of Data The unit can display both Differential and Cumulative data at the same time on the Zoomed View screen. To enable this feature, go to the CONFIG: Options screen. See Figure 6-9. Figure 6-9 CONFIG: Options Button Figure 6-10 DiffCuml on Zoom Button Select the button “DiffCuml on Zoom”... - Page 76 Lighthouse SOLAIR 3350, 5350 Gen E Operating Manual Figure 6-11 Differential and Cumulative Data in Zoomed View The buttons available when touching the data area of the screen after selecting DiffCuml on Zoom are shown in Figure 6-12. Note the selections are different but their functions are the same as on dual display screen.
- Page 77 Operate Counter To return the instrument to the default single-column zoom view, return to the MAIN Screen view, press CONFIG, Options and deselect the button “DiffCuml on Zoom” button. See Figure 6-13. Figure 6-13 Disable DiffCuml on Zoom Select the MAIN button to return to the MAIN Screen view or press BACK to return to the previous level.
-
Page 78: Config (Configuration) Screen
Lighthouse SOLAIR 3350, 5350 Gen E Operating Manual Press the MAIN button, then tap in the data area to go into the Zoomed View. See Figure 6-15. Figure 6-15 Zoomed View with Only Cumulative Data Only one column of data is displayed. -
Page 79: Data Setup
Operate Counter DATA SETUP Figure 6-17 displays the Data Setup option buttons. These options allow the user to configure the parameters for data collection during a sample. Figure 6-17 Data Setup Options Particle Channels The instrument’s particle channels can be enabled or disabled on the Particle Channel. - Page 80 Lighthouse SOLAIR 3350, 5350 Gen E Operating Manual • Pressing MAIN or BACK will prompt to clear all collected data as shown in Figure 6-19. Figure 6-19 Clear Data Screen • From this screen, the user can press OK to clear the data.
-
Page 81: Analog Channels
SOLAIR. Otherwise, only one single-channel or one dual-channel device may be used at a time on each port. Please contact Lighthouse at 800-945-5905 (USA Toll Free) or 541- 770-5905 (Outside of USA) for additional information about converters and wiring. - Page 82 Lighthouse SOLAIR 3350, 5350 Gen E Operating Manual Touching the far left column at the screen shown in Figure 6-21 enables or disables the channel. When enabled, the channel label appears. Channels must be enabled before their data will be stored in memory.
- Page 83 Operate Counter Touching the UNITS column allows entering units for the channel, such as PCT, F, kPa and FPM (Maximum of three characters). The example shown in Figure 6-23 illustrates temperature in Fahrenheit using the letter “F”. Use the ERASE button to erase one character at a time and the ENTER to accept the value.
-
Page 84: Analog Data Display
Lighthouse SOLAIR 3350, 5350 Gen E Operating Manual When the desired settings are complete, a screen showing data similar to that shown in Figure 6-25 allow the user to review the settings. To return any of the screens to correct or change an entry requires only to press the corresponding button. -
Page 85: Zoomed Analog Data Display
Operate Counter Zoomed Analog Data Display When the instrument is Holding or is not Counting, the user may touch anywhere on the Particle Data display area to activate the Zoomed Data View. Touch the Particle button to switch view to analog data. See Figure 6-27. - Page 86 Lighthouse SOLAIR 3350, 5350 Gen E Operating Manual CYCLES: The number of cycles is set to determine how many • times the instrument samples the air in a single location. This is used only in AUTO mode. The range is 0 - 999. When Cycles is set to 0, the instrument will continue running samples indefinitely until the STOP button is pressed.
- Page 87 Operate Counter Note: SAMPLE VOLUME: Instead of selecting a specific Sample Time, When the particle • the instrument can be set to measure a specific Sample Volume in volume is ft , the minimum sample volume is 0.1 ft cubic feet (ft ), cubic meters (m ) or liters (l).
-
Page 88: Settings
Lighthouse SOLAIR 3350, 5350 Gen E Operating Manual SETTINGS The Settings screen allows the user to configure the instrument to count in different modes and formats when running a sample. See Figure 6-30. Figure 6-30 Sample Settings Screen COUNT MODE The following modes are available: Auto, Manual, Beep and Concentration. -
Page 89: Geiger Counter Mode
Operate Counter Concentration data will be recorded and can be viewed in the Data screen and on the printouts. Note: • BEEP - In this mode, the instrument is pre-configured to beep BEEP mode only according to the alarm threshold set in the Alarm configuration and works with CUMULATIVE the instrument’s sample time when the instrument is set to collect data and for Sample Times... -
Page 90: Particle Display
Lighthouse SOLAIR 3350, 5350 Gen E Operating Manual PARTICLE DISPLAY Data on the instrument can be displayed in Differential (DIFF) or Cumulative (CUML) counts. For example, the cumulative count for the 1 m channel is the sum of that channel’s count + 2.5 m count + the 5 m count. -
Page 91: Alarm
Operate Counter ALARM The Particle Alarm screen allows the user to enable alarming on specific channels as shown in Figure 6-31. Figure 6-31 Particle Alarm Configuration Example Note: To enable the alarming for any channel, press the “X” next to that Alarming is only applicable for AUTO and channel. - Page 92 Lighthouse SOLAIR 3350, 5350 Gen E Operating Manual Note: Enter the desired alarm threshold for the selected particle channel, in To use alarms, the Sample Time must be number of particles, then press ENTER. The threshold value will be greater than 1 second.
-
Page 93: Clear Buffer
Operate Counter When the instrument begins to beep in response to the Alarm settings, silence the beep by pressing anywhere on the MAIN screen. After acknowledging the alarm, the count will reset when the next sample cycle begins. CLEAR BUFFER To clear the data buffer on the instrument, press the Clear Buffer button. -
Page 94: Clock
Lighthouse SOLAIR 3350, 5350 Gen E Operating Manual CLOCK The Date & Time screen allows the user to set the instrument’s date and time. See Figure 6-37. Figure 6-37 Date & Time Configuration Screen Set the instrument’s Date by entering values for the desired month, day and year and then press the ENTER button. - Page 95 Operate Counter Figure 6-39 Date Option: Year First Set the instrument’s Time by pressing the TIME button. See Figure 6-40. Figure 6-40 Configuring TIME Enter the desired Time in hours, minutes and seconds then press ENTER to save the new time. Press BACK to return to the Configuration screen or press MAIN to return to the MAIN screen.
-
Page 96: Options
Lighthouse SOLAIR 3350, 5350 Gen E Operating Manual OPTIONS The Options screen allows the user to make visual and sound adjustments as well as selecting different language formats and start-up functions. See Figure 6-41. Figure 6-41 Options Configuration screen CONTRAST ADJUST The contrast/brightness of the LCD screen can be adjusted by pressing the first set of UP and DOWN arrows. - Page 97 Operate Counter WARNING: • The screen in Figure 6-42 appears. Touch anywhere on the screen to continue calibration. careful to touch the screen at the specified locations only. If touching the screen elsewhere during this process, the screen will be incorrectly aligned. Note: If the front panel does not respond to...
- Page 98 Lighthouse SOLAIR 3350, 5350 Gen E Operating Manual • The third screen displays the arrow in the upper left corner. The arrow will have to be touched three times to ensure calibration as Figure 6-44 illustrates this. Figure 6-44 Alignment Screen 3 •...
-
Page 99: Autostart Mode
Operate Counter Note: • Once the final alignment is complete, the following screen is The screen displayed. See Figure 6-46. Touch anywhere in the screen to return alignment function can also be accessed by to the OPTIONs screen. touching the screen when powering the instrument Figure 6-46 Alignment Saved Screen The ScanAir option is not available for this model at this time. -
Page 100: One Second Realtime Modbus Output
Lighthouse SOLAIR 3350, 5350 Gen E Operating Manual the MAIN screen. Note: One Channel mode only affects how data is displayed on the MAIN If the first channel is disabled, the display and screen. When the instrument is in One Channel mode, data will zoomed data view will be continue to be recorded, printed and downloaded for all channels. -
Page 101: Language
Operate Counter greater than one minute, to stabilize the laser and air flow. This setting should be left in the default mode unless special applications, such as “surface scans”, require it to be disabled. Language Pressing the LANGUAGE button allows the user to change the operating language displaying the screen shown in Figure 6-48. -
Page 102: Output Setup
Lighthouse SOLAIR 3350, 5350 Gen E Operating Manual For RS-485 communications, each device on a multi-port chain must have a unique address. See Figure 6-49. Figure 6-49 COMM Address Configuration screen Set the COMM Address by using the numeric keypad to select the address;... - Page 103 Operate Counter Figure 6-50 Output Setup Screen, USB Settings Each Dataxxxx.csv file is managed separately and data is added to the file while the flash drive is attached. When the drive is removed, the next insertion updates its index file and a new file is started. The next increment of the “xxxx”...
- Page 104 Lighthouse SOLAIR 3350, 5350 Gen E Operating Manual Figure 6-51 LMS Express LSD File Import If a USB Flash Drive is attached to the SOLAIR, the PRINTER icon will change to a flash drive and the following message will display as shown in Figure 6-52.
- Page 105 Operate Counter If PRINTER is selected, several options become available for formatting the data and information to be included in the printed reports, as shown in Figure 6-53. Figure 6-53 Output Setup Screen, Printer Settings Output on Sample / Output on Alarm - When Output on •...
- Page 106 Lighthouse SOLAIR 3350, 5350 Gen E Operating Manual • LANDSC - Printer prints in Landscape mode. See Figure 6-54. Figure 6-54 Examples of Portrait and Landscape Prints Note: Differential / Cumulative Toggle - This toggle option specifies The user can select •...
-
Page 107: Trouble Shooting The Printer
Operate Counter Trouble Nothing Prints Shooting the • The printer door may not be completely closed. Printer ACTION: close the door completely. See Figure 6-56. • Print Output is directed to USB Flash Drive. ACTION: Redirect output to printer. Figure 6-56 Door is Closed and Latched •... -
Page 108: Security
Lighthouse SOLAIR 3350, 5350 Gen E Operating Manual ACTION: make sure the paper is lined up with the left and right sides of the paper feed. See Figure 6-58. lined up evenly between left & right sides Figure 6-58 Paper alignment through paper feed •... -
Page 109: Power On Password
POWER ON password. See Figure 6-60. record the unit’s passwords in a safe place. If the password is lost or forgotten, contact Lighthouse technical support at 800-945-5905 (USA Toll Free) or 541- 770-5905 (Outside of USA) for assistance. The... -
Page 110: Configuration Password
Configuration screen. See Figure 6-61. Figure 6-61 CONFIGURATION Password Access Screen SERVICE This section of the Configuration screen is reserved for Lighthouse Authorized Service Providers only. The correct service password must be entered to access this area. Three options on the lower CONFIG screen, STATUS, RECIPE and LOC display the instrument’s current status, and allow the user to... -
Page 111: Recipe
Operate Counter Figure 6-62 SOLAIR 3350 STATUS Screen RECIPE Selecting the RECIPE button displays the Recipe setup screen. See Figure 6-63. Figure 6-63 Recipe Setup Screen The Recipe feature allows the user to save instrument settings for sampling and reports in a database that can store up to 50 recipes. - Page 112 Lighthouse SOLAIR 3350, 5350 Gen E Operating Manual Selecting the ADD button displays the RECIPE text screen. See Figure 6-64. The recipe can be named using up to 12 characters. Note: If the location selected is already assigned to another recipe...
- Page 113 Operate Counter Pressing the EDIT button on the highlighted RECIPE will allow the user to change the recipe settings. The LOAD and UNLOAD buttons add or remove the highlighted recipe as the instrument’s current operating configuration. The DELETE button will delete any highlighted recipes from the database.
-
Page 114: Location
Lighthouse SOLAIR 3350, 5350 Gen E Operating Manual Figure 6-67 Recipe - Analog & Output Settings LOCATION The SOLAIR allows up to 200 different locations and associated alphanumeric labels. Press the LOC button on the Configuration screen to display the Select Location screen as shown in Figure 6-68. - Page 115 Operate Counter screen. The following options can be enabled to configure locations for the SOLAIR. • When enabled, the Auto Increment option will automatically select the next location after completing the programmed number of cycles. The default position is “off” when the unit is powered up. •...
- Page 116 Lighthouse SOLAIR 3350, 5350 Gen E Operating Manual To create a name for a location, press the EDIT button to display the Edit screen shown in Figure 6-70. Figure 6-70 LOCATION Edit Screen • Type in the name of the location using the alphanumeric and underscore keys.
-
Page 117: Data View Buffer Screen
Operate Counter Figure 6-71 Auto Increment Prompt • The Auto Increment mode will select the next corresponding location and continue to sample using the current configuration. If the current location is using a recipe, the user will be prompted to unload the recipe before moving to the next location. - Page 118 Lighthouse SOLAIR 3350, 5350 Gen E Operating Manual Figure 6-72 Data Screen - RAW Data Scroll through the data using the UP and DOWN arrow buttons. • The single arrow moves one record at a time. Figure 6-73 Data Screen - Normalized data in ft The Data screen displays the following information for each data record.
- Page 119 Instr - Indicates the state of the instrument at the time the data was recorded. Instrument states include GOOD or SRVC. If SRVC appears, printouts will say “Service Required” and the sensor may need cleaning. Please contact Lighthouse Technical Support at 800-945-5905 (USA Toll Free) or 541-770-5905 (Outside of USA).
-
Page 120: Printing Data View Buffer Reports
Lighthouse SOLAIR 3350, 5350 Gen E Operating Manual If laser state is SRVC, please contact Lighthouse Technical Support at 1-800-945-5905 (USA Toll Free) or 1-541-770-5905 (Outside of USA). Printing Data The SOLAIR 1.0 CFM instruments store up to 3000 records in the data View Buffer buffer. -
Page 121: Print Record
Operate Counter Print Record When the user presses the PRINT RECORD button, whatever record is currently displayed on the Data View Buffer screen will print as a single sample record. The record will print according to the settings in the Print Configuration. Print Range Note: •... -
Page 122: Print Range (Buffer Report)
Lighthouse SOLAIR 3350, 5350 Gen E Operating Manual PRINT RANGE (BUFFER Report) The instrument stores up to 3000 records in its data buffer. The Buffer Report prints all or a range of the records in the buffer in the format specified by the selections in the Configuration. -
Page 123: Printing Buffer Report
Operate Counter The Data Summary can be viewed as: • Raw Counts, Differential Data • Raw Counts, Cumulative Data • Normalized Counts, Differential Data, Particles/ft • Normalized Counts, Differential Data, Particles/m • Normalized Counts, Cumulative Data, Particles/ft • Normalized Counts, Cumulative Data, Particles/m Printing Buffer Report •... - Page 124 Lighthouse SOLAIR 3350, 5350 Gen E Operating Manual Figure 6-77 displays sample buffer reports. ***** SUMMARY ***** ***** SUMMARY ***** **SOLAIR 3350** **SOLAIR 3350** Serial #: 130704005 Serial #: 130704005 ----- ----- Location: LOC005 Location: LOC005 07-10-2013, 13:32:10 07-10-2013, 12:34:30...
-
Page 125: Reports
Operate Counter REPORTS The SOLAIR can print the following Cleanroom Classification to Standards reports: Note: Federal Standard ft The EU GMP 2009 report is only valid if the ISO 14644-1 instrument is configured with EU GMP 2009 the 0.5 and 5.0 micron channel sizes. - Page 126 Lighthouse SOLAIR 3350, 5350 Gen E Operating Manual • When the reports mode is enabled, the currently selected report type and minimum required samples will be displayed on the MAIN screen as shown in Figure 6-79. Figure 6-79 Reports Data •...
- Page 127 Operate Counter When one of the report options buttons is pressed, the instrument uses the current Room Area, Class Level, Air Flow and Room Status parameters to determine the minimum number of locations, samples and volume per channel in order to classify a cleanroom with that standard.
- Page 128 Lighthouse SOLAIR 3350, 5350 Gen E Operating Manual • Press the CLASS button and the Select Class screen displays as shown in Figure 6-82. Figure 6-82 Select Class Level • Press the displayed values to select the desired Class Level. The selected level will be highlighted in blue.
- Page 129 Operate Counter • Press the AREA button to display screen shown in Figure 6-83. Note: If the entered Area values needs more locations than available, a “Not enough locations” message will be displayed and the user will be asked to enter a lesser area. Figure 6-83 Reports Area Setup Screen Note: •...
- Page 130 Lighthouse SOLAIR 3350, 5350 Gen E Operating Manual • Press the FLOW button to display screen shown in Figure 6-85. Figure 6-85 Reports Air Flow Screen • Choose the appropriate type of air flow (Unidirectional, Non- Unidirectional), then press the BACK button to return to the SETUP screen.
- Page 131 Operate Counter • Select the PARTICLE button to enable or disable particle channels as shown in Figure 6-87. Figure 6-87 Reports Particle Screen • Press the BACK button. • Select the SAMPLE button to configure the number of Cycles, Delay time, Hold time, Sample time and Volume. See Figure 6-88. Figure 6-88 Reports Sample Screen •...
- Page 132 Lighthouse SOLAIR 3350, 5350 Gen E Operating Manual • Select the SETTING button to format the instrument for CUML/ DIFF, RAW/NORM, ft as shown in Figure 6-89. Figure 6-89 Reports Settings Screen • Press the BACK button. • Select the LOC button to select, add or delete locations or enable Auto Inc as shown in Figure 6-90.
- Page 133 Operate Counter • Select BACK to return to the main REPORTs screen or select SAVE to save the configuration in the Recipe database. See Figure 6-91. Figure 6-91 Reports Setup Screen • When “REPORTS” are enabled, the “LOC” and “SAVE” buttons are displayed only when there are at least the minimum number of locations needed for the recipe area available.
-
Page 134: Setting Up Counter To Run Reports
Lighthouse SOLAIR 3350, 5350 Gen E Operating Manual Setting up Counter to Run Reports For this example, the FED STD FT report will be used. See Figure 6-93. Figure 6-93 FED STD FT3 Report Screen • Set the instrument for the Fed Std ft... -
Page 135: Report Output Setup
Operate Counter Based on the minimum requirements displayed Table 6-1, configure the instrument as follows: • Press MAIN to return to the MAIN screen. • Press CONFIG to enter the Configuration screen. • Press SAMPLE to set the Sample time. •... -
Page 136: Printing A Report
Lighthouse SOLAIR 3350, 5350 Gen E Operating Manual Printing a Report To print a report, the user can choose to either clear the data before starting the test or run the samples and then select the range of data to include in the report. -
Page 137: Iso 14644-1
Operate Counter ISO 14644-1 The ISO14644-1 standard requires a minimum of 60 second Sample Time for each sample recorded. Note: EU GMP 2009 The EU GMP 2009 report is only valid if the instrument is configured with The EU GMP Standard Report requires that the unit has the channel the 0.5 and 5.0 micron sizes 0.5 and 5.0 as these are the only channels that apply to this channel sizes. -
Page 138: Sample Printouts Of Standard Reports
Lighthouse SOLAIR 3350, 5350 Gen E Operating Manual Sample Printouts of Standard Reports Figure 6-94, Figure 6-95 and Figure 6-96 are examples of a Federal Standard Ft3, ISO 14644-1 and EU GMP 2009 reports. Note: If a recipe is loaded, the name of the... - Page 139 Operate Counter Note: If a recipe is loaded, the name of the ************* recipe will be printed on the report. ISO 14644-1 **SOLAIR 3350** Serial#: 13704005 Targeted Class: 8 Room Area: 1.49 m^2 Room Stat: Operational Air Flow: Unidirect Min Loc: 2...
- Page 140 Lighthouse SOLAIR 3350, 5350 Gen E Operating Manual Note: If a recipe is loaded, the name of the recipe will be printed on ************ the report. EU GMP 2009 **SOLAIR 3350** Serial #: 130704005 Targeted Class: Room Area: 9.00 m^2...
-
Page 141: Power Shutdown Levels
Operate Counter Power When the instrument is powered by its rechargeable battery, only, a Shutdown Power Shutdown feature protects the battery from discharging completely. A complete discharge could damage the battery. Levels Note: The battery levels are displayed in Table 6-2. It is not recommended to allow the Table 6-2 Levels of Battery Life... - Page 142 Lighthouse SOLAIR 3350, 5350 Gen E Operating Manual 6-78 248083387-1 Rev 10...
-
Page 143: Chapter 7 Programming
Programming General The SOLAIR can be programmed and operated using the MODBUS Information Protocol. The full MODBUS protocol is detailed in Appendix B. This chapter contains the information needed to program the basic configuration for the instrument to meet the userr needs. Communicating The RJ45 connector on the instrument marked “RS485”... -
Page 144: Rj-45 Comm Port
Lighthouse SOLAIR 3350, 5350 Gen E Operating Manual RJ-45 Comm Port WARNING: The RJ45 connector (See Figure 7-1) on the instrument’s RS485 port +24VDC has both RS232 and RS485 lines. The pinouts are displayed in is present on RS-485 Port at Pin 7. -
Page 145: Usb Communications
Programming USB Communications The SOLAIR provides point-to-point communications via the USB Port. If it hasn’t been done, yet, install the USB driver provided on the product CD. Once it has been installed and the instrument is connected, the driver will be used to establish communications using a virtual COM port on the PC. -
Page 146: Configure With The Modbus Protocol
Lighthouse SOLAIR 3350, 5350 Gen E Operating Manual 6. Identify the computer port that has been added to the PC by using the “Properties” of My Computer and examining the COM ports. USB ports are generally added to the bottom of the list and named USB COM port ’x’. -
Page 147: Setting The Real Time Clock
Programming Setting the Real Time Clock The Real Time Clock (RTC) can be read in registers 40027 and 40028: Table 7-2 Real Time Clock Registers Register Data Type Description 40027 signed integer Real Time Clock (RTC) [high]. Works in conjunction with 40028. Displays date and time, in number of seconds since midnight, 1/1/1970. - Page 148 Lighthouse SOLAIR 3350, 5350 Gen E Operating Manual The low word register for Sample Time is 40034. The low word register for Hold Time is 40032. The low word register for Initial Delay is 40030. Table 7-4 Instrument Parameters Register...
-
Page 149: Running The Instrument
Programming Running the The SOLAIR can be run in a few different ways. The applicable action Instrument commands are discussed here: Table 7-5 Action Commands Value Action Saves all writable 4xxxx register values to the EEPROM. Clears the Data Buffer. Record count is set to zero. Saves the instrument parameters in the 40xxx registers to the EEPROM. -
Page 150: Manual Counting Mode
Lighthouse SOLAIR 3350, 5350 Gen E Operating Manual MANUAL Counting Mode In Manual counting mode, the sample time is based on when the counter is instructed to stop counting. At this point, a data record is recorded and the sample time is the interval between the command to start counting and the command to stop counting. -
Page 151: Chapter 8 Maintenance Procedures
Service Wrench icon is displayed on the MAIN screen, the user has been requested to do so by Lighthouse Technical Support personnel or the user has reason to question the data received from the instrument. -
Page 152: Troubleshooting
Allow the unit to sample overnight with the purge filter attached before retesting it. If the counts are still high after the overnight purge, call Lighthouse Technical Support for assistance at 800-945-5905 (USA Toll Free), 541-770-5905 (Outside of USA). -
Page 153: Appendix A Default Settings
Default Settings Default Settings for SOLAIR Particle Counters MENU ITEM VALUE LOC001 PARTICLE CHANNELS ALL CH ENABLED # OF CYCLES DELAY TIME 00:00:04 HOLD TIME 00:00:10 SAMPLE TIME 00:01:00 SAMPLE VOLUME COUNT MODE AUTO PARTICLE DISPLAY CUML DATA FORMAT PARTICLE VOL PARTICLE ALARMS ALL DISABLED ALL THRESHOLDS... - Page 154 Lighthouse SOLAIR 3350, 5350 Gen E Operating Manual 248083387-1 Rev 10...
-
Page 155: Appendix B Solair 3350, 5350 Modbus Register Map V1.48
SOLAIR 3350, 5350 MODBUS Register Map v1.48 COMM Lighthouse particle counters using MODBUS require the following Settings communications settings: Table B-1 MODBUS Communications Settings 19200 Baud Rate Data Bits Stop Bits None Parity RS485, USB and Ethernet Hardware Protocol MODBUS ASCII (supports upper/lower case) -
Page 156: Sensor Settings Registers
Lighthouse SOLAIR 3350, 5350 Gen E Operating Manual Register Map Sensor Settings Registers Instrument settings are stored in holding registers (the 4xxxx series), which are mostly read/writable. Not all holding registers are writable. Table B-3 describes the contents of these registers. - Page 157 SOLAIR 3350, 5350 MODBUS Register Map v1.48 Table B-3 Sensor Settings Registers Register Data Type Description 40020 ASCII string Model Name char[10], char [11] 40021 ASCII string Model Name char[12], char [13] 40022 ASCII string Model Name char[14], char [15]...
- Page 158 Lighthouse SOLAIR 3350, 5350 Gen E Operating Manual Table B-3 Sensor Settings Registers Register Data Type Description 40034 unsigned integer Sample Time [low] 40035 unsigned integer Data Set [high]. Works in conjunction with 40036. Data entered here is applied to the device through the command register.
- Page 159 SOLAIR 3350, 5350 MODBUS Register Map v1.48 Alarm Mode (40037) defines the type of calculation performed to define an alarm condition. Alarm Mode = 0 corresponds to conventional threshold alarming; channel bit set if threshold exceeded for that given channel.
- Page 160 Lighthouse SOLAIR 3350, 5350 Gen E Operating Manual Device Status The Device Status register (40003) displays the current status of the device. Table B-6 Device Status Description RUNNING: Set when a start command is executed remotely via Command 9 (manual start) or Command 11 (instrument start) or through the user interface.
- Page 161 SOLAIR 3350, 5350 MODBUS Register Map v1.48 Table B-7 Command Register Value Action Start local pump, if applicable - perform before 9 below. Stop pump, if applicable - perform after 10 below. Manual Start. The instrument samples continuously until it receives a Manual Stop command.
-
Page 162: Data Registers
Lighthouse SOLAIR 3350, 5350 Gen E Operating Manual Data Data is stored in the input registers (30xxx series), which are read-only. Registers All data items are four bytes long and are stored across two registers. Byte and word order for integer data is big-endian. Thus, data items are formed by placing the high bytes in front of the low bytes. -
Page 163: Data Status Byte (30007 - 30008
SOLAIR 3350, 5350 MODBUS Register Map v1.48 Table B-8 Data Registers Register Data Type Description 30009 unsigned integer Particle Channel 1 [high] 30010 unsigned integer Particle Channel 1 [low] 30011 unsigned integer Particle Channel 2 [high] 30012 unsigned integer Particle Channel 2 [low]... -
Page 164: Alarm Flags In Channels (30076
Lighthouse SOLAIR 3350, 5350 Gen E Operating Manual The bits within the Data Status Byte are flagged to indicate particular conditions of the currently indexed data record. If multiple states occur, the bits are added together. For example, a Flow Alert and a Particle Overflow would return a value of 6 in register 30008 (bits 1 and 2 are set TRUE). -
Page 165: Data Type Registers
SOLAIR 3350, 5350 MODBUS Register Map v1.48 Data Type Registers Note: The 41xxx register series is used to identify the type of data items in the All data records 30xxx series. The Data Type registers run in parallel with the Data have the same data types assigned to them. -
Page 166: Data Units Registers
Lighthouse SOLAIR 3350, 5350 Gen E Operating Manual Note: Particle data items are typed specially. They contain numbers, Only Particle data sometimes a space and sometimes a period used as a decimal point. types have numbers in their strings. These entries are used to identify particle channel sizes and are always expressed in microns. -
Page 167: Data And Alarm Enable Registers
SOLAIR 3350, 5350 MODBUS Register Map v1.48 Table B-12 Data Units Units Description Units Description Meters ft^2 Square feet mBar Milli-bar Square meters Volts ft^3 Cubic feet Milli-volts Cubic meters Amperes Liters Milli-amps Cubic feet per minute Ohms Cubic meters per minute... - Page 168 Lighthouse SOLAIR 3350, 5350 Gen E Operating Manual The 43xxx register series is used to determine which particle data channel is ENABLED and which are set to ALARM ENABLE. These registers supersede the older Data Enable Registers (31xxx) which have been obsoleted.
- Page 169 SOLAIR 3350, 5350 MODBUS Register Map v1.48 Table B-14 Alarm Enable Registers Register Data Type Description 43022 unsigned int Enable for Particle Channel 7 [low] 43023 unsigned int Enable for Particle Channel 8 [high] 43024 unsigned int Enable for Particle Channel 8 [low]...
-
Page 170: Enable Alarming For A Channel
Lighthouse SOLAIR 3350, 5350 Gen E Operating Manual Enable Alarming for a Channel To enable alarming on the third particle channel, the user would enable Bit 1 for register 43014. To disable alarming on the third channel and enable alarming on the second channel, disable Bit 1 for register 43014 and enable Bit 1 for register 43012. - Page 171 SOLAIR 3350, 5350 MODBUS Register Map v1.48 Note: The threshold registers (45xxx series) run in parallel with the data The table below registers (30xxx series). For example, data register 30010’s shows the registers for an 8 channel particle corresponding threshold register would be 45010. Data register 30016’s counter.
-
Page 172: Setting The Alarm Threshold Value
Lighthouse SOLAIR 3350, 5350 Gen E Operating Manual Setting the Alarm Threshold Value The Alarm Threshold Value is set in the low register of the channels. Table B-17 Alarm Threshold Registers set to default value Particle Threshold Registers Channel Value... -
Page 173: Appendix C Modbus Real Time Flow And Laser Current
3. Apply power to the RS485 Converter. more information. 4. Apply power to the SOLAIR 3350 or 5350. 5. Press START in the MAIN screen of the SOLAIR 3350 or 5350. 6. Start the MODBUS software tool on the computer system. 248083387-1 Rev 10... - Page 174 Lighthouse SOLAIR 3350, 5350 Gen E Operating Manual 7. For flow values, read registers 30067 and 30068 as Float32: • Flow value will be shown in CFM, for example: • Flow rate = 3.5 CFM displays 1; • Flow rate < 3.5 CFM displays .9;...
-
Page 175: Appendix D Limited Warranty
Upon expiration of the initial two-year warranty, all parts and any way altered without the explicit written consent of LWS then repairs completed by an authorized Lighthouse repair technician the warranty is null and void. This warranty is limited to a period are subject to a six (6) month warranty. - Page 176 Lighthouse SOLAIR 3350, 5350 Gen E Operating Manual 248083387-1 Rev 10...
- Page 177 Index Numerics Connector Pinout 4-1 ARP 4-16 ARP Cache 4-16 30076 arp -d * 4-20 Alarm Flags B-10 arp –d * 4-23 5-port hub 4-17 arp –s 4-20 Audible Beep Adjust 6-32 AUTO 6-24 AUTOMATIC Counting Mode 7-8 AC Indicator 6-4, 6-6 Automatic Mode 6-6, 7-7 Accessories Autostart 6-35, 6-36...
- Page 178 Lighthouse SOLAIR 3350, 5350 Gen E Operating Manual Clock 6-30 Count Mode 6-24 CMD 4-19 Auto 6-24 COMM Address 6-37 Concentration 6-24 Command Console 4-19 Manual 6-24 Command Register B-6 Count Modes 2-2, 2-4 Communicating with the Instrument 5-1 Counting Efficiency 2-2, 2-3...
- Page 179 External Stop Counter 7-7 Laser Source 2-2, 2-3 Laser Status 6-55 Li-Ion Battery Accessories 3-3 Limited Warranty D-1 Fed Std 209E (ft) 4-7, 6-72 little-endian data B-8, C-1 Federal Standard 209E (ft3) 6-61 Local Area Network 4-16 Flash Drive 5-5 Local Control 7-7 Flow Rate 2-2, 2-3 Location 6-4, 6-8, 6-44...
- Page 180 Lighthouse SOLAIR 3350, 5350 Gen E Operating Manual Print Differential Data 6-42 Print Last Record 6-5 Print Model Name 6-41 One Channel 6-35 Print Range 6-57 One channel mode 6-35 ALL 6-57 One second output 6-36 BACK 6-57 Operating Counter 6-1...
- Page 181 SOLAIR USB port assignment 5-4, 7-4 3200Rx 2-1 Using the Counter 5200Rx 2-1 First Use 6-1 SOLAIR 3350 Optional 6-Channel Thresholds 2-2 Optional 8-Channel Thresholds 2-2 Standard 6-Channel Thresholds 2-2 Vacuum Source 2-3, 2-4 Standard 8-Channel Thresholds 2-2 Valid Data B-10...
- Page 182 Lighthouse SOLAIR 3350, 5350 Gen E Operating Manual Flow Status 6-55 Laser Status 6-55 Print Range 6-57 Print Record 6-57 Warning +24VDC 1-2 Port-Connect 1-2 Warnings Port-Connect 1-2 Warranty D-1 Weight 2-3, 2-4 Zero Count Check C-1 Zero Count Level 2-2, 2-3...
Need help?
Do you have a question about the SOLAIR 3350 and is the answer not in the manual?
Questions and answers