Advertisement
Quick Links
Matco B.V.
Hamburgweg 16
7418 ES Deventer
The Netherlands
T +31 (0)570 52 88 30
F +31 (0)570 52 88 40
E info@matco.nl
I www.matco.nl
User manual
Machine
: Semi-automatic pallet wrapper
Type
: Turntable
Model
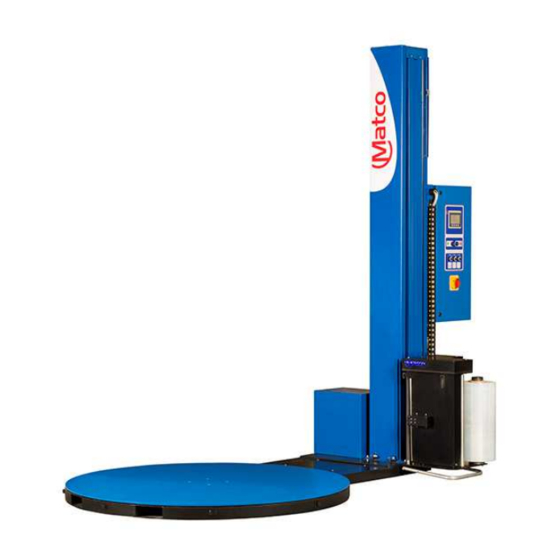
: Matco A400
Year of manufacture
Serial number:
Version 1.0
: 2018
Advertisement

Related Manuals for Matco A400


Summary of Contents for Matco A400
- Page 1 User manual Machine : Semi-automatic pallet wrapper Type : Turntable Model : Matco A400 Year of manufacture : 2018 Serial number: Matco B.V. Hamburgweg 16 Version 1.0 7418 ES Deventer The Netherlands T +31 (0)570 52 88 30 F +31 (0)570 52 88 40 E info@matco.nl...
- Page 2 Table of contents VEILIGHEID ..............................1-1 ............................1-1 EILIG GEBRUIK ........................1-1 EKWALIFICEERD PERSONEEL ..........................1-2 NGEVALLEN PREVENTIE GEBRUIK ..............................2-3 ............................2-3 EDOELD GEBRUIK ..........................2-3 NEIGENLIJK GEBRUIK ........................... 2-3 OEPASSINGSGEBIED ............................2-3 ESTGEVAREN ......................2-4 EN AANZIEN VAN DEZE HANDLEIDING ..................
- Page 3 1 Safety 1.1 Safe use The following symbols are used to warn against dangers and possible sources of danger. Become familiar with them! Not paying attention to a warning can result in personal injury and/or damage to the equipment or other equipment. Watch out: Not observing this can result in a fatal accident, personal injury or damage to equipment.
- Page 4 1.3 Accident prevention • Use of the machine by unauthorised persons is prohibited. • Personnel under the influence of medicine that influences reaction time or who are incapable of operating this equipment for physical reasons are not allowed to use the equipment.
- Page 5 2 Use 2.1 Intended use The winder will from now on simply be referred to as machine and may only be used for winding the appropriate products that meet the data as mentioned in the description. In case of doubt, ask the manufacturer for permission.
- Page 6 Danger of a hazardous area When applying products to the machine it is possible that a hazardous area is entered. Watch out: No access for unauthorised persons! Danger of entering a hazardous area. 2.5 Regarding this manual This manual is only valid in combination with other documentation of the user manual. For special use, this manual may be supplemented with extra specifications and/or supplements.
- Page 7 3 Technical details 3.1 Essential components Please note: The machine may not be used if protective hoods aren't present...
- Page 8 3.2 Description The Matco A400 is a simple pallet wrapper of which safety, ease of use and a robust industrial design are keywords. The machine is equipped with a powered pre-stretch system, a foil carriage with ‘simple foil feed system’ and a foil puncture system. Due to the analogue sensor with angle compensation set- up you save a maximum amount of foil.
- Page 9 3.3 Measurements...
- Page 10 4 Installing Watch out: Only allow qualified personnel to carry out the following tasks. Observe all safety regulations from this manual and from all other relevant documentation. 4.1 Unpacking Unpack carefully and check for transport damage. Store pallet, attachment and material for possible later transportation or remove as waste in accordance with the applicable instructions.
- Page 11 4.6 Plugging in Watch out: Harmful Voltage. Not observing these safety regulations can result in an fatal accident, personal injury or damage to equipment. Connection to power sources: • Preferably connect the machine via a power cable with plug on a feed point with wall socket with safety ground, which is secured with a fuse.
- Page 12 5 Operation Filling foil 1 - Place a foil roll (direction of unwinding depends on the side of the cling). 2 - Apply foil according to the illustration below. CI = CLING INSIDE (adhesive side) This is how the foil has to be placed in the braking system if the adhesive side is on the inside of the foil, when unwinding it from the foil roll.
- Page 13 5.2 Control panel 5-11...
- Page 14 5.3 Control panel explanation The first thing that strikes on the control panel is the operator panel. This includes many functions and options that are explained in paragraph 5.6 Operating screens. The operating panel also includes several push buttons and potentiometers. These are explained below. This button starts the automatic winding program.
- Page 15 5.4 Starting up the machine The machine stars in the following stages: 1. Switching on the machine Turn the main switch of the machine from the ‘0 position’ to the ‘I position’. This supplies the machine with power and switches it on. 2.
- Page 16 5.6 Operating screens The operator panel is a so-called ‘Touch panel’. The various functions as described in this manual can be operated by touching the screen. If the voltage is switched on again, the main menu will reappear on the operating panel. 5.6.1 Main menu This is an example, reality may differ.
- Page 17 5.6.2 Manual operation This is an example, reality may differ. This is the menu for manual operation of the winder. It includes the following functions: This button is for the manual operation of the rotation arm. The movement stops when releasing the button.
- Page 18 5.6.3 Program parameters This is an example, reality may differ. If the user chooses the second option, then this screen appears. Here you can enter the program parameters in a winding program. You do need a password for this. This password is only known by people in your company who are authorised to create or adapt settings.
- Page 19 5.6.3.1 Windings parameters This is an example, reality may differ. This is the first screen with adjustable parameters per program. This screen includes the following functions: Here you enter how many windings you want to have at the underside of a pallet. With these extra windings the load can be attached to the pallet tighter.
- Page 20 5.6.3.2 Parameter times This is an example, reality may differ. This is the third screen with adjustable parameters per program. This screen includes the following functions: Here you indicate the required time for the base windings. This adjustable time is to determine the height at which you want to make the base windings.
- Page 21 5.6.4 Messages This is an example, reality may differ. This screen treats the messages/failures of the machine. If something interrupts the machine, the message button in the main menu appears (See paragraph 5.6.1 ). When you press this, you see this screen. In this screen you get a message stating what is wrong with the machinery.
- Page 22 5.6.5 Supplier information This is an example, reality may differ. In this menu you can find information of the supplier who supplied the machinery. This screen includes the following functions: This button is to continue to the next menu. (See paragraph 5.6.6) This button sends you back to the main menu.
- Page 23 5.6.6 Statistics This is an example, reality may differ. In this menu you can find the various statistics of the machinery. This screen includes the following functions: Here you can see the operating hours counter. The field next to this graphic representation shows how many hours the machinery is in operation.
- Page 24 If this appears, please contact the service of Matco B.V. so they can help you further. This button is to continue to the next menu. Here you can also find a page that includes part of the service.
- Page 25 6 Maintenance Watch out: Switch off the main switch and lock it with a padlock, before maintenance work is done to the machine. Make sure that others cannot switch on the machine. Make sure that protective hoods and similar are assembled when switching on the machine.
- Page 26 6.3 Maintenance diagram Maintenance frequency 1000 2000 hours hours hours hours hours hours hours Clean daily Clean photocell lens Chain under turntable Turntable sprockets Geared belt pulley for the benefit of front carrier Cord for the benefit of carrier Bearings Running wheels foil carriage Running wheels turntable Limit/proximity switch...
- Page 27 6.4 Inspections Inspections Activities Electrical system Check the switches and other operational buttons for proper functioning. Check the signal lights. Check the magnet switches and relays for fusion penetration and humming. Check the wiring and connections. Check the photocells and possible reflectors for operation and adjustment (lenses must be clean).
Need help?
Do you have a question about the A400 and is the answer not in the manual?
Questions and answers