
Subscribe to Our Youtube Channel
Related Manuals for Wellis MONA WZ00090


Summary of Contents for Wellis MONA WZ00090
- Page 1 Mona shower panel INSTRUCTION MANUAL Mona dusch panel BEDIENUNGSANLEITUNG Panneau de douche Mona MODE D´EMPLOI Mona zuhanypanel HASZNÁLATI UTASÍTÁS WZ00090...
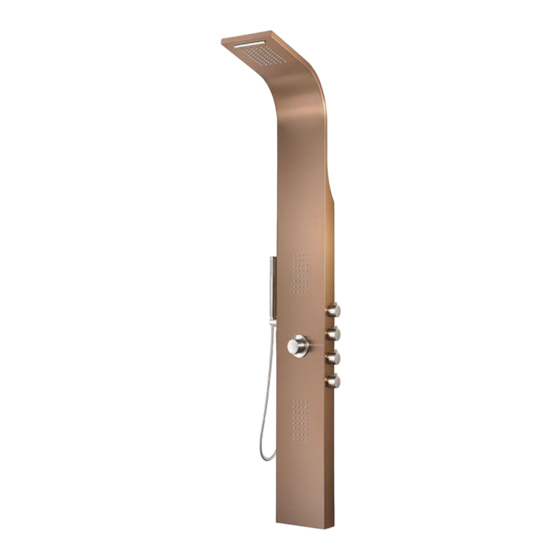
- Page 2 I. Function I . Function I. Function 2. Shower Head 1. Waterfall 3. Body jets 2. Shower Head 1. Waterfall 4. Diverter 3. Body jets 5. Mixer 4. Diverter 6. Hand shower 5. Mixer 6. Hand shower...
-
Page 3: Part List
ts List ase unpack and inspect all packages and components carefully, and ke sure they are complete. Examine for shipping damage. If some Part list Parts List s are damaged or missing, notify your dealer immediately. Parts List Please unpack and inspect all packages and components carefully, and Please unpack and inspect all packages and components carefully, andmake Please unpack and inspect all packages and components carefully, and make sure they are complete. -
Page 5: Wall Mounting
Wall-mounting Wall-mounting Wall-mounting NOTE! Before drilling any holes for fixing your shower panel ensure thatthere are no N o t e ! Before drilling any holes for fixing your shower panel ensure that N o t e ! Before drilling any holes for fixing your shower panel ensure that hidden cables or pipework within the wall. - Page 6 Dimension Dimensions Choose a suitable place to install the shower panel, adjust the shower Choose a suitable place to install the shower panel, adjust the shower panel’s panel’s vertical position based on the user’s height and your sanitary vertical position based on the user’s height and your sanitary room. Usually, room.
- Page 7 H: Cold water - ½” connection M: Hot water - ½” connection Construction and installation of a floor drain is obligatory! The dimensions given are indicative only and may vary due to the manufacturing technology of the product. By +-1 centimetres.
- Page 8 I. Funktion I . Function 1. Wasserfall 2. Duschkopf 1. Waterfall 3. Körperstrahlen 2. Shower Head 4. Ablenker 5. Mixer 3. Body jets 6. Handdusche 4. Diverter 5. Mixer 6. Hand shower...
- Page 9 ts List ase unpack and inspect all packages and components carefully, and ke sure they are complete. Examine for shipping damage. If some Zubehör Liste Parts List s are damaged or missing, notify your dealer immediately. Parts List Please unpack and inspect all packages and components carefully, and Bitte packen Sie alles aus und inspizieren Sie alle Pakete und Zubehörteile Please unpack and inspect all packages and components carefully, and make sure they are complete.
- Page 11 Anbringung an der Wand Wall-mounting Wall-mounting Achtung! Bevor Sie irgendwelche Löcher bohren, um N o t e ! Before drilling any holes for fixing your shower panel ensure that Ihre Dusche anzubringen, vergewissern Sie there are no hidden cables or pipework within the wall. N o t e ! Before drilling any holes for fixing your shower panel ensure that sich, dass es dort keine versteckten Kabel...
- Page 12 Größe Dimensions ählen Sie einen geeigneten Platz, um die Duschkabine zu installieren, Choose a suitable place to install the shower panel, adjust the shower panel’s passen Sie die Duschleitung vertikale Lage je nach der Nutzergröße vertical position based on the user’s height and your sanitary room. Usually, und Ihrem Badezimmer an.
- Page 13 H: Kaltes Wasser - ½” Verbindung M: Heißes Wasser - ½” Verbindung Bau und Installation eines Bodenablaufs ist obligatorisch! Die angegebenen Maße sind nur Richtwerte und können aufgrund der Herstellungstechnologie des Produkts um +-1 Zentimeter variieren.
- Page 14 I. Fonction I . Function 1. Chute d’eau 2. Tête de Douche 1. Waterfall 3. Jets de corps 2. Shower Head 4. Déviateur 5. Mélangeur 3. Body jets 6. Douche à main 4. Diverter 5. Mixer 6. Hand shower...
-
Page 15: Liste Des Pièces
ts List ase unpack and inspect all packages and components carefully, and ke sure they are complete. Examine for shipping damage. If some Liste des pièces Parts List s are damaged or missing, notify your dealer immediately. Parts List Please unpack and inspect all packages and components carefully, and Veuillez déballer et inspecter tous les emballages et composants avec soin, Please unpack and inspect all packages and components carefully, and make sure they are complete. -
Page 17: Montage Mural
Montage mural Wall-mounting Wall-mounting Remarque! Avant de percer des trous pour la fixation de votre N o t e ! Before drilling any holes for fixing your shower panel ensure that panneau de douche, assurez-vous qu’il n’y a pas de there are no hidden cables or pipework within the wall. - Page 18 Dimensions Dimensions Choisissez un endroit approprié pour installer le panneau de douche, Choose a suitable place to install the shower panel, adjust the shower panel’s ajustez la position verticale du panneau de douche selon la taille vertical position based on the user’s height and your sanitary room. Usually, de l’utilisateur et votre espace sanitaire.
- Page 19 H: Eau froide - Lien ½ “ M: Eau chaude - Lien ½ “ La réalisation et l’installation d’un siphon de sol sont obligatoires ! Les dimensions sont données à titre indicatif et peuvent varier de +/-1 centimètre en fonction de la technologie de fabrication du produit.
- Page 20 I. Működés I . Function 1. Vízesés 2. Zuhanypanel fej 1. Waterfall 3. Testvízsugarak 2. Shower Head 4. Áramláskapcsoló 5. Keverő 3. Body jets 6. Kézizuhany 4. Diverter 5. Mixer 6. Hand shower...
- Page 21 ts List ase unpack and inspect all packages and components carefully, and ke sure they are complete. Examine for shipping damage. If some Alkatrészlista Parts List s are damaged or missing, notify your dealer immediately. Parts List Please unpack and inspect all packages and components carefully, and Kérem, csomagoljon ki és gondosan vizsgáljon meg minden egységet és Please unpack and inspect all packages and components carefully, and make sure they are complete.
-
Page 23: Falra-Szerelés
Falra-szerelés Wall-mounting Wall-mounting Megjegyzés! Mielőtt lyukakat fúrna a zuhanypanel rögzítéséhez, N o t e ! Before drilling any holes for fixing your shower panel ensure that győződjön meg arról, hogy nincsenek rejtett there are no hidden cables or pipework within the wall. N o t e ! Before drilling any holes for fixing your shower panel ensure that vezetékek vagy csövek a fal belsejében... - Page 24 Méretek Dimensions Válasszon ki egy megfelelő helyet a zuhanypanel felszereléséhez Choose a suitable place to install the shower panel, adjust the shower panel’s és igazítsa a zuhanypanel függőleges pozícióját a felhasználó vertical position based on the user’s height and your sanitary room. Usually, magasságához és a fürdőszobához! Tipikusan a padlótól számítva Dimensions install the panels at the distance of 210cm from the top to the ground, but you...
- Page 25 H: Hidegvíz - ½”-os kiállás M: Melegvíz - ½”-os kiállás Padlóösszefolyó kiépítése kötelező! A megadott méretek tájékoztató jellegűek, a termék gyártási technológiájából adódóan eltérőek lehetnek. +-1 cm.
Need help?
Do you have a question about the MONA WZ00090 and is the answer not in the manual?
Questions and answers