
Related Manuals for Rose electronics Orion X OXS-CH288-00


Summary of Contents for Rose electronics Orion X OXS-CH288-00
- Page 1 Orion X Enterprise KVM Switch • CATx or Fiber • 48-576 Ports Installation Operation Manual 10707 Stancliff Road Phone: (281) 933-7673 Houston, Texas 77099 techsupport@rose.com...
- Page 2 LIMITED WARRANTY Rose Electronics warrants the Orion™ X to be in good working order for one year from the date of purchase from Rose Electronics or an authorized dealer. Should this product fail to be in good working order at any time during this one-year warranty period, Rose Electronics will, at its option, repair or replace the Unit as set forth below.
- Page 3 DECLARATIONS OF CONFORMITY This is to certify that, when installed and used according to the instructions in this manual, together with the specified cables and the maximum CPU- cable length <3m, the Units listed in Appendix B are shielded against the generation of radio interferences in accordance with the application of Council Directive 2004/108/EG as well as these standards: EN 55022:2006 + A1:2007 (Class A)
-
Page 4: Table Of Contents
TABLE OF CONTENTS Contents Page # Disclaimer..............................1 Introduction ..............................1 About This Manual ............................2 Features ..............................2 Compatibility ............................3 Package contents ............................ 3 System Overview ............................4 Orion X Model Description .......................... 5 Installation ..............................7 System Setup ............................7 Setup of the matrix .......................... - Page 5 Loading of Configurations (external) ....................71 Export and Import Options ........................72 Export Options ........................... 72 Import Options ........................... 73 Matrix Cascading ........................... 73 Matrix Grid ............................. 76 Firmware Update ........................... 78 Matrix Update ............................. 78 Extender Update ..........................80 License Management ..........................
- Page 6 External Failure ........................... 120 Video Interference ..........................120 Fan Malfunction ........................... 120 Power Supply Unit Malfunction ......................120 Network Error ............................120 Failure at the matrix ..........................121 Blank Screen ............................121 Figures Page # Figure 1. System Overview ......................... 4 Figure 2.
- Page 7 Figure 48. Modifying Mouse and Keyboard Settings through the OSD ............. 56 Figure 49. Modifying Mouse and Keyboard Settings through the Java Tool ..........56 Figure 50. Modifying Extender OSD Settings through the OSD ..............57 Figure 51. Modifying Extender OSD Settings through the Java Tool............58 Figure 52.
- Page 8 Figure 104. System Check through the Java Tool .................. 115 Figure 105. Troubleshooting Blank Screen ..................... 121 Figure 106. CPU Board DVI-D Single Link Connector Pinouts ..............125 Figure 107. CPU Board USB Type A Connector Pinouts ................ 125 Figure 108. CPU Board Serial Port Pinouts .................... 125 Figure 109.
-
Page 9: Disclaimer
(See limited warranty.) Introduction Thank you for choosing the Rose Electronics Orion™ X System. The Orion X System is the result of Rose Electronics’ commitment to providing continued state-of-the-art switching solutions for today’s demanding workplace. -
Page 10: About This Manual
About This Manual This manual covers the installation, configuration, and operation of the Orion X system. The system consists of three components; the Orion X switch, the CPU device(s), and the CON device(s). This manual only covers the Orion X switch. The Installation section explains how the three components are interconnected to form a seamless switching network. -
Page 11: Compatibility
Single-mode fiber cable allows up to 3,280 feet (1 km) on either side of the switch. Multi-mode fiber cable allows up to 32,808 feet (10 km) on either side of the switch. To use PS/2 keyboards and mice, please contact Rose Electronics for options. Package contents Orion X unit as ordered ... -
Page 12: System Overview
OVERVIEW System Overview An Orion X matrix system consists of an Orion X matrix, one or more CPU Units, and one or more CON Units. The Orion X matrix is connected to the CPU Units and CON Units by CATx or fiber interconnect cables. The CPU units are connected to the computers’... -
Page 13: Orion X Model Description
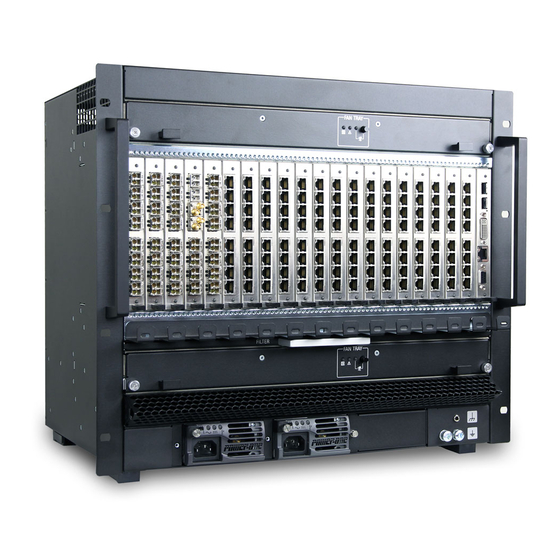
MODELS Orion X Model Description The Orion X is available in models with 48, 80, 160 and 288 ports. The following views of the Orion X matrix illustrate the available chassis types. Figure 2. Orion X 288-Port Model 1 - Slot for power supply unit 1 2 - Slot for fan tray 1 3 - Slot for power supply unit 2 4 - Slot for fan tray 2... -
Page 14: Figure 3. Orion X 160-Port Model
Figure 3. Orion X 160-Port Model 1 - Slot for power supply unit 1 2 - Slot for fan tray 1 3 - Slot for power supply unit 2 4 - Slot for fan tray 2 5 - Slots for I/O boards #1-20 6 - Slot for power supply unit 3 7 - Grounding 8 - Slot for CPU board... -
Page 15: Installation
INSTALLATION Installation The installation section of this manual explains basic System Setup. It also describes in detail how to set up the Orion X as a KVM Matrix, how to stack Orion X matrices, and how to make a grid of matrices. System Setup It is recommended that first time users initially connect all of the system components in the same room as a test setup. -
Page 16: Kvm Matrix
KVM Matrix In single-head mode, up to 288 ports can be used either as input or as output ports depending on the components and equipment. Non-blocking access is available to all users, i.e. user access is not limited by the activities of another user. -
Page 17: Video Matrix
Video Matrix When the Orion X is used as a Video Matrix, up to 288 input ports can be switched to up 288 output ports depending on the components and equipment. Figure 7. Video Matrix 1 – Video Source (e.g. SDI Camera) 2 - Interconnect cables 3 –... -
Page 18: Parallel Operation (Stacking)
Parallel Operation (Stacking) For some installations, such as those with multiple monitors per workstation, or those with the need to connect USB 2.0 devices, the number of connectable CPUs and consoles can be increased by the parallel operation (stacking) of several Orion X devices. One of the Orion X matrices is configured as the master matrix. -
Page 19: Matrix Grid
Matrix Grid A Matrix Grid is a multiple matrix configuration which increases the total number of ports accessible beyond those in a single Orion X. It is also useful when important equipment must be redundantly connected to several different matrix units. A Matrix Grid consists of a master matrix and at least one slave matrix. Up to 16 matrices can be interconnected in a matrix grid installation. -
Page 20: Configuration
CONFIGURATION Configuration The Orion X switch is easy to configure. This can be done through keyboard commands in Command Mode, invoking the On-Screen Display, or using the Java Tool. These options are described below. Command Mode The Orion X has a Command Mode that allows users to perform several functions through keyboard commands during normal use. -
Page 21: Control Options
Set user-defined 'Hot Key' When setting a user-defined 'Hot Key' (e.g. 2x<Space>), ‘Hot Key’ Code 0 is used. For example, to set <Space> as the ‘Hot Key’, the following keyboard sequence would be used: <current 'Hot Key'>, <c>, <0>, <Space>, <Enter>. Set ‘Hot Key’... -
Page 22: Figure 10. Osd Main Menu
Menu Structure Figure 10. OSD Main Menu The general layout of the OSD is structured into three areas: Upper status area (topmost two text lines) Working area Lower status area (lowest two text lines) OSD Keyboard controls The following keyboard commands are available. -
Page 23: Figure 11. Login Screen
Sorting and Searching Functions When dealing with lists and tables in the OSD, keyboard commands can be used to quickly sort, search, and refresh the items displayed. The following keyboard commands are available for lists and tables: Function Keyboard Command Sort by ID numbers in descending order by pressing the keyboard command once. -
Page 24: Control Through The Java Tool
The Java Tool is available as a single executable program file that does not require a separate installation. Copy the tool to a directory on the computer. If the Java Tool was not provided, contact Rose Electronics. Computer Connection to the Matrix Use a crossover network cable for a direct connection between a computer and the matrix, or a standard CATx cable for a connection through a switch or hub. -
Page 25: Figure 12. Java Tool Connect Screen
Figure 12. Java Tool Connect Screen Up to twelve connections between the matrix and Java Tool software can be established at the same time. Java Tool Screen structure Figure 13. Java Tool System Data Screen Orion X Installation and Operations Manual... - Page 26 The Java Tool screen is subdivided into various sections: Menu bar (top line) Toolbar (second line) Tab bar (third line) Task area (left menu section) Working area (right menu section) Status bar (bottom section) Operating Instructions The operation of the Java Tool is intuitive, and is compatible with the user interfaces of the most commonly used operating systems.
- Page 27 Reload Options The information shown in the Java Tool can be reloaded in different ways. By pressing <F5> on the keyboard By clicking Edit > Reload in the menu bar By clicking the "Reload" symbol in the symbol bar Context Function The Java Tool offers several context-specific functions that support a user friendly and effective operation.
-
Page 28: Figure 14. Java Tool Online Configuration
Online Configuration Configurations and system settings can be also edited when the Java Tool is in online mode with an active connection between matrix and Java Tool. Figure 14. Java Tool Online Configuration To edit a configuration in online mode, proceed as follows: 1. -
Page 29: Control Through The Serial Interface
Report The Java Tool is equipped with a report function that exports the current switching status and all relevant parts of the matrix configuration to a PDF file. The report function can be used in both online or offline mode of the Java Tool. -
Page 30: Assignment
Assignment CPU specific or console specific assignments can be made on the Orion X. CPU specific assignments can be made by attaching virtual CPUs to real CPUs. Console specific assignments can be made by attaching virtual consoles to real consoles. Virtual CPU Virtual CPUs can be assigned to real CPUs in this menu. -
Page 31: Figure 17. Virtual Cpu Devices Assignment Through Java Tool
Assignment through Java Tool Select Assignment > Virtual CPU Devices in the task area. Figure 17. Virtual CPU Devices Assignment through Java Tool To make an assignment, proceed as follows: 1. Select a virtual CPU in the Virtual CPU list. 2. -
Page 32: Virtual Console
Virtual Console Real consoles can be assigned to virtual consoles in this menu. This simplifies the process of setting and changing access permissions, by changing the permissions of the virtual console and then applying them to all real consoles assigned to the virtual console. Virtual consoles can be switched in exactly the same way as real consoles. -
Page 33: Figure 19. Virtual To Real Console Assignment Through Java Tool
Assignment through Java Tool Select Assignment > Virtual CON Devices in the task area. Figure 19. Virtual to Real Console Assignment through Java Tool To make an assignment, proceed as follows: 1. Select the desired real console in the Real Console table. 2. -
Page 34: System Settings
System Settings Several system settings can be set up and modified on the Orion X. The configuration of the system settings can only be done by users with administrator rights. System Data The system configuration is set up here. This can be done through either the OSD or the Java Tool. The following settings can be modified. -
Page 35: Figure 20. Modifying System Settings Through The Osd
Field Selection Description Keep I/O boards with incorrect or invalid firmware online in the Activated matrix. Invalid IO-Boards Shut down I/O boards with incorrect or invalid firmware Deactivated automatically (default). Hor. Mouse Speed Adjustment of the horizontal mouse speed, 1 = slow, 9 = fast (default value: 4) Ver. -
Page 36: Automatic Id
Modifying System Data through the Java Tool Select the General tab in System > System Data. Figure 21. Modifying System Settings through the Java Tool Automatic ID The settings for automatic creation of CPU and CON devices when a new extender unit is connected are handled in this menu. -
Page 37: Figure 22, Modifying Automatic Id Settings Through The Osd
Modifying Automatic ID Settings through the OSD Select Configuration > System in the main menu. Figure 22, Modifying Automatic ID Settings through the OSD Select between the following buttons: Button Function Cancel Reject changes Okay Save changes Modifying Automatic ID Settings through the Java Tool ... -
Page 38: Access Control
Access Control The access control configuration is set in this screen. The screen can be accessed in the OSD and the Java Tool. The following settings can be modified. Field Selection Description Users must login with a user name and a password once to enter OSD. -
Page 39: Figure 24. Modifying Access Control Through The Osd
Modifying Access Control through the OSD Select Configuration > Access in the main menu. Figure 24. Modifying Access Control through the OSD Select between the following buttons: Button Function Cancel Reject changes Save Save changes Modifying Access Control through the Java Tool ... -
Page 40: Switch Settings
Switch Settings The configuration of the switching parameters is set in this menu. This menu can be accessed in the OSD and the Java Tool. The following settings can be modified. Field Selection Description Users can switch to any CPU as an observer, even ones that already have another user connected (observers have no keyboard or mouse access). -
Page 41: Figure 26. Modifying Switch Settings Through The Osd
Modifying Switch Settings through the OSD Select Configuration > Switch in the main menu. Figure 26. Modifying Switch Settings through the OSD Select between the following buttons: Button Function Cancel Reject changes Save Save changes Modifying Switch Settings through the Java Tool ... -
Page 42: Network
Enter the Syslog server’s IP address in the form “192.168.1.1” Activate debug messages in Trace (default: NO) Note: The debug messages are exclusively for matrix diagnostics. They should be activated only after consultation with Rose Electronics. Otherwise, increased data traffic might limit the performance of the equipment. -
Page 43: Figure 28. Modifying Network Settings Through The Osd
Modifying Network Settings through the OSD Select Configuration > Network in the main menu. Figure 28. Modifying Network Settings through the OSD Select between the following buttons: Button Function Cancel Reject changes Okay Save changes Modifying Network Settings through the Java Tool ... -
Page 44: Date And Time
Date and Time This menu allows changes to the Date and Time, based on Simple Network Time Protocol (SNTP). This menu can be accessed in the OSD and the Java Tool. The following settings can be modified. Field Selection Description Activated Enable network time server synchronization SNTP Client... -
Page 45: Figure 31. Modifying Date And Time Settings Through The Java Tool
To set the real time clock without using SNTP, proceed as follows: 1. Set the current date in the Date field. 2. Set the current day of the week in the Day field (Monday = 1). 3. Enter the current time (international standard notation) in the Time field. 4. -
Page 46: User Settings
User Settings User identities and their privilege levels can be created and modified on the Orion X. User This menu is used to create and modify user identities and their privileges. It can be accessed with the OSD and the Java Tool. The following settings can be modified. -
Page 47: Figure 33. Modifying User Settings Through The Java Tool
Select between the following buttons: Button Function Create a new user Edit Edit an existing user Delete Delete an existing user Cancel Reject changes Okay Save Changes Modifying User Settings through the Java Tool Select Definition > User in the task area. Figure 33. -
Page 48: User Favorites List
To configure user’s access rights to CPUs, proceed as follows: 1. Select a user in the User list. 2. Three access lists (Full Access, Video Access Access) are displayed, with the available CPUs displayed in the assigned access lists. 3. To move a CPU to a different access list, right click on it, and from the pop-up window select the access list to which the CPU should be moved. -
Page 49: User Macros
Setting up User Favorites through the Java Tool In the working area of the User menu, select a user and then click the Favorites tab. Figure 35. Setting Up User Favorites through the Java Tool To create a favorites list for any user, proceed as follows: 1. -
Page 50: Figure 36. Setting Up User Macros Through The Osd
The following actions can be assigned to a User Macro: Field Selection Description Connect (P1=CON, Make a bidirectional connection from console P1 to CPU P2 P2=CPU) Connect Video (P1=CON, Make a video connection from console P1 to CPU P2 P2= CPU) Connect Private (P1=CON, Make a private connection from console P1 to CPU P2 P2= CPU) -
Page 51: Figure 37. Setting Up User Macros Through The Java Tool
To create a macro for the selected user, proceed as follows: 1. In the Key field, select the function key (F1 to F16) to which a macro is to be assigned. 2. Select the position in the Key list (1-16) where a macro command is to be inserted. 3. -
Page 52: Extender Settings
Extender Settings The creation of new extender units and the deletion of existing extender units are managed in this menu. It can be accessed in the OSD and the Java Tool. The extender unit describes a physical extender connected to the matrix. Every extender board with a direct cable connection to the matrix is recognized as an extender unit. -
Page 53: Flex-Port Extender Units
Managing Extender Settings through the Java Tool Select Definition > EXT Units in the task area. Figure 39. Managing Extender Settings through the Java Tool Select between the following buttons: Button Function New Unit Create a new extender unit Delete Unit Delete an existing unit Apply... -
Page 54: Usb 2.0 Extender
USB 2.0 Extender This section describes how to configure and use USB 2.0 extenders. USB 2.0 extenders must be connected to standard I/O boards. They can be configured for independent switching, or can be assigned to existing KVM extenders. USB 2.0 extenders can be configured through the OSD or the Java Tool. Configuring USB 2.0 Extenders through the OSD Select Configuration >... -
Page 55: Figure 41. Configuring Usb 2.0 Extenders Through The Java Tool
Configuring USB 2.0 Extenders through the Java Tool Select Definition > EXT Units in the task area. Figure 41. Configuring USB 2.0 Extenders through the Java Tool To create a USB 2.0 extender definition through the Java Tool, proceed as follows: 1. -
Page 56: Extenders For Uni I/O Boards (Usb 2.0 / Usb 3.0)
Extenders for UNI I/O Boards (USB 2.0 / USB 3.0) This section describes how to configure and use USB 2.0 / USB 3.0 extenders. USB 3.0 extenders need at least one UNI I/O boards and SFP modules supporting 6.25 Gbps. These extenders can be configured through the OSD or the Java Tool. -
Page 57: Figure 43. Configuring Uni I/O Board Extenders Through The Java Tool
Configuring UNI I/O Board Extenders through the Java Tool Select Definition > EXT Units in the task area. Figure 43. Configuring UNI I/O Board Extenders through the Java Tool To create a UNI I/O board extender definition through the Java Tool, proceed as follows: 1. -
Page 58: Cpu Device Settings
CPU Device Settings New CPU devices are defined in this menu, including their assignment to extenders. The assignment helps to describe and switch more complex computer configurations (e.g. Quad-Head with USB 2.0) in the matrix. This menu can be accessed in the OSD and the Java Tool. The following settings can be modified. -
Page 59: Figure 45. Modifying Cpu Settings Through The Java Tool
Modifying CPU Settings through the Java Tool Select Definition > CPU Devices in the task area. Figure 45. Modifying CPU Settings through the Java Tool Select between the following buttons: Button Function New Device Open a new CPU Device Delete Device Delete a CPU Device Apply... -
Page 60: Console Device Settings
To access a new CPU from the matrix, an assignment of one or more CPU type extender units is required. Proceed as follows: 1. Select the new CPU in the CPU Devices list. 2. Select one or more extenders in the Extender available list. 3. -
Page 61: Figure 46. Setting Up Con Devices Through The Osd
Setting up CON Devices through the OSD Select Configuration > CON Devices in the main menu. Figure 46. Setting Up CON Devices through the OSD Select between the following buttons: Button Function New R. Create a new real console New V. -
Page 62: Figure 47. Setting Up Con Devices Through The Java Tool
Setting up CON Devices through the Java Tool Select Definition > CON Devices in the task area. Figure 47. Setting Up CON Devices through the Java Tool Select between the following buttons: Button Function New Device Open a new CON Device Delete Device Delete a CON Device Apply... -
Page 63: Mouse And Keyboard
One or more CON Units (extender) must be assigned to the console device for it to access a CPU through the matrix. To make an extender assignment, proceed as follows. 1. Select the console in the CON Devices list to be assigned an extender. 2. -
Page 64: Figure 48. Modifying Mouse And Keyboard Settings Through The Osd
Modifying Mouse and Keyboard Settings through the OSD Select Configuration > EXT Units in the main menu. Figure 48. Modifying Mouse and Keyboard Settings through the OSD Select between the following buttons: Button Function Cancel Reject changes Okay Save changes Modifying Mouse and Keyboard Settings through the Java Tool ... -
Page 65: Extender Osd
Extender OSD The Extender OSD settings can be adjusted. These local settings apply to individual consoles. The settings can be accessed from the OSD and the Java Tool. The following Extender OSD settings are available. Field Selection Description When opening the OSD with the key sequence, a CPU selection Enable CPU Activated list will be displayed in the center of the screen. -
Page 66: Figure 51. Modifying Extender Osd Settings Through The Java Tool
In order to change the Extender OSD settings, proceed as follows: 1. Select the console extender in the EXT Units list for which Extender OSD settings are to be modified. 2. Confirm the selection by pressing the <Enter> key, and the respective console extender will be enabled for editing. -
Page 67: Console Favorites
Console Favorites Lists of up to 16 favorite CPUs can be created for each console. Switching to a CPU in the console favorites list is done by pressing the keyboard 'Hot Key' sequence followed by the number of the CPU in the list (1 to 16). -
Page 68: Console Macros
Setting up Console Favorites through the Java Tool Select Definition > CON Devices in the Task area, then select a console in the CON Devices list and click the Favorites tab to open it. Figure 53. Setting Up Console Favorites through the Java Tool To create a favorites list for any console, proceed as follows: 1. -
Page 69: Figure 54. Setting Up Console Macros Through The Osd
The following functions can be used in console macros. Field Selection Description Function Connect (P1=CON, P2=CPU) Make a bidirectional connection from console (01-16) P1 to CPU P2 Connect Video (P1=CON, P2= CPU) Make a video connection from console P1 to CPU P2 Make a private connection from console P1 to Connect Private (P1=CON, P2= CPU) -
Page 70: Figure 55. Setting Up Console Macros Through The Java Tool
To create a macro for a console, proceed as follows: 1. Select a console in the CON devices list. 2. Select a keyboard function key (F1 to F16) in the Key field to be used to invoke the macro. 3. Select the position in the macro list (1-16) where the macro command is to be inserted. 4. -
Page 71: Parallel Operation
Parallel Operation Parallel operation means control of a CPU Device by keyboard and mouse is allowed to pass from one CON Device to another concurrently connected Con Device. A CPU Device can never be controlled by more than one CON Device at a given time, but control can pass from the controlling CON Device after a specified period of keyboard and mouse inactivity. -
Page 72: Multi-Screen Control
Setting Up Parallel Operation through the Java Tool Select System > Switch in the task area. Figure 57. Setting Up Parallel Operation through the Java Tool In order to configure parallel operation through the Java Tool, proceed as follows. 1. -
Page 73: Figure 58. Setting Up Multi-Screen Control Through The Osd
Setting Up Multi-Screen Control through the OSD Select Assignments > Multi-Screen Control in the main menu. Figure 58. Setting Up Multi-Screen Control through the OSD To configure Multi-Screen Control through the OSD, proceed as follows. 1. Select the desired configuration layout for the CON Device in the Arrangement field (1 x 4 or 2 x 2). -
Page 74: Figure 59. Setting Up Multi-Screen Control Through The Java Tool
Setting Up Multi-Screen Control through the Java Tool Select Assignment > Multi-Screen Control in the task area. Figure 59. Setting Up Multi-Screen Control through the Java Tool To configure Multi-Screen Control through the Java Took, proceed as follows. 1. Select the block of four ports in the working area list that should be configured for Multi-Screen Control. Only blocks of four ports that contain at least one CON Unit are shown. -
Page 75: Saving And Loading Of Configurations
Saving and Loading of Configurations The menus described in this section provide a variety of ways to save and recall configurations, whether currently active configurations, internally stored configurations, or configurations saved on media external to the Orion X equipment. Active Configuration This menu can only be accessed in the OSD. -
Page 76: Figure 61. Saving Internal Configuration Through The Java Tool
In Default and File #1 to File #8, the name and information records of the respective saved configuration are shown. Each of these storage locations can be overwritten. The configuration stored in the Default location will become the default configuration. The storage location to be overwritten by the current configuration must be selected explicitly. -
Page 77: Loading Of Configurations (Internal)
Loading of Configurations (internal) In this menu, configurations previously saved to internal memory are loaded to become the active configuration. This menu can be accessed from the OSD and the Java Tool. Loading Internal Configuration through the OSD Figure 62. Loading Internal Configuration through the OSD Active shows the current configuration’s name and description. -
Page 78: Saving Of Configurations (External)
Loading Internal Configuration through the Java Tool Figure 63. Loading Internal Configuration through the Java Tool To load the configuration from the internal matrix memory, proceed as follows: 1. Select Administration > Activate Configuration in the task area during online-mode. 2. -
Page 79: Loading Of Configurations (External)
To save the active configuration as an external configuration file, proceed as follows: 1. Select File > Save As in the menu bar. 2. Enter a legal file name for the configuration. 3. Select the directory on the storage medium where it is to be saved. 4. -
Page 80: Export And Import Options
Export and Import Options The Orion X offers the option to export configuration lists (extender, CPUs, consoles and users) for external editing. The files can then be imported into the matrix configuration through the Java Tool. Exported configuration lists are always saved as .csv files for ease of offline editing with common spreadsheet applications. -
Page 81: Import Options
Import Options Configuration lists are imported in this menu. Figure 67. Importing Configuration Lists through the Java Tool To import, proceed as follows: 1. Select File > Import in the menu bar. 2. After opening the menu, select the list to import (Extender, CPU, Console or User). 3. -
Page 82: Figure 68. Setting Up Matrix Cascading Through The Osd
Setting Up Matrix Cascading through the OSD Select Configuration > EXT Units in the main menu of the master matrix. Figure 68. Setting Up Matrix Cascading Through the OSD 1. Press the New button. A new Extender Unit that is to be connected with Tie Lines will be created. 2. -
Page 83: Figure 69. Setting Up Matrix Cascading Through The Java Tool
Setting Up Matrix Cascading through the Java Tool Figure 69. Setting Up Matrix Cascading Through the Java Tool 1. Connect to the Master Matrix and then select Activate Online Configuration Mode. 2. Select Definition > EXT Units in the task area and click the New button. This opens a pop-up window. 3. -
Page 84: Matrix Grid
Matrix Grid The Matrix Grid screen is used to specify a configuration of two or more connected matrix switches. This may be necessary if the total number of ports in the entire system needs to be increased, or if some connections to important equipment should be distributed to several matrix switches for redundancy. -
Page 85: Figure 70. Setting Up A Matrix Grid Through The Osd - Step 1
Setting Up a Matrix Grid through the OSD In order to configure a Matrix Grid, proceed as follows. The following configuration steps have to be repeated for each matrix switch in the grid separately. 1. Select Configuration > System in the main menu. Figure 70. -
Page 86: Firmware Update
5. Activate the Enable Matrix Grid function. 6. Enter the device names of each matrix in the Grid into the Matrix Grid list, starting in the left column. A Grid Master will be automatically selected for the Matrix Grid. The closer a matrix is to the top of the list, the more likely it is to be considered in the selection process, if certain criteria like system availability are met. -
Page 87: Figure 73. Matrix Update Through The Java Tool
Preparation Take the following steps in order to prepare for the matrix update: 1. Save the matrix configuration externally. 2. Open Extras > Options in the menu bar, and enter the path to the firmware update files in the Firmware Directory setting. Click the Okay button to confirm the path. 3. -
Page 88: Extender Update
Extender Update The firmware of the extenders connected to the matrix can be updated in this screen. Extender update can be performed only in the Java Tool. Preparation Take the following steps in order to prepare for the extender update. 1. -
Page 89: Figure 75. Extender Update In Standard Mode Through The Java Tool - Step 2 (Update Firmware)
Figure 75. Extender Update in Standard Mode through the Java Tool - Step 2 (Update Firmware) 5. Start the actual update process by clicking the Update button. Note: Just before update begins, all affected I/O boards will be put into Service Mode. Each will be reactivated when its firmware update has completed. -
Page 90: Figure 77. Extender Update In Expert Mode - Step 2 (From The Service Mode Of The Osd)
2. Put the matrix into Service Mode upon request in the pop-up window or through Matrix > Activate Service Mode in the menu bar. Note: During Service Mode, all matrix functions are disabled on the I/O boards on which updates are being performed. -
Page 91: License Management
This menu provides for upgrading Orion X functionality by installing the license keys for new function bundles. Contact Rose Electronics to obtain license keys. This menu is accessible only from the Java Tool. Figure 78. License Management through the Java Tool To activate a function bundle, proceed as follows: 1. -
Page 92: Operation
OPERATION Operation The Orion X can be operated in three different ways: 1. Direct Switching through a keyboard connected to a CON port using 'Hot Keys' to switch between as many as 16 favorites using 'Hot Keys' to invoke switching macros 2. -
Page 93: Scan Mode
Direct Switching of Video, Keyboard and Mouse to previous CPU 1. Start Command Mode with the 'Hot Key'. The Caps Lock and Scroll Lock keyboard LEDs will flash when Command Mode is activated. 2. Press the <p> key on the keyboard. Command Mode is closed and the console is connected to the previous CPU with complete control. -
Page 94: Addressing Of Main And Sub Matrices
Addressing of Main and Sub Matrices The Orion X can be cascaded over two levels. Commands (including displaying the OSD) can be sent to either the main or the sub matrix. When command mode is active, an extra keystroke can indicate whether the command should be handled by the main matrix or the sub matrix. -
Page 95: Figure 80. Cpu Selection List In Osd For Kvm Switching
To switch the console to any available CPU, proceed as follows: 1. Select a CPU device from the CPU Devices list on the left side to connect to the CON device. 2. Confirm the desired connection type with the appropriate keyboard command. Switching operations by a CON device can only be made to the devices in the CPU Devices list. -
Page 96: Extended Switching
To activate scan mode, proceed as follows. 1. Define a favorites list for a CON Device or user. 2. Start Command Mode with the 'Hot Key' and press <o> to open the OSD. 3. Select one of the CPU Devices in the CPU selection list that are defined in the favorites list. 4. -
Page 97: Figure 82. Extended Kvm Switching Through Java Tool - Method 1 (From Extended Switch Option)
The following information is shown in this menu: Field Description CON device Assigned physical extender unit (CON unit) CON assigned Virtual CON Device that is assigned to the real CON device CPU connected Currently connected CPU device CON status Current connection status (CON device) EXT list List of all available physical extender units (CON units) CPU device... -
Page 98: Figure 83. Extended Kvm Switching Through Java Tool - Method 2 (From Matrix View Option)
To make a KVM connection between a console and a CPU, double-click on the corresponding selection box within the Full Access column and select the desired CPU. To make a video connection between a console and a CPU, double-click on the corresponding selection box within the Video Only column and select the desired CPU. -
Page 99: Con Switch
To perform switching operations between CON and CPU devices proceed as follows: 1. Move the mouse cursor to the port that is to be switched. 2. Hold down the left mouse button and move the cursor to the port that is to be connected to the first port. The cursor movement will be indicated as a black line. -
Page 100: Multi-Screen Control
1. If not in the Switch menu of the OSD, start Command Mode with the 'Hot Key'. 2. Press <o> to open the OSD. This shows a list of all available CPUs as a start menu. 3. Select Local CPU in the list and switch to it. The switching operation to the local source will be performed immediately. -
Page 101: Usb 2.0 Switching
USB 2.0 Switching Switching of USB 2.0 extenders works like the switching of KVM extenders. There are two options for switching USB 2.0 extenders depending on how the extenders are configured in the Matrix. 1. An extender unit with USB 2.0 is created and assigned to an existing device which has KVM extender units. -
Page 102: Serial Interface
To create a new switch macro, proceed as follows: 1. Open a new switch macro by clicking on the New icon in the Presets column of the working area. A prompt will be displayed asking whether the existing connections should be adopted for the new switch macro. -
Page 103: Factory Reset
Factory Reset Resetting the system to factory defaults is available through the OSD and the Java Tool. When a factory reset is done, all current settings and all configurations stored in the matrix will be lost. This also applies to the network parameters (DHCP will be reset to N) and the admin password. If firmware updates have been performed, the Orion X will be set to the defaults defined in the most recent firmware applied. -
Page 104: Summary Of Keyboard Commands
Summary of Keyboard Commands The following two tables summarize all the keyboard commands that affect extender and matrix functions. In the command notation, ‘+’, ‘,’ and ‘x’ have these meanings: <Key> + <Key> Press keys simultaneously <Key>, <Key> Press keys successively 2x <Key>... - Page 105 Matrix Keyboard Command Description <'Hot Key'>, <o> Open OSD <‘Hot Key‘>, <m>, <o> Open OSD of the master matrix in a cascaded environment <‘Hot Key‘>, <s>, <o> Open OSD of the sub matrix in a cascaded environment Set a KVM connection (keyboard, mouse and video) to the selected <'Hot Key'>, <’n’>, <Enter>...
-
Page 106: Diagnostics And Status Indicators
STATUS INDICATORS Diagnostics and Status Indicators This section describes the diagnostics that are available on the Orion X. Status indicators, both physically on the unit as LED indicators, and in the software, are discussed here. Status LEDs The Orion X components are fitted with the following LEDs for overall status indication. CPU Board Figure 86. -
Page 107: I/O Board
I/O Board CATx SFP Fiber SFP Coax Figure 87. I/O Board Status LEDs Status LED 1 Status LED 2 Status LEDs on the LAN Port: Pos. Status Description Light Blue I/O Board boot process Red Flashing I/O Board registration process Red / Yellow I/O Board in Service Mode or firmware conflict with CPU Status 1... -
Page 108: I/O Board Ports
I/O Board Ports CATx SFP Fiber SFP Coax Figure 88. I/O Board Ports Status LEDs 1 → Link Status LED 1 2 → Link Status LED 2 Status LEDs at the ports of the I/O boards: Pos. Status Description Link Status Port not activated (Orange) Flashing... -
Page 109: Power Supply Unit Orion X 288/160
Power Supply Unit Orion X 288/160 Figure 90. Orion X 288/160 Power Supply Unit LEDs 1 → AC Input Status LED 2 → DC Output Status LED 3 → Over Temperature Status LED Pos. Status Description AC Input OK (Green) Operating condition DC Output OK (Green) Operating condition... -
Page 110: Port Status
Port Status The connections and the switching status between the various consoles and CPUs are shown in this screen. It can only be accessed from the Java Tool. Viewing Port Status with the Java Tool The current port configuration of the Orion X is illustrated in this screen. ... - Page 111 The colors indicate the connection status: Color Description Grey Port not connected Orange Video connection Green KVM connection Faulty Port Blue Port connected to another matrix through a Grid Line The symbol indicates an extender that is recognized and defined at a certain port: Symbol Description Port connected to a CPU unit Port is connected to a CPU unit that is switched to a CON unit in Private Mode...
- Page 112 Click the left mouse button to display extender information for the currently selected port on the right hand side of the working area. The following information is available: Field Description Extender Name Name of the selected extender Extender Type Type of the selected extender Port ID Number of the selected port...
-
Page 113: Port Status Matrix Grid
Port Status Matrix Grid This screen shows the connections and switching status between the CON and CPU Devices within the Matrix Grid. The screen can only be accessed in the Java Tool. The screen is designed to show the matrix switches that are part of the Matrix Grid. Each matrix is displayed in an optimized view of 24 ports per line, in order to be able to show a larger number of ports, ... -
Page 114: Extender Osd
Extender OSD All extenders used with the Orion X are provided with their own OSD to display the connection status of the console. Figure 95.Extender OSD The following information is shown in the OSD information screen: Field Description Name of the console Name of the currently connected CPU Full Access: The console has a KVM connection to the displayed CPU. -
Page 115: Network Status
Network Status The current network configuration is shown in this screen. This screen can be accessed through the OSD or the Java Tool. The following information is shown in this menu: Field Description DHCP The network is allowed to assign network settings dynamically. Displays YES or NO. IP Address The current IP address of the matrix, whether provided manually or via DHCP Subnet Mask... -
Page 116: Firmware Status Matrix
Viewing Network Status through the Java Tool Figure 97. Viewing Network Status through the Java Tool 1. Select Status > Matrix View in the task area. 2. Use the left mouse button to click on the network port of the CPU board. The corresponding network status will be shown on the right side of the working area. -
Page 117: Figure 98. Viewing Firmware Status Through The Osd
Viewing Firmware Status through the OSD Select Status > Firmware in the main menu. Figure 98. Viewing Firmware Status through the OSD Viewing Firmware Status through the Java Tool Select Status > Matrix Firmware in the task area. Figure 99. Viewing Firmware Status through the Java Tool To read out the firmware status and store it locally (file extension .dtf), select Matrix >... -
Page 118: Firmware Status Extender
To get a better overview, the various modules can be expanded and contracted by clicking with the left mouse button on the plus or minus symbols in the Name column. By clicking with the left mouse button on the plus or minus symbol in the upper right corner of the working area (Expand Tree view), information can be expanded and contracted for all modules at once. -
Page 119: Trace Function
Trace Function All events, e.g. activities and switching operations of the Orion X matrix, are logged and displayed in this screen. This function is used for diagnostic purposes. This screen can only be accessed from the OSD. The following information is shown in this menu: Field Description Date... - Page 120 Options Select Extras > Options in the menu bar and open the Syslog tab. The following options are available: Option Description Log File Directory Default directory to store the log files Log File Name Default name of the log file Log File Extension Default extension for the log file Daily Logfiles...
-
Page 121: Snmp
SNMP The SNMP function allows all function-critical and safety-critical elements of the matrix to be monitored and queried. This function complies with the RFC 1157 standard. The SNMP option can be accessed from the OSD and the Java Tool. Note: When using SNMP monitoring, the use of a dedicated network to maintain continuous access is strongly recommended. -
Page 122: Figure 103. Snmp Monitoring Through The Java Tool
The following traps are available. Trap Description Status Notification about matrix status Temperature Notification about temperature within the matrix Insert Board Notification about insertion of a new I/O board into a slot Remove Board Notification about removal of an I/O board from a slot Invalid Board Notification about a faulty I/O board Notification about a newly connected extender to the matrix, a switched on... -
Page 123: System Check
System Check System Check provides a diagnostic ability to check the matrix configuration. This feature detects and displays suboptimal and faulty settings. It is used exclusively as a confidence check. It does not make any active changes in the configuration. The System Check feature can only be accessed through the Java Tool. -
Page 124: Service Information
This Unit does not contain any internal user-serviceable parts. In the event a Unit needs repair or maintenance, you must first obtain a Return Authorization (RA) number from Rose Electronics or an authorized repair center. This Return Authorization number must appear on the outside of the shipping container. - Page 125 SAFETY The Orion X has been tested for conformance to safety regulations and requirements, and has been certified for international use. Like all electronic equipment, the Orion X should be used with care. To protect yourself from possible injury and to minimize the risk of damage to the Unit, read and follow these safety instructions. Follow all instructions and warnings marked on this Unit.
-
Page 126: Maintenance
MAINTENANCE Maintenance The Orion X contains various components and assemblies that can be maintained by the user. The following components and assemblies are hot swappable, and can be removed and exchanged while the matrix is in operation. The following components within the Orion X can be hot swapped. Note: It is recommended that all relevant components of the matrix, including a chassis, are kept as spares in order to ensure 24/7 operation. -
Page 127: I/O Board
I/O Board To replace an I/O board, proceed as follows: 1. Pull the locking pin slowly out of the I/O board until it moves no further. Wait until the I/O board has been deregistered from the matrix. Deregistration will be confirmed by a permanent green light of the status LED #1 at the I/O board. -
Page 128: Troubleshooting
TROUBLESHOOTING Troubleshooting This section provides support for problems with the Orion X matrix. It is assumed that fully operational CPU and CON Devices are available, which can be tested over a peer-to-peer connection using CATx or fiber cables. Please refer to the extender manuals, if necessary. External Failure Problem Possible Reason... -
Page 129: Failure At The Matrix
Failure at the matrix Problem Possible Reason Solution Serial control not working or CPU and matrix operating at Synchronize baud settings only partially working different baud rates. between CPU and the matrix Serial control via RJ45 port not Wrong network cable ... -
Page 130: Appendices
Communication with fiber devices is performed via Gigabit SFPs that are connected to suitable fibers fitted with LC type connectors. Note: The correct function of the device can only be guaranteed with SFPs provided by Rose Electronics. SFP modules can be damaged by electrostatic discharge (ESD). Please consider ESD handling specifications. -
Page 131: Sdi (Interconnect)
SDI (Interconnect) Communication with SDI devices requires a mini coax connection with mini BNC connectors or 3G SFPs with transmission speeds of 0.36 Gbps (SD-SDI, SMPTE 259M), 1.485 Gbps (HD-SDI, SMPTE 292M) and 2.97 Gbps (3G SDI). Interconnect Cable The cables used to connect the Orion X to the extenders are described here. CATx A point-to-point connection is required. -
Page 132: Fiber
Fiber A point-to-point connection is necessary. Operation with multiple patch panels is allowed. Routing over active network components, such as Ethernet Hubs, Matrixes or Routers, is not allowed. Type of Interconnect Cable (Cable notations according to VDE) Type of Cable Specifications Two fibers 9μm I-V(ZN)H 2E9 (in-house patch cable) -
Page 133: Figure 106. Cpu Board Dvi-D Single Link Connector Pinouts
Connector Pinouts This section shows the pinouts for the connectors on the Orion X. CPU Board Connector DVI-D Single Link Figure 106. CPU Board DVI-D Single Link Connector Pinouts Pin Signal Pin Signal Pin Signal T.M.D.S data 2- T.M.D.S data 1- T.M.D.S data 0- T.M.D.S data 2+ T.M.D.S data 1+... -
Page 134: Figure 109. Cpu Board Rj45 Connector Pinouts
RJ45 Figure 109. CPU Board RJ45 Connector Pinouts Pin Signal Pin Signal n.c. n.c. n.c. n.c. I/O Board This section shows the pinouts of the connectors that are present on the different I/O boards. CATx I/O Board with RJ45 Connector Figure 110. -
Page 135: Power Supply
Power Supply Maximum Current / Voltage Orion X 288-port model 12 A, 100-240 VAC, 50/60 Hz Orion X 160-port model 9 A, 100-240 VAC, 50/60 Hz Orion X 80 and 48 port models 2.3 A, 100-240 VAC, 50/60 Hz Power Requirement Orion X 288-port model max. -
Page 136: Shipping Weight
Shipping Weight Orion X 288-port model Matrix 76.2 lb (34.6 kg) fully equipped Shipping Box 90.6 lb (41.1 kg) Orion X 160-port model Matrix 60.0 lb (26.3 kg) fully equipped Shipping Box 69.9 lb (31.7 kg) Orion X 80-port model Matrix 24.5 lb (11.1 kg) fully equipped Shipping Box... -
Page 137: Appendix B - Part Numbers
Appendix B – Part numbers Orion X Unit Part # Description OXS-CH288-00 Orion X-288TM 288 Port Switch Frame w/Control Board, 2 power supplies, w/o I/O Cards OXS-CH160-00 Orion X-160TM 160 Port Switch Frame w/Control Board, 2 power supplies, w/o I/O Cards OXS-CH080-00 Orion X-80TM 80 Port Switch Frame w/Control Board, 1 power supply, w/o I/O Cards... -
Page 138: Orion X Transmitters
Orion X Transmitters Transmitters – CATx Part # Description OT2-SLDTXUD1D Orion X-Tender™, Transmitter Unit, DVI-D, USB HID, CATx OT2-SLDTXUD1V Orion X-Tender™, Transmitter Unit, DVI-I (VGA), USB HID, CATx OT2-SLDTXTD1D Orion X-Tender™, Transmitter Unit, DVI-D, USB HID, USB2.0, CATx OT4-SLDTXTD1V Orion X-Tender™, Transmitter Unit, DVI-I (VGA), USB USB2.0, HID, CATx OT2-SLDTXUD1D/AUD Orion X-Tender™, Transmitter Unit, DVI-D, USB HID, Aud/Ser, CATx OT4-SLDTXUD1V/AUD... - Page 140 ▪ ▪ WWW.ROSE.COM sales@rose.com (800) 333-9343 ▪ ▪ Rose Electronics 10707 Stancliff Road Houston, Texas 77099 Rose USA (281) 933-7673 ▪ Rose Europe +49 (0) 2454 969442 Rose Asia +65 6324 2322 ▪ Rose Australia +61 (0) 421 247083 WWW.ROSE.COM...
Need help?
Do you have a question about the Orion X OXS-CH288-00 and is the answer not in the manual?
Questions and answers