Table of Contents
Advertisement
Quick Links
Making cooking as much fun as eating
Please read this instruction manual. This will ensure that you
make use of all the technical benefits the cooker has to offer.
It will provide you with important safety information. You will
then be familiarised with the individual components of your
new cooker. And we will show you how to make settings
step by step. It is quite simple.
The tables list the settings and shelf positions for numerous
well known dishes. All these dishes are tested in our cooking
studio.
In the unlikely event of a fault, look here for information on
how to rectify minor faults yourself.
A detailed table of contents will help you to find your way
around quickly.
Enjoy your meal!
Instruction manual
HLN 343250 B
HLN 343260 B
en
9000 482 143
140889
Advertisement
Table of Contents

Related Manuals for Bosch HLN 343250 B


Summary of Contents for Bosch HLN 343250 B
- Page 1 In the unlikely event of a fault, look here for information on how to rectify minor faults yourself. A detailed table of contents will help you to find your way around quickly. Enjoy your meal! Instruction manual HLN 343250 B HLN 343260 B 9000 482 143 140889...
-
Page 2: Table Of Contents
Table of contents Important information ..... . . Safety precautions ......Causes of damage . - Page 3 Table of contents Cleaning function ......Detaching the rails ......Notes .
-
Page 4: Important Information
Important information Read this instruction manual carefully. This will enable you to operate your appliance safely and correctly. Keep the instruction manual in a safe place. If the appliance changes owners, the instructions should always be included. Check the appliance for damage after unpacking it. Transport damage Do not connect the appliance if it has been damaged in transport. - Page 5 Hot surfaces Never touch the hotplates, the internal surfaces of the oven or the heating elements when they are hot. There is a risk of burning. Children must always be kept at a safe distance from the appliance. Open the oven door carefully. Hot steam may escape. Please note the residual heat indicator on the hob.
-
Page 6: Causes Of Damage
Repairs Incorrect repairs are dangerous. There is a risk of electrocution. Repairs may only be carried out by one of our experienced after sales engineers. Never replace a damaged power cable yourself. Risk of electrocution The power cable may only be replaced by one of our experienced after sales engineers. - Page 7 Damage to the oven Do not place the baking tray on the oven floor. Do not cover it with aluminium foil. Do not place dishes on the oven floor. This will cause heat accumulation. The baking and roasting times will no longer be correct and the enamel will be damaged.
-
Page 8: Installation And Connection
Installation and connection Electrical connection The appliance must be connected to the mains by a licensed expert. The regulations of your electricity supplier must be observed. Any damage arising from the appliance being connected incorrectly will invalidate the guarantee. For the installer An all pole isolating switch must be present on the Safety precautions installation side with a contact gap of at least 3 mm. -
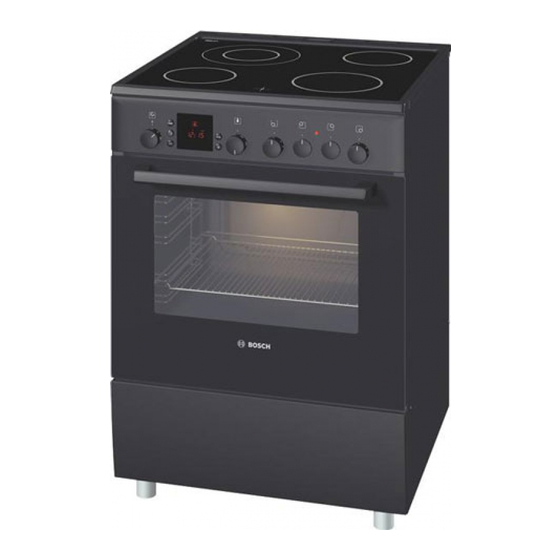
Page 9: This Is Your New Cooker
This is your new cooker Steam outlet Ceramic hob Hotplate Function selectors control Operating buttons Temperature with display panel selector Oven door Plinth drawer... -
Page 10: The Hob
The hob Steam outlet Caution. Hot air escapes from here 21 and 12 cm 14.5 cm dual circuit hotplate hotplate 18 cm 14.5 cm hotplate hotplate Residual heat indicator Hotplate controls You can use the four hotplate controls to control the level of heating provided by the hotplates. - Page 11 Settings t Top/bottom heating for sponge cakes in tins on one level, bakes, lean roasts of beef, veal and game á Hot air* for sponge cakes in tins, for puff pastry and for drying s Bottom heating for the final baking stage, for browning and for preserving R Hot air grilling for grilling large pieces of meat...
- Page 12 The temperature symbol in the display lights up when the oven is heating up. It goes out when the oven stops heating up. The symbol does not light up during radiant grilling and hot air grilling. You can adjust the grill setting on the radiant grill to Grill levels small area V or large area x using the temperature selector.
- Page 13 HEZ 324000 wire insert for grilling. Always place the wire insert in the universal pan. Fat and meat juices are collected. Universal pan HEZ 332000 for moist cakes, pastries, frozen food and large roasts. It can also be used to catch dripping fat when you are grilling directly on the wire shelf.
- Page 14 Optional accessories* Telescopic shelf with full extension With the pull out rails at levels 2, 3 and 4, you can HEZ338305 x 3 pull the accessories out fully without them tilting. XXL roasting dish HEZ390800 For large amounts, e.g. several fish. The roasting dish has a granite enamel exterior and an ovenproof glass lid.
-
Page 15: Before Using For The First Time
Before using for the first time This section tells you everything you need to do before using the cooker for the first time. Heat the oven and clean the accessories. Read the safety instructions in the Important information" section. Firstly, check to see if the j symbol and three zeros are flashing in the display. -
Page 16: Using The Hob
Using the hob Setting procedure Adjust the heat setting of the individual hotplates using the hotplate controls. 0 = Hotplate off 1 = Lowest heat setting 9 = Highest heat setting The indicator light lights up when a hotplate is on. Dual circuit hotplate The size of this hotplate can be altered. -
Page 17: Setting The Oven
Setting the oven You have various options for setting the oven. Switching off the oven When your meal is ready, switch off the oven yourself. manually The oven switches off You can leave the kitchen for a long period. automatically The oven switches on and You can put your meal in the oven in the morning, for off automatically... -
Page 18: If The Oven Is To Switch Off Automatically
Switching off Switch off the function selector when the meal is ready. Changing the setting You may change the temperature or grill setting at any time. If the oven is to switch off automatically Example: Top/bottom heating t, 200 ºC, cooking time of 45 minutes Select the desired type of heating using the function selector. - Page 19 Press the j clock button twice. The cooking time symbol ? will flash. Set the cooking time using the + or - button. + button default value = 30 minutes. - button default value = 10 minutes. The oven switches on after a few seconds. The ? symbol lights up in the display.
-
Page 20: If The Oven Is To Switch On And Off Automatically
If the oven is to switch on and off Please remember that easily spoiled foods must not automatically be allowed to remain in the oven for too long. Example: Imagine - it's 10:45 a.m. The meal will take 45 minutes to cook and must be ready at 12:45 pm. - Page 21 Set the cooking time using the + or - button. + button default value = 30 minutes. - button default value = 10 minutes. Press the j clock button until the ! symbol flashes. In the display you will see the time when the meal will be ready.
-
Page 22: Time
Time When the oven is first connected, or following a power cut, the j symbol and three zeros flash in the display. Set the time. The function selector must be switched off. Setting procedure Example: 13:00 Press the j clock button. 12.00 appears in the display and the j symbol flashes. -
Page 23: Timer
Timer You can use the timer as a kitchen timer. It operates independently of the oven. The timer has a special signal. This means that you can tell whether the set timer period has elapsed or the cooking time is complete. You can also set the timer if the childproof lock is active. -
Page 24: Childproof Lock
The timer and cooking time The symbols light up. The timer period counts down count down simultaneously visibly in the display. To call up the remaining cooking time ?, end time ! or time j: Press the j clock button until the symbol in question flashes. The value called up will then appear in the display for a few seconds. -
Page 25: Care And Cleaning
Care and cleaning Do not use high pressure cleaners or steam jets. There is a danger of short circuiting. Do not use caustic or abrasive cleaning agents. The surface could be damaged. If an abrasive substance comes into contact with the frontage, wash it off immediately with water. -
Page 26: Oven Back Wall Top And Side Walls
Oven back wall top and side walls The back wall, top and side walls in the oven clean themselves. They are coated with a highly porous ceramic layer. This coating absorbs and dispels splashes from baking and roasting while the oven is in operation. -
Page 27: Cleaning Function
3. Half close the oven door. With both hands, grip the door on the left and right hand sides. Close the door a little more and pull it out. After cleaning, refit the oven door in the reverse order to removal. Cleaning function The cleaning function is a regeneration program. -
Page 28: Detaching The Rails
Detaching the rails The rails can be removed for cleaning. To unhook the rails: Lift the front of the rails upwards and detach Then pull the rails forward and take them out. Clean the rails using either washing up liquid and a sponge or a brush. -
Page 29: Troubleshooting
Troubleshooting Should a malfunction occur, it is often only due to a minor fault. Please read the following instructions before calling the after-sales service: Problem Possible cause Comments/remedy The oven does not work. Blown fuse. Look in the fuse box and check that the fuse is in working order. -
Page 30: Replacing The Oven Seal
Replacing the glass cover You must replace a damaged glass cover. The replacement glass cover may be obtained from the after sales service. Please specify the E number and FD number of your appliance. Replacing the oven seal If the oven seal is faulty, it must be replaced by an after sales service expert. -
Page 31: Tables And Tips
Tables and tips This table contains a selection of dishes and the optimum settings at which to cook them. You can find out which type of heating and temperature is best for your dish, which accessories to use, and at which oven level the dish should be inserted. - Page 32 Food Dish Shelf Cooking Temperature Cooking position method time min Wire shelf + 160 170 20 25 Victoria sandwich 2 x 20 cm tins Wire shelf + á 150 160 25 30 2 x 20 cm tins Light fruit cake Wire shelf + á...
- Page 33 Food Dish Shelf Cooking Temperature Cooking position method time min Wire shelf + loaf tin 210 220 25 30 (White) Bread (900 g or 2 x 450 g) Wire shelf + loaf tin á 190 200 25 30 (900 g or 2 x 450 g) Universal pan 190 200 15 20...
- Page 34 Food Dish Shelf Cooking Temperature Cooking position method time min Universal pan 230 240 15 20 Pizza, homemade Universal pan á 190 200 15 20 Preheat at higher temperature, then reduce and insert food. Multishelf Baking Preheat oven every time. Food Dish Shelf...
-
Page 35: Baking Tips
Baking tips You wish to cook to your own Refer to the instructions in the tables for similar types of food. recipe. How to check that a sponge cake Approximately 10 minutes before the end of the baking time is cooked properly. given in the recipe, pierce the tallest point of the cake with a cocktail stick. -
Page 36: Meat, Poultry, Fish
Condensation forms when you Steam can form during baking. Depending on the oven, it will bake moist cakes. either escape above the oven door or through the steam outlet on the hob. The steam can condense on the appliance or on the front of adjacent cabinets and drip off as condensation. -
Page 37: Roasting With Hot Air
Roasting with Hot Air We recommend a size of meat between 2 and 5 pounds. Turn meat after half of cooking time Meat Food Dish Shelf Cooking Temperature Cooking position method time min per 1 lb + add. Time Beef rare Universal pan with á... -
Page 38: Roasting With Hotair Grilling
Food Dish Shelf Cooking Temperature Cooking position method time min Roast dinner / Wire shelf and á 170 180 90 100 complete meal universal pan with wire insert If necessary: Bake apple pie for additional time on lower shelf position till bottom is done. Use a dark metal tin for better baking results. -
Page 39: Grilling
Roasting Poultry Turn after C of cooking time. Food Dish Shelf Cooking Temperature Cooking position method time min per 1 lb. + add. time Chicken, Duck, up to Universal pan with 200 230 14+30 6 pound wire insert Goose up to 10 pound Universal pan with 160 180 18+30... -
Page 40: Tips For Roasting And Grilling
Tips for roasting and grilling How can you tell when the roast Use a meat thermometer (available from specialist shops) or is ready? carry out a spoon test". Press down on the roast with a spoon. If it feels firm, it is ready. If the spoon can be pressed in, it needs to be cooked for a little longer. -
Page 41: Defrosting
Cooking method t Preheat oven every time. Frozen Potato products should cover maximum 1 layer on the universal pan. Food Dish Shelf Cooking Temperature Cooking position method ºC time min Frozen pizza, 1 level Wire shelf 200 210 15 20 Chilled pizza, 1 level Wire shelf 190 200... -
Page 42: Preserving
Meal Level Type of Temperature in Cooking time in heating ºC hours 600 g apple rings Approx. 5 800 g sliced pears Approx. 8 1.5 kg prunes or plums Approx. 8 10 200 g fresh herbs, washed Approx. 1½ Note Very moist fruit or vegetables should be turned several times. - Page 43 Pour half a litre of hot water (approximately 80 ºC) into the universal pan. Close the oven door. Set the function selector to s bottom heating. Set the temperature selector to 170 180 ºC. Preserving fruit As soon as the contents of the jars begins to simmer, that is when small bubbles appear at short intervals after about 40 to 50 minutes turn off the temperature selector.
-
Page 44: Tips For Saving Energy
Remove the jars Never place the hot jars on a cold or wet surface as this could cause the glass to crack. Tips for saving energy in the oven Only preheat the oven if this is specified in the recipe or in the operating instructions table. -
Page 45: Acrylamide In Foodstuffs
Acrylamide in foodstuffs Which foods are affected? Acrylamide is mainly produced in grain and potato products heated at high temperatures, such as potato crisps, chips, toast, rolls, bread, baked goods (biscuits, gingerbread, cookies). Tips for keeping acrylamide to a minimum when preparing food General Keep cooking times to a minimum. -
Page 46: Test Dishes Referring To En/Iec 60350
Test dishes referring to EN/IEC 60350 Baking Preheat oven if indicated. If no indication start from cold oven. Food Dish and notes Shelf Cooking Temp. ºC Cooking position method time min Shortbread Universal pan 150 170 20 30 Shortbread* 2 levels Universal pan + á... - Page 47 Notes...
- Page 48 Notes...
Need help?
Do you have a question about the HLN 343250 B and is the answer not in the manual?
Questions and answers