D-Link DIR-300NRU User Manual
Wireless router with built-in 4-port switch
Hide thumbs
Also See for DIR-300NRU:
- User manual (93 pages) ,
- Quick installation manual (16 pages) ,
- Quick installation manual (28 pages)
Table of Contents
Advertisement
Quick Links
Advertisement
Table of Contents

Related Manuals for D-Link DIR-300NRU


Summary of Contents for D-Link DIR-300NRU
- Page 1 User Manual DIR-300NRU Wireless Router with Built-in 4-port Switch July 2012...
-
Page 2: Table Of Contents
DIR-300NRU Wireless Router with Built-in 4-port Switch User Manual Contents Chapter 1. Introduction..........5 Contents and Audience............5 Conventions..............5 Document Structure............5 Chapter 2. Overview..........6 General Information............6 Specifications..............7 Product Appearance............12 Front Panel and Right Side Panel.........12 Back Panel...............13 Delivery Package............14 Chapter 3. Installation and Connection......15 Before You Begin............15... - Page 3 DIR-300NRU Wireless Router with Built-in 4-port Switch User Manual Status..............80 Network Statistics............80 DHCP..............81 Routing Table............82 LAN Clients..............83 Net................84 WAN..............84 Creating PPPoE WAN Connection..........85 Creating Static IP WAN Connection........89 Creating Dynamic IP WAN Connection........92 Creating PPTP or L2TP WAN Connection........95 Creating PPTP + Static IP or L2TP + Static IP WAN Connection...99 Creating PPTP + Dynamic IP or L2TP + Dynamic IP WAN Connection..104...
- Page 4 DIR-300NRU Wireless Router with Built-in 4-port Switch User Manual System..............158 Administrator Password..........159 Configuration............160 System Log..............162 Firmware Upgrade............164 NTP Client..............166 Traceroute..............167 Telnet..............168 Chapter 5. Operation Guidelines........169 Safety Instructions............169 Wireless Installation Considerations........169 Connecting to Cable or DSL Modem..........170 Chapter 6. Abbreviations and Acronyms......171...
-
Page 5: Chapter 1. Introduction
Chapter 2 gives an overview of the router's hardware and software features, describes its appearance and the package contents. Chapter 3 explains how to install the router DIR-300NRU and configure a PC in order to access its web-based interface. Chapter 4 describes all pages of the web-based interface in detail. -
Page 6: Chapter 2. Overview
You are able to connect the wireless router DIR-300NRU to a cable or DSL modem or to a private Ethernet line and use a high-speed Internet connection to successfully fulfill a wide range of professional tasks. -
Page 7: Specifications
DIR-300NRU Wireless Router with Built-in 4-port Switch Overview User Manual Specifications WAN Interface: 1 10/100BASE-TX Ethernet port for cable or DSL modem or private Ethernet line. • LAN Interface: 4 10/100BASE-TX Ethernet ports. • WLAN Interface: IEEE 802.11n (up to 150Mbps) •... - Page 8 DIR-300NRU Wireless Router with Built-in 4-port Switch Overview User Manual Wireless Connection: Supported security settings: • ◦ WEP ◦ WPA/WPA2 Personal ◦ WPA/WPA2 Enterprise MAC filter • Managing connected stations • PIN and PBC methods of WPS • WMM (Wi-Fi QoS) •...
- Page 9 DIR-300NRU Wireless Router with Built-in 4-port Switch Overview User Manual EIRP (Effective Isotropic Radiated Power) 802.11b: • ◦ 17dBm 802.11g: • ◦ 16dBm 802.11n: • ◦ 19dBm. Receiver Sensitivity: 802.11b (typical at PER = 8% (1000-byte PDUs) at room temperature): •...
- Page 10 DIR-300NRU Wireless Router with Built-in 4-port Switch Overview User Manual ◦ HT40: ◦ –90dBm at BPSK, coding rate 1/2 (MCS-0) ◦ –87dBm at QPSK, coding rate 1/2 (MCS-1) ◦ –85dBm at QPSK, coding rate 3/4 (MCS-2) ◦ –82dBm at 16-QAM, coding rate 1/2 (MCS-3) ◦...
- Page 11 DIR-300NRU Wireless Router with Built-in 4-port Switch Overview User Manual LEDs: Power • Internet • WLAN • 4 LAN LEDs • WPS. • Power: External power adapter DC 5V/1А • Reset to Factory Defaults button. • Operating Temperature: from 0 to 40 C (from 32 to 104 •...
-
Page 12: Product Appearance
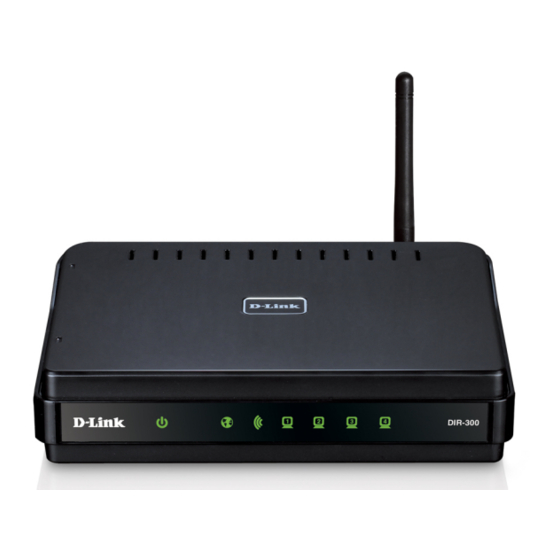
DIR-300NRU Wireless Router with Built-in 4-port Switch Overview User Manual Product Appearance Front Panel and Right Side Panel Figure 1. Front panel view. Mode Description The router is powered on. Solid green Power The router is powered off. No light The Internet connection is on. -
Page 13: Back Panel
DIR-300NRU Wireless Router with Built-in 4-port Switch Overview User Manual Back Panel Figure 2. Back panel view. Port Description LAN 1-4 4 Ethernet ports to connect computers or network devices. A port to connect to a cable or DSL modem or to a private Ethernet line INTERNET (it is recommended to use the cable included in the delivery package). -
Page 14: Delivery Package
DIR-300NRU Wireless Router with Built-in 4-port Switch Overview User Manual Delivery Package The following should be included: Wireless router DIR-300NRU • Power adapter DC 5V/1A • Ethernet cable (CAT 5E) • Antenna • Quick Installation Guide” (brochure). • The “User Manual” and “Quick Installation Guide” documents in Russian and English are available on D-Link website (see ftp.dlink.ru/pub/Router/DIR-300_NRU/Description/B5/1_4_0). -
Page 15: Chapter 3. Installation And Connection
Operating System Configuration of the wireless router DIR-300NRU with a built-in 4-port switch (hereinafter referred to as “the router”) is performed via the built-in web-based interface. The web-based interface is available from any operating system that supports a web browser. -
Page 16: Connecting To Pc
DIR-300NRU Wireless Router with Built-in 4-port Switch Installation and Connection User Manual Connecting to PC PC with Ethernet Adapter 1. Make sure that your PC is powered off. 2. Connect an Ethernet cable between any of LAN ports located on the back panel of the router and the Ethernet port of your PC. - Page 17 DIR-300NRU Wireless Router with Built-in 4-port Switch Installation and Connection User Manual 3. In the Local Area Connection Properties window, on the General tab, select the Internet Protocol (TCP/IP) line. Click the Properties button. Figure 4. The Local Area Connection Properties window.
- Page 18 DIR-300NRU Wireless Router with Built-in 4-port Switch Installation and Connection User Manual 4. Select the Obtain an IP address automatically and Obtain DNS server address automatically radio buttons. Click the OK button. Figure 5. The Internet Protocol (TCP/IP) Properties window.
-
Page 19: Obtaining Ip Address Automatically In Os Windows 7
DIR-300NRU Wireless Router with Built-in 4-port Switch Installation and Connection User Manual Obtaining IP Address Automatically in OS Windows 7 1. Click the Start button and proceed to the Control Panel window. 2. Select the Network and Sharing Center section. (If the Control Panel has the category... - Page 20 DIR-300NRU Wireless Router with Built-in 4-port Switch Installation and Connection User Manual 3. In the menu located on the left part of the window, select the Change adapter settings line. Figure 7. The Network and Sharing Center window. Page 20 of 172...
- Page 21 DIR-300NRU Wireless Router with Built-in 4-port Switch Installation and Connection User Manual 4. In the opened window, right-click the relevant Local Area Connection icon and select the Properties line in the menu displayed. Figure 8. The Network Connections window. Page 21 of 172...
- Page 22 DIR-300NRU Wireless Router with Built-in 4-port Switch Installation and Connection User Manual 5. In the Local Area Connection Properties window, on the Networking tab, select the Internet Protocol Version 4 (TCP/IPv4) line. Click the Properties button. Figure 9. The Local Area Connection Properties window.
-
Page 23: Pc With Wi-Fi Adapter
DIR-300NRU Wireless Router with Built-in 4-port Switch Installation and Connection User Manual 6. Select the Obtain an IP address automatically and Obtain DNS server address automatically radio buttons. Click the OK button. Figure 10. The Internet Protocol Version 4 (TCP/IPv4) Properties window. -
Page 24: Configuring Wi-Fi Adapter In Os Windows Xp
DIR-300NRU Wireless Router with Built-in 4-port Switch Installation and Connection User Manual Configuring Wi-Fi Adapter in OS Windows XP 1. Click the Start button and proceed to the Control Panel > Network and Internet Connections > Network Connections window. 2. Select the icon of the wireless network connection and make sure that your Wi-Fi adapter is Figure 11. -
Page 25: Configuring Wi-Fi Adapter In Os Windows 7
DIR-300NRU Wireless Router with Built-in 4-port Switch Installation and Connection User Manual Configuring Wi-Fi Adapter in OS Windows 7 1. Click the Start button and proceed to the Control Panel window. 2. Select the Network and Sharing Center section. (If the Control Panel has the category... - Page 26 DIR-300NRU Wireless Router with Built-in 4-port Switch Installation and Connection User Manual 6. In the opened window, in the list of available wireless networks, select the wireless network DIR-300NRUB5 and click the Connect button. Figure 14. The list of available networks.
-
Page 27: Connecting To Web-Based Interface
2. In the address bar of the web browser, enter the IP address of the router (by default, the following IP address is specified: 192.168.0.1). Press the Enter key. Figure 15. Connecting to the web-based interface of the DIR-300NRU device. 3. On the opened page, enter the username and password for the administrator account in the Login and Password fields correspondingly (by default, the following username and password are specified: admin, admin). - Page 28 DIR-300NRU Wireless Router with Built-in 4-port Switch Installation and Connection User Manual Right after the first access to the web-based interface you are forwarded to the page for changing the administrator password specified by default. Figure 17. The page for changing the default administrator password.
-
Page 29: Web-Based Interface Structure
DIR-300NRU Wireless Router with Built-in 4-port Switch Installation and Connection User Manual Web-based Interface Structure After successful registration the router's quick settings page opens. Figure 18. The quick settings page. The web-based interface of the router is multilingual. Select a needed language from the menu displayed when the mouse pointer is over the Language caption. - Page 30 DIR-300NRU Wireless Router with Built-in 4-port Switch Installation and Connection User Manual On the quick settings page you can run a needed Wizard, quickly get to some pages of the web- based interface, search for a specific page, or switch to the advanced settings section.
- Page 31 DIR-300NRU Wireless Router with Built-in 4-port Switch Installation and Connection User Manual Figure 20. The advanced settings page. The pages of the Status section display data on the current state of the router (for the description of the pages, see the Status section, page 80).
-
Page 32: Saving And Restoring Settings
DIR-300NRU Wireless Router with Built-in 4-port Switch Installation and Connection User Manual Also you can find a specific page via search. To do this, enter the name of the page, wholly or partly, in the search bar in the top part of the web-based interface page, and then select a needed link in the search results. - Page 33 DIR-300NRU Wireless Router with Built-in 4-port Switch Installation and Connection User Manual Figure 23. The top-page menu. Click the Reboot line if you have already saved the router's settings. Click the Save&Reboot line to save new settings and immediately reboot the router.
-
Page 34: Chapter 4. Configuring Via Web-Based Interface
DIR-300NRU Wireless Router with Built-in 4-port Switch Configuring via Web-based Interface User Manual CHAPTER 4. CONFIGURING WEB-BASED INTERFACE Click'n'Connect To configure connection to the Internet, click the Click'n'Connect link in the Net section. Figure 24. Configuring connection to the Internet. - Page 35 DIR-300NRU Wireless Router with Built-in 4-port Switch Configuring via Web-based Interface User Manual Figure 25. The page for selecting the connection type. On the opened page, select the needed choice of the radio button and click the Next button. Page 35 of 172...
-
Page 36: Creating Wan Connection
DIR-300NRU Wireless Router with Built-in 4-port Switch Configuring via Web-based Interface User Manual Creating WAN Connection PPPoE Connection Figure 26. Configuring PPPoE WAN connection. In the Connection name field, specify a name for the connection for easier identification. In the Username field, enter your login, and in the Password and Password confirmation fields –... - Page 37 DIR-300NRU Wireless Router with Built-in 4-port Switch Configuring via Web-based Interface User Manual Figure 27. Configuring PPPoE WAN connection. The expert settings mode. The Ethernet section. Parameter Description Connection name A name for connection for easier identification. Ethernet The maximum size of units transmitted by the interface.
- Page 38 DIR-300NRU Wireless Router with Built-in 4-port Switch Configuring via Web-based Interface User Manual Figure 28. Configuring PPPoE WAN connection. The expert settings mode. The PPP section. Parameter Description Username A username (login) to access the Internet. Select the checkbox if you don't need to enter a username and Without authorization password to access the Internet.
- Page 39 DIR-300NRU Wireless Router with Built-in 4-port Switch Configuring via Web-based Interface User Manual Parameter Description Select the checkbox if you want the router to establish connection to the Internet on demand. In the Maximum idle time field, specify a Dial on demand period of inactivity (in seconds) after which the connection should be terminated.
- Page 40 DIR-300NRU Wireless Router with Built-in 4-port Switch Configuring via Web-based Interface User Manual Figure 29. Configuring PPPoE WAN connection. The expert settings mode. The Miscellaneous section. Parameter Description Miscellaneous Enable RIP Select the checkbox to allow using RIP for this connection.
-
Page 41: Static Ip Connection
DIR-300NRU Wireless Router with Built-in 4-port Switch Configuring via Web-based Interface User Manual Static IP Connection Figure 30. Configuring Static IP WAN connection. In the Connection name field, specify a name for the connection for easier identification. Fill in the IP Address and Netmask fields. - Page 42 DIR-300NRU Wireless Router with Built-in 4-port Switch Configuring via Web-based Interface User Manual Figure 31. Configuring Static IP WAN connection. The expert settings mode. The Ethernet section. Parameter Description Connection name A name for connection for easier identification. Ethernet The maximum size of units transmitted by the interface.
- Page 43 DIR-300NRU Wireless Router with Built-in 4-port Switch Configuring via Web-based Interface User Manual Figure 32. Configuring Static IP WAN connection. The expert settings mode. The IP and Miscellaneous sections. Parameter Description IP Address Enter an IP address for this WAN connection.
- Page 44 DIR-300NRU Wireless Router with Built-in 4-port Switch Configuring via Web-based Interface User Manual Parameter Description Select the checkbox to allow the router to answer ping requests Ping from the external network through this connection. For security reasons, it is recommended not to select this checkbox.
-
Page 45: Dynamic Ip Connection
DIR-300NRU Wireless Router with Built-in 4-port Switch Configuring via Web-based Interface User Manual Dynamic IP Connection Figure 33. Configuring Dynamic IP WAN connection. In the Connection name field, specify a name for the connection for easier identification. If your ISP has provided the addresses of the DNS servers, deselect the Obtain DNS server addresses automatically checkbox and fill in the Primary DNS server field. - Page 46 DIR-300NRU Wireless Router with Built-in 4-port Switch Configuring via Web-based Interface User Manual Figure 34. Configuring Dynamic IP WAN connection. The expert settings mode. The Ethernet section. Parameter Description Connection name A name for connection for easier identification. Ethernet The maximum size of units transmitted by the interface.
- Page 47 DIR-300NRU Wireless Router with Built-in 4-port Switch Configuring via Web-based Interface User Manual Figure 35. Configuring Dynamic IP WAN connection. The expert settings mode. The IP and Miscellaneous sections. Parameter Description Obtain DNS server Select the checkbox to configure automatic assignment of DNS addresses server addresses.
- Page 48 DIR-300NRU Wireless Router with Built-in 4-port Switch Configuring via Web-based Interface User Manual Parameter Description Select the checkbox to allow the router to answer ping requests Ping from the external network through this connection. For security reasons, it is recommended not to select this checkbox.
-
Page 49: Pptp Or L2Tp Connection
DIR-300NRU Wireless Router with Built-in 4-port Switch Configuring via Web-based Interface User Manual PPTP or L2TP Connection Figure 36. Configuring PPTP WAN connection. In the Connection name field, specify a name for the connection for easier identification. In the Username field, enter your login, and in the Password and Password confirmation fields –... - Page 50 DIR-300NRU Wireless Router with Built-in 4-port Switch Configuring via Web-based Interface User Manual Figure 37. Configuring PPTP WAN connection. The expert settings mode. The VPN section. Parameter Description Connection name A name for connection for easier identification. Select the checkbox to enable auto-start of the connection upon the Connect automatically boot-up of the router.
- Page 51 DIR-300NRU Wireless Router with Built-in 4-port Switch Configuring via Web-based Interface User Manual Parameter Description Select a method of MPPE encryption. No encrypt: MPPE encryption is not applied. • MPPE 40/128 bit: MPPE encryption with a 40-bit or 128-bit •...
- Page 52 DIR-300NRU Wireless Router with Built-in 4-port Switch Configuring via Web-based Interface User Manual Figure 38. Configuring PPTP WAN connection. The expert settings mode. The Miscellaneous section. Parameter Description Miscellaneous Enable RIP Select the checkbox to allow using RIP for this connection.
-
Page 53: Pptp + Static Ip Or L2Tp + Static Ip Connection
DIR-300NRU Wireless Router with Built-in 4-port Switch Configuring via Web-based Interface User Manual PPTP + Static IP L2TP + Static IP Connection Figure 39. Configuring PPTP + Static IP WAN connection. Fill in the IP Address and Netmask fields. In the Gateway IP address field, enter the IP address of the gateway used by this WAN connection. - Page 54 DIR-300NRU Wireless Router with Built-in 4-port Switch Configuring via Web-based Interface User Manual Figure 40. Configuring PPTP + Static IP WAN connection. The expert settings mode. The Ethernet section. Parameter Description Ethernet The maximum size of units transmitted by the interface.
- Page 55 DIR-300NRU Wireless Router with Built-in 4-port Switch Configuring via Web-based Interface User Manual Figure 41. Configuring PPTP + Static IP WAN connection. The expert settings mode. The IP and Miscellaneous sections. Parameter Description IP Address Enter an IP address for this WAN connection.
- Page 56 DIR-300NRU Wireless Router with Built-in 4-port Switch Configuring via Web-based Interface User Manual Parameter Description Select the checkbox to allow the router to answer ping requests Ping from the external network through this connection. For security reasons, it is recommended not to select this checkbox.
- Page 57 DIR-300NRU Wireless Router with Built-in 4-port Switch Configuring via Web-based Interface User Manual Figure 43. Configuring PPTP + Static IP WAN connection. In the Connection name field, specify a name for the connection for easier identification. In the Username field, enter your login, and in the Password and Password confirmation fields –...
- Page 58 DIR-300NRU Wireless Router with Built-in 4-port Switch Configuring via Web-based Interface User Manual Figure 44. Configuring PPTP + Static IP WAN connection. The expert settings mode. The VPN section. Parameter Description Connection name A name for connection for easier identification.
- Page 59 DIR-300NRU Wireless Router with Built-in 4-port Switch Configuring via Web-based Interface User Manual Parameter Description Select a method of MPPE encryption. No encrypt: MPPE encryption is not applied. • MPPE 40/128 bit: MPPE encryption with a 40-bit or 128-bit •...
- Page 60 DIR-300NRU Wireless Router with Built-in 4-port Switch Configuring via Web-based Interface User Manual Figure 45. Configuring PPTP + Static IP WAN connection. The expert settings mode. The Miscellaneous section. Parameter Description Miscellaneous Enable RIP Select the checkbox to allow using RIP for this connection.
-
Page 61: Pptp + Dynamic Ip Or L2Tp + Dynamic Ip Connection
DIR-300NRU Wireless Router with Built-in 4-port Switch Configuring via Web-based Interface User Manual PPTP + Dynamic IP or L2TP + Dynamic IP Connection Figure 46. Configuring PPTP + Dynamic IP WAN connection. If your ISP has provided the addresses of the DNS servers, deselect the Obtain DNS server addresses automatically checkbox and fill in the Primary DNS server field. - Page 62 DIR-300NRU Wireless Router with Built-in 4-port Switch Configuring via Web-based Interface User Manual Figure 47. Configuring PPTP + Dynamic IP WAN connection. The expert settings mode. The Ethernet section. Parameter Description Ethernet The maximum size of units transmitted by the interface.
- Page 63 DIR-300NRU Wireless Router with Built-in 4-port Switch Configuring via Web-based Interface User Manual Figure 48. Configuring PPTP + Dynamic IP WAN connection. The expert settings mode. The IP and Miscellaneous sections. Parameter Description Obtain DNS server Select the checkbox to configure automatic assignment of DNS addresses server addresses.
- Page 64 DIR-300NRU Wireless Router with Built-in 4-port Switch Configuring via Web-based Interface User Manual Parameter Description Select the checkbox to allow the router to answer ping requests Ping from the external network through this connection. For security reasons, it is recommended not to select this checkbox.
- Page 65 DIR-300NRU Wireless Router with Built-in 4-port Switch Configuring via Web-based Interface User Manual Figure 50. Configuring PPTP + Dynamic IP WAN connection. The expert settings mode. The VPN section. Parameter Description Connection name A name for connection for easier identification.
- Page 66 DIR-300NRU Wireless Router with Built-in 4-port Switch Configuring via Web-based Interface User Manual Parameter Description Select a method of MPPE encryption. No encrypt: MPPE encryption is not applied. • MPPE 40/128 bit: MPPE encryption with a 40-bit or 128-bit •...
- Page 67 DIR-300NRU Wireless Router with Built-in 4-port Switch Configuring via Web-based Interface User Manual Figure 51. Configuring PPTP + Dynamic IP WAN connection. The expert settings mode. The Miscellaneous section. Parameter Description Miscellaneous Enable RIP Select the checkbox to allow using RIP for this connection.
-
Page 68: Checking Internet Availability
DIR-300NRU Wireless Router with Built-in 4-port Switch Configuring via Web-based Interface User Manual Checking Internet Availability On the page, you can check the WAN connection you have created. Figure 52. Checking the Internet availability. In the Result section, the status of the WAN connection and possible causes of malfunctions are displayed. -
Page 69: Configuring Wireless Connection
DIR-300NRU Wireless Router with Built-in 4-port Switch Configuring via Web-based Interface User Manual Configuring Wireless Connection On the page, you can change the name of your wireless network, specify a password to it, or disable Wi-Fi connections. Figure 53. Configuring the wireless connection. -
Page 70: Wireless Network Settings Wizard
DIR-300NRU Wireless Router with Built-in 4-port Switch Configuring via Web-based Interface User Manual Wireless Network Settings Wizard To specify all needed settings for your wireless network, click the Wireless network settings wizard in the Wi-Fi section. Figure 54. Common and advanced settings of the wireless LAN. - Page 71 DIR-300NRU Wireless Router with Built-in 4-port Switch Configuring via Web-based Interface User Manual In the Basic settings section, you can change the basic parameters of your router's WLAN: “hide” your wireless network (Hide Access Point), specify a name for the network (SSID),...
- Page 72 DIR-300NRU Wireless Router with Built-in 4-port Switch Configuring via Web-based Interface User Manual On the next page, you can modify security settings of the WLAN. By default, the Open network authentication type with no encryption is specified for the WLAN.
- Page 73 DIR-300NRU Wireless Router with Built-in 4-port Switch Configuring via Web-based Interface User Manual Figure 57. Network authentication types supported by the router. The router supports the following authentication types: Authentication type Description Open authentication (with WEP encryption for wireless network Open modes not supporting 802.11n devices).
- Page 74 DIR-300NRU Wireless Router with Built-in 4-port Switch Configuring via Web-based Interface User Manual The WPA , WPA2 , and WPA/WPA2 mixed authentication types require a RADIUS server. When the Open or Shared value is selected, the WEP Encryption settings section is displayed (the section is unavailable for the wireless network operating modes which support the standard 802.11n):...
- Page 75 DIR-300NRU Wireless Router with Built-in 4-port Switch Configuring via Web-based Interface User Manual Parameter Description The checkbox activating WEP encryption. When the checkbox is selected, the Default Key ID field, the Encryption Key WEP as Enable Encryption WEP HEX checkbox, and four Encryption Key WEP fields are displayed on the page.
- Page 76 DIR-300NRU Wireless Router with Built-in 4-port Switch Configuring via Web-based Interface User Manual When the WPA-PSK, WPA2-PSK, or WPA-PSK/WPA2-PSK mixed value is selected, the WPA Encryption settings section is displayed: Figure 59. The WPA2-PSK value is selected from the Network Authentication drop-down list.
- Page 77 DIR-300NRU Wireless Router with Built-in 4-port Switch Configuring via Web-based Interface User Manual When the WPA, WPA2, or WPA/WPA2 mixed value is selected, the RADIUS settings and WPA Encryption settings sections are available: Figure 60. The WPA2 value is selected from the Network Authentication drop-down list.
-
Page 78: Virtual Server Settings Wizard
DIR-300NRU Wireless Router with Built-in 4-port Switch Configuring via Web-based Interface User Manual Virtual Server Settings Wizard To create a virtual server for redirecting incoming Internet traffic to a specified IP address in the LAN, click the Virtual server settings wizard link in the Firewall section. -
Page 79: Iptv Setup Wizard
DIR-300NRU Wireless Router with Built-in 4-port Switch Configuring via Web-based Interface User Manual IPTV Setup Wizard To configure the router to use an IPTV set-top box, click the IPTV settings wizard in the IP-TV section. Figure 62. The page for selecting a LAN port to connect an IPTV set-top box. -
Page 80: Status
DIR-300NRU Wireless Router with Built-in 4-port Switch Configuring via Web-based Interface User Manual Status The pages of this section display data on the current state of the router: network statistics • IP addresses leased by the DHCP server • the routing table •... -
Page 81: Dhcp
DIR-300NRU Wireless Router with Built-in 4-port Switch Configuring via Web-based Interface User Manual DHCP The Status / DHCP page displays the information on computers that have been identified by hostnames and MAC addresses and have got IP addresses from the DHCP server of the device, as well as the IP address expiration periods (the lease time). -
Page 82: Routing Table
DIR-300NRU Wireless Router with Built-in 4-port Switch Configuring via Web-based Interface User Manual Routing Table The Status / Routing table page displays the information on routes. The table contains destination IP addresses, gateways, subnet masks, and other data. Figure 65. The Status / Routing table page. -
Page 83: Lan Clients
DIR-300NRU Wireless Router with Built-in 4-port Switch Configuring via Web-based Interface User Manual LAN Clients On the Status / LAN clients page, you can view the list of devices connected to the router and devices accessing its web-based interface. Figure 66. The Status / LAN clients page. -
Page 84: Net
DIR-300NRU Wireless Router with Built-in 4-port Switch Configuring via Web-based Interface User Manual In this menu you can configure basic parameters of the router's local area network and configure connection to the Internet (a WAN connection). On the Net / WAN page, you can create and edit connections used by the router. -
Page 85: Creating Pppoe Wan Connection
DIR-300NRU Wireless Router with Built-in 4-port Switch Configuring via Web-based Interface User Manual Creating PPPoE WAN Connection To create a connection of the PPPoE type, click the Add button on the Net / WAN page. On the opened page, select the PPPoE value from the Connection Type drop-down list and specify the needed values. - Page 86 DIR-300NRU Wireless Router with Built-in 4-port Switch Configuring via Web-based Interface User Manual Parameter Description A MAC address assigned to the interface. This parameter is mandatory if your ISP uses MAC address binding. In the field, enter the MAC address registered by your ISP upon concluding the agreement.
- Page 87 DIR-300NRU Wireless Router with Built-in 4-port Switch Configuring via Web-based Interface User Manual Parameter Description Username A username (login) to access the Internet. Select the checkbox if you don't need to enter a username and Without authorization password to access the Internet.
- Page 88 DIR-300NRU Wireless Router with Built-in 4-port Switch Configuring via Web-based Interface User Manual Figure 70. The page for creating a new connection. The Miscellaneous section. Parameter Description Miscellaneous Enable RIP Select the checkbox to allow using RIP for this connection.
-
Page 89: Creating Static Ip Wan Connection
DIR-300NRU Wireless Router with Built-in 4-port Switch Configuring via Web-based Interface User Manual Creating Static IP WAN Connection To create a connection of the Static IP type, click the Add button on the Net / WAN page. On the opened page, select the Static IP value from the Connection Type drop-down list and specify the needed values. - Page 90 DIR-300NRU Wireless Router with Built-in 4-port Switch Configuring via Web-based Interface User Manual Parameter Description A MAC address assigned to the interface. This parameter is mandatory if your ISP uses MAC address binding. In the field, enter the MAC address registered by your ISP upon concluding the agreement.
- Page 91 DIR-300NRU Wireless Router with Built-in 4-port Switch Configuring via Web-based Interface User Manual Parameter Description IP Address Enter an IP address for this WAN connection. Netmask Enter a subnet mask for this WAN connection. Gateway IP address Enter an IP address of the gateway used by this WAN connection.
-
Page 92: Creating Dynamic Ip Wan Connection
DIR-300NRU Wireless Router with Built-in 4-port Switch Configuring via Web-based Interface User Manual Creating Dynamic IP WAN Connection To create a connection of the Dynamic IP type, click the Add button on the Net / WAN page. On the opened page, select the Dynamic IP value from the Connection Type drop-down list and specify the needed values. - Page 93 DIR-300NRU Wireless Router with Built-in 4-port Switch Configuring via Web-based Interface User Manual Parameter Description A MAC address assigned to the interface. This parameter is mandatory if your ISP uses MAC address binding. In the field, enter the MAC address registered by your ISP upon concluding the agreement.
- Page 94 DIR-300NRU Wireless Router with Built-in 4-port Switch Configuring via Web-based Interface User Manual Parameter Description Obtain DNS server Select the checkbox to configure automatic assignment of DNS addresses server addresses. If the checkbox is selected, the Primary DNS automatically server and Secondary DNS server fields are not displayed.
-
Page 95: Creating Pptp Or L2Tp Wan Connection
DIR-300NRU Wireless Router with Built-in 4-port Switch Configuring via Web-based Interface User Manual Creating PPTP or L2TP WAN Connection To create a connection of the PPTP or L2TP type, click the Add button on the Net / WAN page. On the opened page, select the relevant value from the Connection Type drop-down list and specify the needed values. - Page 96 DIR-300NRU Wireless Router with Built-in 4-port Switch Configuring via Web-based Interface User Manual Figure 76. The page for creating a new connection. The VPN section. Parameter Description Select the checkbox to enable auto-start of the connection upon the Connect automatically boot-up of the router.
- Page 97 DIR-300NRU Wireless Router with Built-in 4-port Switch Configuring via Web-based Interface User Manual Parameter Description Select a method of MPPE encryption. No encrypt: MPPE encryption is not applied. • MPPE 40/128 bit: MPPE encryption with a 40-bit or 128-bit •...
- Page 98 DIR-300NRU Wireless Router with Built-in 4-port Switch Configuring via Web-based Interface User Manual Figure 77. The page for creating a new connection. The Miscellaneous section. Parameter Description Miscellaneous Enable RIP Select the checkbox to allow using RIP for this connection.
-
Page 99: Creating Pptp + Static Ip Or L2Tp + Static Ip Wan Connection
DIR-300NRU Wireless Router with Built-in 4-port Switch Configuring via Web-based Interface User Manual Creating PPTP + Static IP or L2TP + Static IP WAN Connection To create a connection of the PPTP + Static IP or L2TP + Static IP type, click the Add button on the Net / WAN page. - Page 100 DIR-300NRU Wireless Router with Built-in 4-port Switch Configuring via Web-based Interface User Manual Parameter Description A MAC address assigned to the interface. This parameter is mandatory if your ISP uses MAC address binding. In the field, enter the MAC address registered by your ISP upon concluding the agreement.
- Page 101 DIR-300NRU Wireless Router with Built-in 4-port Switch Configuring via Web-based Interface User Manual Parameter Description Primary DNS server/ Enter addresses of the primary and secondary DNS servers in the relevant fields. Secondary DNS server Miscellaneous Enable RIP Select the checkbox to allow using RIP for this connection.
- Page 102 DIR-300NRU Wireless Router with Built-in 4-port Switch Configuring via Web-based Interface User Manual Parameter Description Select the checkbox to enable auto-start of the connection upon the Connect automatically boot-up of the router. Username A username (login) to access the Internet.
- Page 103 DIR-300NRU Wireless Router with Built-in 4-port Switch Configuring via Web-based Interface User Manual Parameter Description Fill in the field if you want to use a static IP address to access the Static IP Address Internet. Select the checkbox if you want to log...
-
Page 104: Creating Pptp + Dynamic Ip Or L2Tp + Dynamic Ip Wan Connection
DIR-300NRU Wireless Router with Built-in 4-port Switch Configuring via Web-based Interface User Manual Creating PPTP + Dynamic IP or L2TP + Dynamic IP WAN Connection To create a connection of the PPTP + Dynamic IP or L2TP + Dynamic IP type, click the Add button on the Net / WAN page. - Page 105 DIR-300NRU Wireless Router with Built-in 4-port Switch Configuring via Web-based Interface User Manual Parameter Description A MAC address assigned to the interface. This parameter is mandatory if your ISP uses MAC address binding. In the field, enter the MAC address registered by your ISP upon concluding the agreement.
- Page 106 DIR-300NRU Wireless Router with Built-in 4-port Switch Configuring via Web-based Interface User Manual Parameter Description Enable RIP Select the checkbox to allow using RIP for this connection. Select the checkbox to allow multicast traffic from the external Enable IGMP Multicast network (e.g.
- Page 107 DIR-300NRU Wireless Router with Built-in 4-port Switch Configuring via Web-based Interface User Manual Parameter Description Select the checkbox to enable auto-start of the connection upon the Connect automatically boot-up of the router. Username A username (login) to access the Internet.
- Page 108 DIR-300NRU Wireless Router with Built-in 4-port Switch Configuring via Web-based Interface User Manual Parameter Description Fill in the field if you want to use a static IP address to access the Static IP Address Internet. Select the checkbox if you want to log...
-
Page 109: Lan
DIR-300NRU Wireless Router with Built-in 4-port Switch Configuring via Web-based Interface User Manual To configure the router's local interface, proceed to the Net / LAN page. Figure 86. Basic settings of the local interface. If needed, edit the basic settings of the local interface. - Page 110 DIR-300NRU Wireless Router with Built-in 4-port Switch Configuring via Web-based Interface User Manual Parameter Description An operating mode of the router's DHCP server. Enable: the router assigns IP addresses to clients automatically in accordance with the specified parameters. When this value is selected, the Start IP, End IP, and the Lease time fields are displayed on the page.
- Page 111 DIR-300NRU Wireless Router with Built-in 4-port Switch Configuring via Web-based Interface User Manual Figure 88. The section for creating MAC-IP pairs. To create a MAC-IP pair, click the Add button. In the IP field, enter an IP address which will be assigned to the device from the LAN, then in the MAC field, enter the MAC address of this device.
-
Page 112: Wi-Fi
DIR-300NRU Wireless Router with Built-in 4-port Switch Configuring via Web-based Interface User Manual Wi-Fi In this menu you can specify all needed settings for your wireless network. Common settings On the Wi-Fi / Common settings page, you can enable your wireless local area network (WLAN). -
Page 113: Basic Settings
DIR-300NRU Wireless Router with Built-in 4-port Switch Configuring via Web-based Interface User Manual Basic Settings On the Wi-Fi / Basic settings page, you can configure basic parameters of the device's WLAN. Figure 90. Basic settings of the wireless LAN. Parameter... -
Page 114: Security Settings
DIR-300NRU Wireless Router with Built-in 4-port Switch Configuring via Web-based Interface User Manual Security Settings On the Wi-Fi / Security settings page, you can modify security settings of the WLAN. Figure 91. The default security settings. By default, the Open network authentication type with no encryption is specified for the WLAN. - Page 115 DIR-300NRU Wireless Router with Built-in 4-port Switch Configuring via Web-based Interface User Manual Figure 92. Network authentication types supported by the router. The router supports the following authentication types: Authentication type Description Open authentication (with WEP encryption for wireless network Open modes not supporting 802.11n devices).
- Page 116 DIR-300NRU Wireless Router with Built-in 4-port Switch Configuring via Web-based Interface User Manual The WPA , WPA2 , and WPA/WPA2 mixed authentication types require a RADIUS server. When the Open or Shared value is selected, the WEP Encryption settings section is displayed (the section is unavailable for the wireless network operating modes which support the standard 802.11n):...
- Page 117 DIR-300NRU Wireless Router with Built-in 4-port Switch Configuring via Web-based Interface User Manual Parameter Description The checkbox activating WEP encryption. When the checkbox is selected, the Default Key ID field, the Encryption Key WEP as Enable Encryption WEP HEX checkbox, and four Encryption Key WEP fields are displayed on the page.
- Page 118 DIR-300NRU Wireless Router with Built-in 4-port Switch Configuring via Web-based Interface User Manual When the WPA-PSK, WPA2-PSK, or WPA-PSK/WPA2-PSK mixed value is selected, the WPA Encryption settings section is displayed: Figure 94. The WPA2-PSK value is selected from the Network Authentication drop-down list.
- Page 119 DIR-300NRU Wireless Router with Built-in 4-port Switch Configuring via Web-based Interface User Manual When the WPA, WPA2, or WPA/WPA2 mixed value is selected, the RADIUS settings and WPA Encryption settings sections are available: Figure 95. The WPA2 value is selected from the Network Authentication drop-down list.
-
Page 120: Mac Filter
DIR-300NRU Wireless Router with Built-in 4-port Switch Configuring via Web-based Interface User Manual MAC Filter On the Wi-Fi / MAC Filter page, you can define a set of MAC addresses of devices which will be allowed to access the WLAN, or define MAC addresses of devices which will not be allowed to access the WLAN. - Page 121 DIR-300NRU Wireless Router with Built-in 4-port Switch Configuring via Web-based Interface User Manual Figure 97. The tab for adding a MAC address. Enter an address in the MAC address field of the MAC address adding section and click the Add button.
-
Page 122: Station List
DIR-300NRU Wireless Router with Built-in 4-port Switch Configuring via Web-based Interface User Manual Station List On the Wi-Fi / Station List page, you can view the list of wireless clients connected to the router. Figure 98. The list of the wireless clients. -
Page 123: Wps
DIR-300NRU Wireless Router with Built-in 4-port Switch Configuring via Web-based Interface User Manual On the Wi-Fi / WPS page, you can enable the function for secure configuration of the WLAN and select a method used to easily add wireless devices to the WLAN. - Page 124 DIR-300NRU Wireless Router with Built-in 4-port Switch Configuring via Web-based Interface User Manual To activate the WPS function, select the WPS Enable checkbox and click the Change button. When the checkbox is selected, the Information and Connection sections are available on the page.
-
Page 125: Using Wps Function Via Web-Based Interface
DIR-300NRU Wireless Router with Built-in 4-port Switch Configuring via Web-based Interface User Manual Using WPS Function via Web-based Interface To add a wireless device via the PIN method of the WPS function, follow the next steps: 1. Select the WPS Enable checkbox. - Page 126 DIR-300NRU Wireless Router with Built-in 4-port Switch Configuring via Web-based Interface User Manual Later you will be able to add wireless devices to the WLAN by pressing the WPS button of the router. 1. Select the PBC method in the software of the wireless device that you want to connect to the router's WLAN.
-
Page 127: Additional Settings
DIR-300NRU Wireless Router with Built-in 4-port Switch Configuring via Web-based Interface User Manual Additional Settings On the Wi-Fi / Additional settings page, you can define additional parameters for the WLAN of the router. Changing parameters presented on this page may negatively affect your WLAN! Figure 100. - Page 128 DIR-300NRU Wireless Router with Built-in 4-port Switch Configuring via Web-based Interface User Manual Parameter Description The time period (in seconds) between sending a DTIM (a message DTIM Period notifying on broadcast or multicast transmission) and data transmission. TX Power The transmit power (in percentage terms) of the router.
-
Page 129: Wmm
DIR-300NRU Wireless Router with Built-in 4-port Switch Configuring via Web-based Interface User Manual On the Wi-Fi / WMM page, you can enable the Wi-Fi Multimedia function. The WMM function implements the QoS features for Wi-Fi networks. It helps to improve the quality of data transfer over Wi-Fi networks by prioritizing different types of traffic. - Page 130 DIR-300NRU Wireless Router with Built-in 4-port Switch Configuring via Web-based Interface User Manual For every Access Category the following fields are available: Parameter Description Arbitrary Inter-Frame Space Number. This parameter influences Aifsn time delays for the relevant Access Category. The lower the value, the higher is the Access Category priority.
-
Page 131: Client
DIR-300NRU Wireless Router with Built-in 4-port Switch Configuring via Web-based Interface User Manual Client On the Wi-Fi / Client page, you can configure the router as a client to connect to a wireless access point. As a rule, the client mode is used to connect to a WISP network. All parameters specified on this page should be provided by your WISP. - Page 132 For the WPA-PSK, WPA2-PSK, or WPA-PSK/WPA2-PSK mixed authentication types, fill in the Encryption Key PSK field and click the Change button. After clicking the Change button, the wireless channel of DIR-300NRU will switch to the channel of the wireless access point to which you have connected.
-
Page 133: Advanced
DIR-300NRU Wireless Router with Built-in 4-port Switch Configuring via Web-based Interface User Manual Advanced In this menu you can configure advanced settings of the router: create groups of ports for VLANs • enable the UPnP function • configure a DDNS service •... -
Page 134: Vlan
DIR-300NRU Wireless Router with Built-in 4-port Switch Configuring via Web-based Interface User Manual VLAN On the Advanced / VLAN page, you can create and edit groups of ports for virtual networks (VLANs). By default, 2 groups are created in the router's system: lan: it includes ports 1-4 and the wireless interface;... - Page 135 DIR-300NRU Wireless Router with Built-in 4-port Switch Configuring via Web-based Interface User Manual Figure 104. The page for editing a group of ports for VLAN. You can specify the following parameters: Parameter Description Main settings Name A name for the port for easier identification.
- Page 136 DIR-300NRU Wireless Router with Built-in 4-port Switch Configuring via Web-based Interface User Manual Parameter Description Ports From the list, select an available value (a physical port of the router, Port the wireless interface) to assign it to this group. The port will be displayed in the table at the bottom of the page.
-
Page 137: Upnp
DIR-300NRU Wireless Router with Built-in 4-port Switch Configuring via Web-based Interface User Manual UPnP On the Advanced / UPnP page, you can enable and disable the UPnP function. UPnP is a set of networking protocols designed for automatic configuration of network devices. The UPnP function performs automatic configuration of the device's parameters for network applications requiring an incoming connection to the router. -
Page 138: Ddns
DIR-300NRU Wireless Router with Built-in 4-port Switch Configuring via Web-based Interface User Manual DDNS On the Advanced / DDNS page, you can define parameters of the DDNS service, which allows associating a domain name with dynamic IP addresses. Figure 106. The Advanced / DDNS page. - Page 139 DIR-300NRU Wireless Router with Built-in 4-port Switch Configuring via Web-based Interface User Manual Figure 107. The page for editing the DDNS service. You can specify the following parameters: Parameter Description DDNS Service Select a DDNS provider from the drop-down list.
-
Page 140: Dns
DIR-300NRU Wireless Router with Built-in 4-port Switch Configuring via Web-based Interface User Manual On the Advanced / DNS page, you can add DNS servers to the system. Figure 108. The Advanced / DNS page. DNS servers are used to determine the IP address from the name of a server in Intranets or the Internet (as a rule, they are specified by an ISP or assigned by a network administrator). -
Page 141: Routing
DIR-300NRU Wireless Router with Built-in 4-port Switch Configuring via Web-based Interface User Manual Routing On the Advanced / Routing page, you can add static routes (routes for networks that are not connected directly to the device but are available through the interfaces of the device) into the system. - Page 142 DIR-300NRU Wireless Router with Built-in 4-port Switch Configuring via Web-based Interface User Manual Figure 110. The page for adding a static route. You can specify the following parameters: Parameter Description Destination network A destination network to which this route is assigned.
-
Page 143: Remote Access
DIR-300NRU Wireless Router with Built-in 4-port Switch Configuring via Web-based Interface User Manual Remote Access On the Advanced / Remote access page, you can configure access to the web-based interface of the router. By default, the access from external networks to the router is closed. If you need to allow access to the router from the external network, create relevant rules. - Page 144 DIR-300NRU Wireless Router with Built-in 4-port Switch Configuring via Web-based Interface User Manual Figure 112. The page for adding a rule for remote management. You can specify the following parameters: Parameter Description A host or a subnet to which the rule is applied. To choose a device...
-
Page 145: Igmp
DIR-300NRU Wireless Router with Built-in 4-port Switch Configuring via Web-based Interface User Manual IGMP On the Advanced / IGMP page, you can enable IGMP for the router. IGMP is used for managing multicast traffic (transferring data to a group of destinations). This protocol allows using network resources for some applications, e.g., for streaming video, more... -
Page 146: Firewall
DIR-300NRU Wireless Router with Built-in 4-port Switch Configuring via Web-based Interface User Manual Firewall In this menu you can configure the firewall of the router: add rules for IP filtering • create virtual servers • define a DMZ • configure the MAC filter. - Page 147 DIR-300NRU Wireless Router with Built-in 4-port Switch Configuring via Web-based Interface User Manual Figure 115. The page for adding a rule for IP filtering. You can specify the following parameters: Parameter Description IP filter rule editing Name A name for the rule for easier identification.
- Page 148 DIR-300NRU Wireless Router with Built-in 4-port Switch Configuring via Web-based Interface User Manual Parameter Description The source host/subnet IP address. If the IP address range checkbox is selected, specify the starting IP address of the range in the Source (first) field and the ending IP address in the Source (last) field.
-
Page 149: Virtual Servers
DIR-300NRU Wireless Router with Built-in 4-port Switch Configuring via Web-based Interface User Manual Virtual Servers On the Firewall / Virtual servers page, you can create virtual servers for redirecting incoming Internet traffic to a specified IP address in the local area network. - Page 150 DIR-300NRU Wireless Router with Built-in 4-port Switch Configuring via Web-based Interface User Manual Figure 117. The page for adding a virtual server. You can specify the following parameters: Parameter Description Select a virtual server template from the drop-down list, or select...
- Page 151 DIR-300NRU Wireless Router with Built-in 4-port Switch Configuring via Web-based Interface User Manual Parameter Description The IP address of the server from the local area network. To choose a device connected to the router's LAN at the moment, select the...
-
Page 152: Dmz
DIR-300NRU Wireless Router with Built-in 4-port Switch Configuring via Web-based Interface User Manual A DMZ is a host or network segment located “between” internal (local) and external (global) networks. In the router, the DMZ implements the capability to transfer a request coming to a port of the router from the external network to a specified host of the internal network. -
Page 153: Mac Filter
DIR-300NRU Wireless Router with Built-in 4-port Switch Configuring via Web-based Interface User Manual MAC Filter On the Firewall / MAC filter page, you can configure MAC-address-based filtering for computers of the router's LAN. Figure 119. The Firewall / MAC filter page. - Page 154 DIR-300NRU Wireless Router with Built-in 4-port Switch Configuring via Web-based Interface User Manual Figure 120. The page for adding an address for the MAC filter. On the opened page, enter the MAC address of the device from the router's LAN in the MAC address field.
-
Page 155: Control
DIR-300NRU Wireless Router with Built-in 4-port Switch Configuring via Web-based Interface User Manual Control This menu is designed to create restrictions on access to certain web sites. URL Filter On the Control / URL filter page, you can specify restrictions on access to certain web sites. - Page 156 DIR-300NRU Wireless Router with Built-in 4-port Switch Configuring via Web-based Interface User Manual Figure 122. The Control / URL filter page. The URL addresses tab. On the opened page, specify the needed parameters. Figure 123. The page for adding an address for the URL filter.
- Page 157 DIR-300NRU Wireless Router with Built-in 4-port Switch Configuring via Web-based Interface User Manual To remove an address from the list of URL addresses, select the relevant address in the table on the URL addresses tab and click the Delete button.
-
Page 158: System
DIR-300NRU Wireless Router with Built-in 4-port Switch Configuring via Web-based Interface User Manual System In this menu you can do the following: change the password used to access the router's settings • save the current settings to the non-volatile memory •... -
Page 159: Administrator Password
DIR-300NRU Wireless Router with Built-in 4-port Switch Configuring via Web-based Interface User Manual Administrator Password On the System / Administrator password page, you can change the password for the administrator account used to access the web-based interface of the router and to access the device settings via TELNET. -
Page 160: Configuration
DIR-300NRU Wireless Router with Built-in 4-port Switch Configuring via Web-based Interface User Manual Configuration On the System / Configuration page, you can save the changed settings to the non-volatile memory, restore the factory defaults, backup the current configuration, or restore the router's configuration from a previously created file. - Page 161 DIR-300NRU Wireless Router with Built-in 4-port Switch Configuring via Web-based Interface User Manual The following buttons are available on the page: Control Description Click the button to save settings to the non-volatile memory. Please, save settings every time you change the router's parameters.
-
Page 162: System Log
DIR-300NRU Wireless Router with Built-in 4-port Switch Configuring via Web-based Interface User Manual System Log On the System / System log page, you can set the system log options and configure sending the system log to a remote host. Figure 126. The System / System log page. The Configuration tab. - Page 163 DIR-300NRU Wireless Router with Built-in 4-port Switch Configuring via Web-based Interface User Manual Control Description From the drop-down list, select the IP value to specify an IP address Server address type of a host from the local or global network, or the URL value to specify a URL address of a remote server.
-
Page 164: Firmware Upgrade
The current version of the router's firmware is displayed in the Firmware version field located next the D-Link logo in the top left corner of the page. If you need to install a newer version of the firmware, follow the next steps: Attention! Do not turn off the router before the firmware upgrade is completed. - Page 165 DIR-300NRU Wireless Router with Built-in 4-port Switch Configuring via Web-based Interface User Manual 6. Select the Factory line in the top-page menu displayed when the mouse pointer is over the System caption. 7. Wait until the router is rebooted. Log into the web-based interface, using the default IP address, login and password (192.168.0.1, admin, admin).
-
Page 166: Ntp Client
DIR-300NRU Wireless Router with Built-in 4-port Switch Configuring via Web-based Interface User Manual NTP Client On the System / NTP client page, you can configure automatic synchronization of the system time with a time server on the Internet. Figure 129. The System / NTP client page. -
Page 167: Traceroute
DIR-300NRU Wireless Router with Built-in 4-port Switch Configuring via Web-based Interface User Manual Traceroute On the System / Traceroute page, you can define the route of data transfer to a host via the traceroute utility. Figure 130. The System / Traceroute page. -
Page 168: Telnet
DIR-300NRU Wireless Router with Built-in 4-port Switch Configuring via Web-based Interface User Manual Telnet On the System / Telnet page, you can enable or disable access to the device settings via TELNET from your LAN. By default, access is enabled. -
Page 169: Chapter 5. Operation Guidelines
RF noise in your home or office. To maximize your wireless range, follow the guidelines below. 1. Keep the number of walls and ceilings between the DIR-300NRU device and other network devices to a minimum – each wall or ceiling can reduce your wireless network range by 3- 90 feet (1-30 meters). -
Page 170: Connecting To Cable Or Dsl Modem
DIR-300NRU Wireless Router with Built-in 4-port Switch Operation Guidelines User Manual Connecting to Cable or DSL Modem If you need to connect the router to a cable or DSL modem, do the following. 1. Place the router in an open location in the supposed center of your wireless network. Do not plug the power adapter into the router. -
Page 171: Chapter 6. Abbreviations And Acronyms
DIR-300NRU Wireless Router with Built-in 4-port Switch Abbreviations and Acronyms User Manual CHAPTER 6. ABBREVIATIONS AND ACRONYMS Access Category Advanced Encryption Standard Address Resolution Protocol BSSID Basic Service Set Identifier Cyclic Redundancy Check DDNS Dynamic Domain Name System DDoS Distributed Denial of Service... - Page 172 DIR-300NRU Wireless Router with Built-in 4-port Switch Abbreviations and Acronyms User Manual Quality of Service RADIUS Remote Authentication in Dial-In User Service Routing Information Protocol Request To Send SSID Service Set Identifier TKIP Temporal Key Integrity Protocol User Datagram Protocol...
Need help?
Do you have a question about the DIR-300NRU and is the answer not in the manual?
Questions and answers