
Related Manuals for Landmann avalon PTS 5.1 Plus


Summary of Contents for Landmann avalon PTS 5.1 Plus
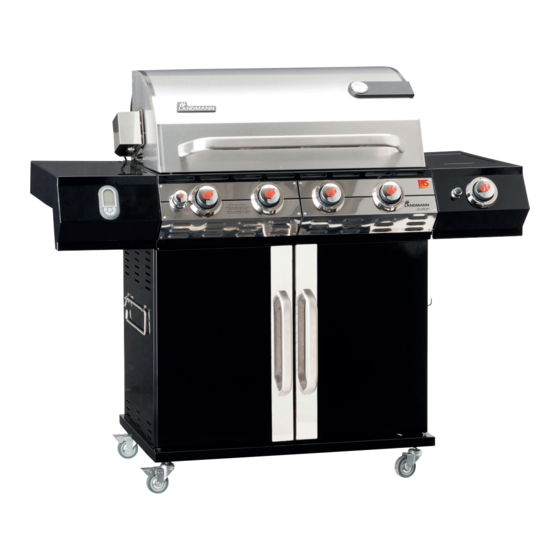
- Page 1 avalon PTS 5.1+ Assembly and Operating Manual 12798 ersion DATeD: #2016 12/15 DiTion...
- Page 2 2 avalon PTS 5.1+...
-
Page 3: Table Of Contents
Table of contents Scope of delivery ............................. 4 Controls ..............................4 Function ..............................5 Utilisation ..............................5 Intended use ................................5 Improper use ................................. 5 Guarantee claims and warranty ......................5 Safety instructions ............................ 5 Definition of terms used ............................5 General Safety Instructions .......................... -
Page 4: Scope Of Delivery
Controls Scope of supply Pos. Qty. Designation Pos. Designation Function Warming rack Flame regu- Activate the pulse igniti- on (press the button in) lator of the Hotplate infrared back and open the gas supply Cooking grill burner to the rotisserie burner (12) (set to "H"... -
Page 5: Function
• Do not use the barbecue to heat materials and substances other than barbecue food. Guarantee claims and warranty Your Landmann barbecue left the factory in a techni- cally flawless condition. For this reason, in addition to your statutory warran-... -
Page 6: General Safety Instructions
• Never use the barbecue if it is visibly damaged. Possible consequences: • Never modify the barbecue's technology. Only Use original spare parts from Landmann. • Severe burns from touching parts near the burners. • use accessories that are approved for this barbe- cue (if in doubt, contact the customer service). - Page 7 Danger: Gas is highly flammable Danger: Gas displaces oxygen Liquid gas is highly flammable and explosive. Liquid gas is heavier than oxygen. Therefore it settles on the ground and displaces the oxygen Possible consequences: at that level. • Serious injury to persons or damage to proper- Possible consequences: ty if escaping or accumulated gas ignites in an uncontrolled manner.
-
Page 8: Assembly
Assembly Here are a few tips to help you assemble your barbe- Danger: Fatal electric shock cue quickly and successfully: The electric motor on the rotisserie (6) runs on a • To make sure that no parts are missing, carefully 230 V power supply. -
Page 9: Connecting And Disconnecting The Gas Cylinder
The following parts are included in delivery. They cue. Proceed as follow: comply with the standards applicable in the country to which they have been supplied by Landmann. 7. Fold up the gas cylinder retaining bar (22) on the right side wall. -
Page 10: Disconnecting The Gas Cylinder
4. Open the cylinder valve (turn G1 anti-clockwise). Disconnecting the gas cylinder 5. Check to ensure that the gas system does not leak. 1. Close the cylinder valve (turn G1 clockwise). If it does, close the cylinder valve immediately (turn G1 in clockwise direction). 2. - Page 11 Ignite the standard burners (10) and infrared bottom burner (11) Caution: Please note that a gas flame is often difficult to see due to its blue colouring, particularly in Caution: bright sunlight. For this reason: Always place the hot plate (2) above the infrared –...
-
Page 12: Using The Thermometer
Using the thermometer Switching the thermometer on/off: Press the switch on the side (ON/OFF) to switch the thermometer (26) on/off. Switch the thermometer off after barbecuing. Caution: • The temperature sensor and connecting cable may become very hot. Always use a barbecue mitten to pull the sensor out of the meat and deposit the temperature sensor so that it can cool down. -
Page 13: Using The Rotisserie Set
Manual temperature setting 3. Place the electric motor for the rotisserie (6) on the mount (7) and push it back to the mechanical Holds down the "Mode" key for five seconds to set stop. the desired cooking temperature manually. Adjust the desired temperature using the "MIN"... -
Page 14: Switching Off The Barbecue
Cleaning rotisserie to "On" and make sure that the skewer is turning smoothly; if not, switch off the rotisserie motor and rearrange the meat. Barbecue 10. Press the rotisserie flame regulator (A) and turn it anti-clockwise to the "H" ("High") setting. Keep it depressed in this position. -
Page 15: Maintenance
Maintenance Battery controller buttons 1. Open the left door of the cabinet. The barbecue is maintenance-free. Nevertheless, you should check it at regular intervals. The intervals 2. Insert a 9V block battery into the bracket, obser- depend on how often it is used and the environmen- ving correct polarity. -
Page 16: Troubleshooting
Troubleshooting If there is a fault despite due care, this chapter may help you to resolve the fault. Fault Possible cause Remedy There is a smell of gas Leak in the gas system 1. Close the cylinder valve immedia- tely (turn G2 clockwise). 2. -
Page 17: Specifications
Technical specifications Approvals Intertek Testing & Certification Ltd. (ITS) Test number - 0359, pin no. 359CL1161 Barbecue Appliance category according to DIN EN 498 3+(28-30/37) Mass 88 kg Dimensions (L x H x W) approx. 146 x 120 x 61 cm Cooking area (L x W) approx. -
Page 18: Assembly
8 x M4 x 12 mm S1 S1 1 x M5 x 8 mm 18 avalon PTS 5.1+... - Page 19 4 x M6 x 12 mm 5 mm avalon PTS 5.1+...
- Page 20 1 x M5 x 8 mm 20 avalon PTS 5.1+...
- Page 21 1 x M5 x 8 mm 5 mm 4 x M6 x 12 mm avalon PTS 5.1+...
- Page 22 22 avalon PTS 5.1+...
- Page 23 1 x M5 x 8 mm avalon PTS 5.1+...
- Page 24 2 x M4 x 8 mm 1 x M5 x 10 mm 24 avalon PTS 5.1+...
- Page 25 20 Frontside 20 Backside 2 x M4 x 8 mm avalon PTS 5.1+...
- Page 26 1 x M5 x 10 mm 26 avalon PTS 5.1+...
- Page 27 avalon PTS 5.1+...
- Page 28 28 avalon PTS 5.1+...
- Page 29 avalon PTS 5.1+...
- Page 30 30 avalon PTS 5.1+...
- Page 31 2 x M4 x 10mm 2 x M4 nut avalon PTS 5.1+...
- Page 32 1 x M5 nut 32 avalon PTS 5.1+...
- Page 33 avalon PTS 5.1+...
- Page 34 34 avalon PTS 5.1+...
- Page 35 avalon PTS 5.1+...
- Page 36 Adresse / Address / Adresse / Indirizzo / Cím / Adres / Adress / Adresse / Adresse / Osoite Germany Landmann® GmbH & Co. Handels-KG Am Binnenfeld 3-5, D-27711 Osterholz-Scharmbeck, Deutschland Tel. **49 - 47 91 - 30 8 - 59 oder 16, Fax **49 - 47 91 - 30 8 - 36 Mo-Do 8:00 bis 16:45 Uhr, Fr 8:00 bis 15:30 Uhr e-mail: ohz@landmann.de, internet: www.landmann.com...
Need help?
Do you have a question about the avalon PTS 5.1 Plus and is the answer not in the manual?
Questions and answers