Toro Reelmaster 3100-D Series Operator's Manual
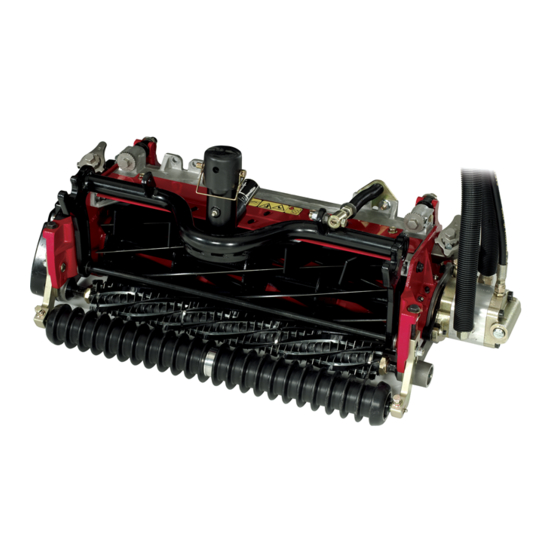
27-inch verticutter
Hide thumbs
Also See for Reelmaster 3100-D Series:
- Service manual (385 pages) ,
- Operator's manual (104 pages) ,
- Installation instructions manual (16 pages)

Subscribe to Our Youtube Channel
Related Manuals for Toro Reelmaster 3100-D Series


Summary of Contents for Toro Reelmaster 3100-D Series
- Page 1 Form No. 3444-175 Rev A 27-inch Verticutter Reelmaster ® 3100-D Series DPA Cutting Unit Model No. 03203—Serial No. 408000000 and Up *3444-175* Register at www.Toro.com. Original Instructions (EN)
-
Page 2: Table Of Contents
Contents Whenever you need service, genuine Toro parts, or additional information, contact an Authorized Service Dealer or Toro Customer Service and have the model Safety ............... 3 and serial numbers of your product ready. Figure 1 General Safety ........... -
Page 3: Safety
Remove all debris or other objects that might be • Use only accessories, attachments, and picked up and thrown by the blades of the cutting replacement parts approved by Toro. unit. Keep all bystanders away from the working area. Blade Safety •... -
Page 4: Safety And Instructional Decals
Safety and Instructional Decals Safety decals and instructions are easily visible to the operator and are located near any area of potential danger. Replace any decal that is damaged or missing. decal137-9706 137-9706 1. Cutting hazard of the hand or foot—shut off the engine, remove the key or disconnect the spark plug, wait for all moving parts to stop, and read the Operator’s Manual before performing maintenance. -
Page 5: Setup
Setup Loose Parts Use the chart below to verify that all parts have been shipped. Procedure Description Qty. Verticutter Inspect the verticutter. Transport roller assembly Install the transport rollers. Cotter pin O-ring Install the O-ring and the grease fitting. Grease fitting –... -
Page 6: Installing The O-Ring And The Grease Fitting
Remove and discard the setscrew on the reel-motor side plate (Figure g195548 Figure 3 1. Transport roller assembly 2. Cotter pin g028407 Figure 5 Note: Position the roller to the rear of the verticutter. 1. Bolts 3. Setscrew (remove and discard) 2. -
Page 7: Adjusting The Blade Depth
Adjusting the Blade Depth Adjusting the Rear Grass Shield No Parts Required No Parts Required Procedure Procedure Note: The maximum recommended blade penetration depth is 6 mm (1/4 inch). Note: When operating in turf conditions where much Place the verticutter reel on a level surface. debris or unusually heavy thatch is encountered, open the rear discharge shield to help allow the debris to Place 2 gauge bars, which have the desired... -
Page 8: Adjusting The Roller Scrapers
rollers (Figure 9) to protect the blades from hard surface contact. Remove the cotter pin that secures the transport roller bracket to the side plate pin. Adjusting the Roller Position the transport roller as follows: Scrapers • Lower the roller bracket before the verticutter is lowered to the shop floor. -
Page 9: Product Overview
The maximum recommended setting is 6 mm To ensure optimum performance and continued safety (1/4 inch) deep blade penetration. certification of the machine, use only genuine Toro replacement parts and accessories. Replacement The power requirements to operate the parts and accessories made by other manufacturers verticutter reels vary with turf and soil conditions. -
Page 10: Maintenance
Maintenance Lubricating the Verticutter Each verticutter has 5 grease fittings (Figure 12) that Using the Kickstand When must be lubricated weekly with No. 2 lithium grease. The lubrication points are the front roller (2), the rear Tipping the Cutting Unit roller (2), and the reel motor splines (1). -
Page 11: Removing The Verticutter Blades From The Shaft
Removing the Verticutter Installing the Verticutter Blades from the Shaft Blades Secure the end of the verticutter shaft, which Assemble a reel blade (Figure 14). has only one washer and nut, in a vise. Assemble a large spacer. On other end of shaft, rotate the nut Do not invert the reel blades when assembling counter-clockwise and remove the nut. -
Page 12: Optional Blade Spacing
Optional Blade Spacing Changing the configuration of the verticutter from the standard spacing (1.20 inches) to the optional spacing (0.94 inch) requires an additional 23 spacers (Part No. 140-5532) and an additional 5 carbide-tip blades (Part No. 106-8625) as shown in Figure g349402 Figure 15... -
Page 13: Servicing The Roller
Refer to your parts catalog or Roller Rebuild Tool Kit (Part No. 115-0803) (Figure contact your authorized Toro distributor for assistance. 16) are available for servicing the roller. The Roller Rebuild Kit includes all the bearings, bearing nuts,... - Page 14 The method of transmission shall be electronic transmittal. This machinery shall not be put into service until incorporated into approved Toro models as indicated on the associated Declaration of Conformity and in accordance with all instructions, whereby it can be declared in conformity with all relevant Directives.
- Page 15 The Toro Company (“Toro”) respects your privacy. When you purchase our products, we may collect certain personal information about you, either directly from you or through your local Toro company or dealer. Toro uses this information to fulfil contractual obligations - such as to register your warranty, process your warranty claim or to contact you in the event of a product recall - and for legitimate business purposes - such as to gauge customer satisfaction, improve our products or provide you with product information which may be of interest.
- Page 16 Countries Other than the United States or Canada Customers who have purchased Toro products exported from the United States or Canada should contact their Toro Distributor (Dealer) to obtain guarantee policies for your country, province, or state. If for any reason you are dissatisfied with your Distributor's service or have difficulty obtaining guarantee information, contact your Authorized Toro Service Center.
Need help?
Do you have a question about the Reelmaster 3100-D Series and is the answer not in the manual?
Questions and answers