Advertisement
Quick Links
ISTR - 1039 / 00
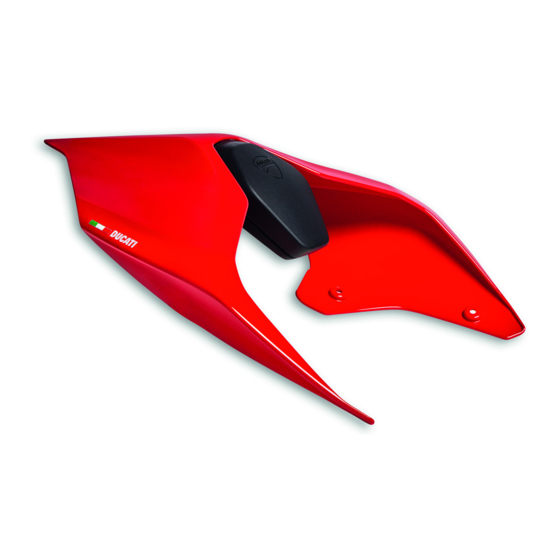
Kit cover sella passeggero - 97180791AA
Passenger seat cover kit - 97180791AA
Simbologia
Per una lettura rapida e razionale sono stati impiegati simboli che
evidenziano situazioni di massima attenzione, consigli pratici o
semplici informazioni. Prestare molta attenzione al significato dei
simboli, in quanto la loro funzione è quella di non dovere ripete-
re concetti tecnici o avvertenze di sicurezza. Sono da considerare,
quindi, dei veri e propri "promemoria". Consultare questa pagina
ogni volta che sorgeranno dubbi sul loro significato.
Attenzione
La non osservanza delle istruzioni riportate può creare una situa-
zione di pericolo e causare gravi lesioni personali e anche la morte.
Importante
Indica la possibilità di arrecare danno al veicolo e/o ai suoi compo-
nenti se le istruzioni riportate non vengono eseguite.
Note
Fornisce utili informazioni sull'operazione in corso.
Riferimenti
I particolari evidenziati in grigio e riferimento numerico (Es.
rappresentano l'accessorio da installare e gli eventuali componenti
di montaggio forniti a kit.
I particolari con riferimento alfabetico (Es.
componenti originali presenti sul motoveicolo.
Tutte le indicazioni destro o sinistro si riferiscono al senso di marcia
del motociclo.
Avvertenze generali
Attenzione
Le operazioni riportate nelle pagine seguenti devono essere ese-
guite da un tecnico specializzato o da un'officina autorizzata Du-
cati.
Attenzione
Le operazioni riportate nelle pagine seguenti se non eseguite a re-
gola d'arte possono pregiudicare la sicurezza del pilota.
Note
Documentazione necessaria per eseguire il montaggio del Kit è il
Manuale Officina, relativo al modello di moto in vostro possesso.
Note
Nel caso fosse necessaria la sostituzione di un componente del kit
consultare la tavola ricambi allegata.
1
Symbols
To allow quick and easy consultation, this manual uses graphic
symbols to highlight situations in which maximum care is required,
as well as practical advice or information. Pay attention to the
meaning of the symbols since they serve to avoid repeating tech-
nical concepts or safety warnings throughout the text. The sym-
bols should therefore be seen as real reminders. Please refer to
this page whenever in doubt as to their meaning.
Failure to follow these instructions might give raise to a dangerous
situation and provoke severe personal injuries or even death.
Failure to follow these instructions might cause damages to the
vehicle and/or its components.
Useful information on the procedure being described.
References
1
)
Parts highlighted in grey and with a numeric reference (Example
1
nents supplied with the kit.
A
) rappresentano i
Parts with an alphabetic reference (Example
components fitted on the vehicle.
Any right- or left-hand indication refers to the vehicle direction of
travel.
General notes
Carefully perform the operations on the following pages since they
might negatively affect rider safety.
Carefully perform the operations on the following pages since they
might negatively affect rider safety.
The following documents are necessary for assembling the Kit:
Workshop Manual of your bike model.
Should it be necessary to change any kit parts, please refer to the
attached spare part table.
Operating, servicing and maintaining a passenger vehicle or off-
highway motor vehicle can expose you to chemicals including en-
gine exhaust, carbon monoxide, phthalates, and lead, which are
known to the State of California to cause cancer and birth defects
or other reproductive harm. To minimize exposure, avoid breath-
ing exhaust, do not idle the engine except as necessary, service
your vehicle in a well-ventilated area and wear gloves or wash your
hands frequently when servicing your vehicle. For more informa-
tion go to www.P65Warnings.ca.gov/passenger-vehicle.
Warning
Caution
Notes
) are the accessory to be installed and any assembly compo-
Warning
Warning
Notes
Notes
Warning
A
) are the original
Advertisement

Subscribe to Our Youtube Channel
Related Manuals for DUCATI Performance 97180791AA


Summary of Contents for DUCATI Performance 97180791AA
- Page 1 ISTR - 1039 / 00 Kit cover sella passeggero - 97180791AA Passenger seat cover kit - 97180791AA Simbologia Symbols Per una lettura rapida e razionale sono stati impiegati simboli che To allow quick and easy consultation, this manual uses graphic...
- Page 2 ISTR 1039 / 00 Importante Important I componenti del kit possono essere soggetti ad aggiornamenti; The parts of the kit can be updated; for information always up to consultare il DCS (Dealer Communication System) per avere infor- date, please refer to DCS (Dealer Communication System). mazioni sempre aggiornate.
- Page 3 ISTR 1039 / 00 Smontaggio componenti originali Removing the original components Smontaggio sella passeggero Removing the passenger seat Inserire la chiave nella serratura (A) e ruotarla fino a sentire lo scat- Insert the key into the seat lock (A) and turn it until the passenger to di sgancio della sella passeggero (B).
- Page 4 ISTR 1039 / 00 Smontaggio cinghietto passeggero Removing the passenger seat strap Svitare le n.2 viti (C1) e rimuovere il cinghietto passeggero (C). Loosen no.2 screws (C1) and remove passenger seat strap (C).
- Page 5 ISTR 1039 / 00 Smontaggio assieme fianchetti posteriori Removing the rear side body panel assembly Svitare le n.4 viti (D1) con rosette in nylon (D2) di fissaggio inferiore Loosen no.4 screws (D1) with nylon washers (D2) for the lower fas- assieme fianchetti posteriori (D), come mostrato nel riquadro (X).
- Page 6 ISTR 1039 / 00 Montaggio componenti kit Assembling the kit components Importante Important Verificare, prima del montaggio, che tutti i componenti risultino Before assembling, check that all parts are clean and in good con- puliti e in perfetto stato. Adottare tutte le precauzioni necessarie ditions.
- Page 7 ISTR 1039 / 00 2,5 Nm ± 10% 2,5 Nm ± 10% Montaggio assieme codone Assembling the tail guard assembly Posizionare l’assieme codone (2) come mostrato in figura, calzando Place the tail guard assembly (2) as shown in the figure, insert- il gommino (2A) sul dente (E).
- Page 8 ISTR 1039 / 00 Montaggio assieme schienalino Assembling the back rest assembly Montare l'assieme schienalino (1) inserendone la staffa (1A) all’in- Fit back rest assembly (1) inserting bracket (1A) inside opening (F) terno dell’apertura (F) del telaietto posteriore. Inserire la chiave of rear subframe.
-
Page 9: Avertissements Généraux
ISTR - 1039 / 00 Kit cache de selle passager - 97180791AA Kit Beifahrersitzbankabdeckung - 97180791AA Symboles Symbole Pour faciliter la consultation de ce manuel, des symboles signalent Zum schnellen und übersichtlichen Lesen werden Symbole verwendet, des situations exigeant le maximum d'attention, des conseils pra- die außerordentlich wichtige Situationen, praktische Ratschläge oder... - Page 10 ISTR 1039 / 00 Important Wichtig Les composants du kit peuvent être soumis à des mises à jour ; Die Bestandteile des Kits können Aktualisierungen unterliegen. veuillez consulter le DCS (Dealer Communication System) pour des Lesen Sie stets die Angaben im DCS (Dealer Communication Sys- informations toujours actualisées.
- Page 11 ISTR 1039 / 00 Dépose des composants d’origine Abnahme der Original-Bestandteile Dépose selle passager Abnahme der Beifahrersitzbank Insérer la clé dans la serrure (A) et la tourner jusqu’au déclic du Den Schlüssel in das Schloss (A) einstecken und so lange drehen, crochet de la selle passager (B).
- Page 12 ISTR 1039 / 00 Dépose petite sangle passager Abnahme des Beifahrerriemchens Desserrer les 2 vis (C1) et déposer la petite sangle passager (C). Die 2 Schrauben (C1) lösen, dann das Beifahrerriemchen (C) ent- fernen.
- Page 13 ISTR 1039 / 00 Dépose ensemble flancs de carénage arrière Abnahme der hinteren Seitenabdeckungseinheit Desserrer les 4 vis (D1) avec rondelles en nylon (D2) de fixation in- Die 4 Schrauben (D1) mit Nylon-Unterlegscheiben (D2) zur unte- férieure ensemble flancs de carénage arrière (D), comme l’encadré ren Befestigung der hinteren Seitenabdeckungseinheit (D), wie im (X) le montre.
- Page 14 ISTR 1039 / 00 Pose des composants kit Montage der Kit-Bestandteile Important Wichtig Avant la pose, vérifier que tous les composants sont propres et en Vor der Montage überprüfen, dass alle Bestandteile sauber sind bon état. Prendre toutes les précautions nécessaires pour éviter und sich im perfekten Zustand befinden.
- Page 15 ISTR 1039 / 00 2,5 Nm ± 10% 2,5 Nm ± 10% Pose ensemble corps de selle Montage der Heckverkleidungseinheit Placer l’ensemble corps de selle (2) comme la figure le montre, en Die Heckverkleidungseinheit (2) wie abgebildet anordnen und da- insérant la dent (E) sur le plot caoutchouc (2A).
- Page 16 ISTR 1039 / 00 Pose ensemble dossier Montage der Rückenlehneneinheit Poser l’ensemble dossier (1) en insérant la bride (1A) à l’intérieur Die Rückenlehneneinheit (1) montieren und den Bügel (1A) in die de l’ouverture (F) du sous-cadre arrière. Introduire la clé dans la Öffnung (F) einfügen, die im Heckrahmen vorhanden ist.
-
Page 17: Advertências Gerais
ISTR - 1039 / 00 Conjunto cobertura para assento do passageiro - 97180791AA Passenger seat cover kit - 97180791AA Símbolos Symbols Para uma leitura rápida e racional, foram utilizados símbolos que To allow quick and easy consultation, this manual uses graphic evidenciam situações de máxima atenção, conselhos práticos ou... - Page 18 ISTR 1039 / 00 Importante Important Os componentes do conjunto podem sofrer atualizações; consulte The parts of the kit can be updated; for information always up to o DCS (Dealer Communication System) a fim de obter informações date, please refer to DCS (Dealer Communication System). sempre atualizadas.
- Page 19 ISTR 1039 / 00 Desmontagem dos componentes originais Removing the original components Desmontagem do assento do passageiro Removing the passenger seat Insira a chave na fechadura (A) e rode-a até ouvir o estalido de de- Insert the key into the seat lock (A) and turn it until the passenger sengate do assento do passageiro (B).
- Page 20 ISTR 1039 / 00 Desmontagem da cinta do passageiro Removing the passenger seat strap Desatarraxe os 2 parafusos (C1) e remova a cinta do passageiro (C). Loosen no.2 screws (C1) and remove passenger seat strap (C).
- Page 21 ISTR 1039 / 00 Desmontagem do conjunto de painéis laterais tra- Removing the rear side body panel assembly seiros Loosen no.4 screws (D1) with nylon washers (D2) for the lower fas- Desatarraxe os 4 parafusos (D1) com arruelas de nylon (D2) de fi- tening of the rear side body panel assembly (D), as shown in the xação inferior do conjunto de painéis laterais traseiros (D), como box (X).
- Page 22 ISTR 1039 / 00 Montagem dos componentes do conjunto Assembling the kit components Importante Important Verifique, antes da montagem, se todos os componentes estão Before assembling, check that all parts are clean and in good con- limpos e em perfeito estado. Adote todas as precauções necessá- ditions.
- Page 23 ISTR 1039 / 00 2,5 Nm ± 10% 2,5 Nm ± 10% Montagem do conjunto rabeta Assembling the tail guard assembly Posicione o conjunto rabeta (2) como mostrado na figura, inserin- Place the tail guard assembly (2) as shown in the figure, insert- do o dente (E) na borracha (2A).
- Page 24 ISTR 1039 / 00 Montagem do conjunto encosto Assembling the back rest assembly Monte o conjunto encosto (1) inserindo-lhe a braçadeira (1A) den- Fit back rest assembly (1) inserting bracket (1A) inside opening (F) tro da abertura (F) do subchassi traseiro. Insira a chave na fecha- of rear subframe.
- Page 25 ISTR - 1039 / 00 Kit cover asiento pasajero - 97180791AA パッセンジャーシートカバーキット - 97180791AA Símbolos シンボル Para una lectura rápida y racional se han empleado símbolos que 素早くかつ合理的に読み進めることができるように、本マニュア evidencian situaciones de máxima atención, consejos prácticos o ルではいくつかのシンボルを導入し、最大限の注意を払う必要 simples informaciones. Prestar mucha atención al significado de がある状況や、推奨事項、または一般情報を明確にしてありま...
- Page 26 ISTR 1039 / 00 Importante 重要 Es posible que los componentes del kit sean actualizados; consul- キットの構成部品は更新されることがあります。DCS (Dealer tar el DCS (Dealer Communication System) para tener información Communication System) から常に最新の情報をチェックするよ siempre al día. うにしてください。 Pos. Denominación 名称 Conjunto respaldo バックレストアセンブリ Conjunto cuerpo asiento テールガードアセンブリ...
- Page 27 ISTR 1039 / 00 Desmontaje componentes originales オリジナル構成部品の取り外し Desmontaje asiento pasajero パッセンジャーシートの取り外し Introducir la llave en la cerradura (A) y girarla hasta oír el chasquido 鍵穴 (A) にキーを差し込み、カチッと音がしてパッセンジャーシ del gancho del asiento pasajero (B). Quitar el asiento pasajero (B) ート (B) のロックが外れるまで鍵を回します。パッセンジャーシ extrayéndolo hacia la parte delantera de la motocicleta.
- Page 28 ISTR 1039 / 00 Desmontaje correa pasajero パッセンジャーベルトの取り外し Desatornillar los 2 tornillos (C1) y quitar la correa pasajero (C). 本のスクリュー (C1) を緩めて外し、パッセンジャーベルト (C) を取り外します。...
- Page 29 ISTR 1039 / 00 Desmontaje conjunto carenados laterales traseros リアサイドパネルアセンブリの取り外し Desatornillar los 4 tornillos (D1) con arandelas de nylon (D2) de 枠 (X) 内に示すように、リアサイドパネルアセンブリ (D) の下 fijación inferior conjunto carenados laterales traseros (D), como se 側を固定している 4 本のスクリュー (D1) をナイロンワッシャー indica en el recuadro (X).
- Page 30 ISTR 1039 / 00 Montaje componentes kit キット部品の取り付け Importante 重要 Antes del montaje, comprobar que todos los componentes se en- 取り付けの前に全ての部品に汚れがなく、完璧な状態であること cuentren limpios y en perfecto estado. Adoptar todas las precau- を確認してください。作業する部分が破損しないように、必要な ciones necesarias para evitar dañar cualquier parte en la que se すべての予防措置を講じてください。...
- Page 31 ISTR 1039 / 00 2,5 Nm ± 10% 2,5 Nm ± 10% Montaje conjunto cuerpo asiento テールガードアセンブリの取り付け Posicionar el conjunto cuerpo asiento (2) como ilustra la figura, in- テールガードアセンブリ (2) を図のように配置し、ツメ (E) を troduciendo el diente (E) en el componente de goma (2A). Introdu- ラバー...
- Page 32 ISTR 1039 / 00 Montaje conjunto respaldo バックレストアセンブリの取り付け Montar el conjunto respaldo (1) introduciendo el sostén (1A) en la リアサブフレームに設けられた開口部 (F) にブラケット (1A) を abertura (F) del subchasis trasero. Introducir la llave en la cerradu- 挿入して、バックレストアセンブリ (1) を取り付けます。キーを ra (A) y girarla para abrir el pestillo. Desplazar el conjunto respaldo ロック...
- Page 33 レース専用部品 ご注文書 ご注文商品 商品名 P/N 商品名 P/N 商品名 P/N 商品名 P/N 商品名 P/N お客様ご記入欄 私は上記レース専用部品を下記車両に装着し、サーキット走行のみに 利用し、一般公道には利用しません。 車台番号 ZDM モデル名 お客様署名 ご注文日 ドゥカティ正規ネットワーク店記入欄 お客様に上記レース専用部品を販売し、レース専用部品のご利用方法を 説明いたしました。 販売店署名 販売日 年 月 日 販売店様へお願い 1. 上記ご記入の上、弊社アフターセールス 部までFAX してください 。FAX : 03 - 6692 - 1317 1. 上記ご記入の上、弊社アフターセールス 部までFAX してください 。FAX : 03 - 6692 - 1317 2.
Need help?
Do you have a question about the 97180791AA and is the answer not in the manual?
Questions and answers