Table of Contents
Advertisement
Advertisement
Table of Contents

Related Manuals for La Crosse Technology V50AU


Summary of Contents for La Crosse Technology V50AU
- Page 1 Wi-Fi PROFESSIONAL WEATHER STATION SET UP GUIDE MODEL NUMBER V50AU...
-
Page 2: Table Of Contents
Table of Contents BASICS LA CROSSE VIEW RAIN Initial Setup Connecting to the App Positioning Your Sensor Station Settings Connecting Your Station Viewing Your Rain Data Buttons Adding Your Sensor to Cleaning & Storage the App LCD Display Brightness Auto-Dim Settings WIND TEMP. -
Page 3: Basics
BASICS Initial Setup Inside of Rain Sensor Bottom of Breeze Pro Sensor Back of Station Power Jack Power Up Unlatch the Locking Tabs on the sides of the Rain Sensor to remove the Funnel. Then install 2 “AA” batteries into the Battery Compartment. Install 3 “AA”... -
Page 4: Connecting To The App
LA CROSSE VIEW Connecting to the App Stay Connected to Your Home Stay connected to your home anytime, anywhere Anytime, Anywhere. with the La Crosse View app. Monitor home conditions and set alerts so your home can get ahold of you when something seems off. Connecting your station is optional and the display will function as a standalone unit without the Wi-Fi connection. -
Page 5: Connecting Your Station
LA CROSSE VIEW Connecting Your Station Now that you’ve created your La Crosse View account, it’s time to connect your station to your home router using the La Crosse View app. Connecting to Your Wi-Fi Network The La Crosse View app is required to connect the station to your Wi-Fi network. Download, install, and log into your La Crosse View account first. -
Page 6: Adding Your Sensor To
LA CROSSE VIEW Adding Your Sensor to the App Upon getting the station connected to your Wi-Fi network, the next app screen will explain how your connected sensor(s) should be added. Within the next 15 minutes, you should receive an Add Device notification in your app. This is indicated by the Red Cloud and the numbers inside of it. -
Page 7: Station Settings
BASICS Station Settings When the station is first powered on, it will begin searching for your outdoor sensors, which should connect shortly. To manually set your time, date, and other settings, hold the button to enter the Settings Menu. Settings Menu Order Greeting •... -
Page 8: Buttons
BASICS Buttons Side View Back View 1. WIND ALERTS 6. EXTRA Hold to enter Wind Alert Settings. Press to turn Press to toggle through rain, pressure, and extra Wind Alert on/off. sensor data. Hold to add sensors. While viewing, hold the MINUS button to delete the sensor. -
Page 9: Lcd Display Brightness
BASICS LCD Display Brightness Adjusting the LCD Display Brightness Press the LIGHT button to adjust the backlight intensity. There are 4 brightness levels, plus an off option. Auto-Dim Settings Program your display to automatically dim during preselected times. Hold the LIGHT button to enter the Auto-Dim Settings Menu. -
Page 10: Positioning Your Sensor
RAIN Positioning the Rain Sensor For Accurate Measurements • Mount the Rain Sensor horizontally and ensure it’s level. • For accurate readings, the sensor should be mounted in an open area and more than 91.4cm (3ft) above the ground. • Ensure the base of your Rain Sensor is not in a depression. -
Page 11: Cleaning & Storage
RAIN Rain Sensor Cleaning & Storage Cleaning Your Rain Sensor • Leaves, grass, or other debris may need to be removed periodically from the funnel of your Rain Sensor. • Be sure to check inside your Rain Sensor as well. Insects or dirt can begin to restrict the movement of the Rocker. -
Page 12: Wind
WIND Positioning the Breeze Pro Sensor For Accurate Measurements • Ensure the sensor is mounted level with the Solar Panel facing directly to the north. This will help optimize battery life and transmit correct wind direction readings. • Ideally, the Breeze Pro Sensor should be mounted on the tallest object in your area. -
Page 13: Installation Options
Adjustable Base. Please note that these advanced options will require additional equipment and possibly professional help for best results. These illustrations are not to scale and are for informative purposes only. La Crosse Technology is not responsible for any damages or injury that may occur during installation. Tripod... -
Page 14: Viewing Your Wind Data
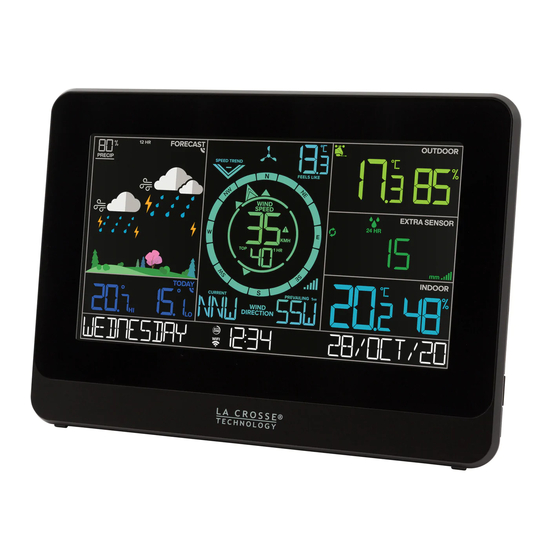
WIND Viewing Your Wind Data 1. WIND SPEED TREND 2. COMPASS ROSE 3. CURRENT WIND SPEED INDICATOR Displays cardinal direction The top wind speed in the Shows wind speed trends with animated arrows past 31 seconds over the past 60 minutes (16 directions total) 4. -
Page 15: History Records
WIND Wind Speed History and Alerts Viewing Wind Speed History Records Press the WIND button to toggle through wind speed history records with time and date stamps. The wind speed records include: past 24 hours, 7 days, 1 month, & 1 year. Monthly Wind Speed Record Example Setting the Wind Speed Alert Hold the... -
Page 16: Viewing Your Th Data
1. FORECASTED HIs & LOs* 2. “FEELS LIKE” 3. OUTDOOR TEMPERATURE (or Outdoor Records) TEMPERATURE Current Outdoor Temperature Daily Forecasted Highs & Lows Based on current temp. & wind from AccuWeather* speed (heat index & wind chill) 4. BREEZE SENSOR ICON 5. -
Page 17: History Records
TEMPERATURE & HUMIDITY Temperature & Humidity Records Temperature & Humidity Records Viewing Records Press the TEMP button to toggle through temperature & humidity records with time and date stamps. Records Viewing Order Outdoor High Temperature • Outdoor Low Temperature • Outdoor High Humidity •... -
Page 18: Forecast
FORECAST Foliage Scenes Viewing Your Forecast Data Seasonal Trees Spring (Sept. 1 to Nov. 30 The foliage scene in the forecast section changes seasonally. The dates are pre-programmed. Forecast Icons When using this station without Wi-Fi connection, the Summer (Dec. 1 to Feb. -
Page 19: Enhanced Forecast Data
FORECAST Viewing Your Forecast Data Available Forecast Icons when Connected* Sunny Partly Sunny Clouds Light Rain Rain T-Storm Light Snow Snow Wintry Mix Windy Tip: icon will appear in the top right corner of the forecast section when your display is connected and receiving AccuWeather forecasts. -
Page 20: Add-On Sensors
Auto Scroll Icon ( ) will appear if activated. Find all of your add-on sensor Note: When first powering up, or after a factory options by scanning the QR reset, extra sensors should automatically connect code or visiting: to your station. Add-on Sensors are not included. www.lacrossetechnology.com/v50au#parts... -
Page 21: Appendix
0 to 9999mm (0 to 393.6 Inches) or Wi-Fi service. • Transmission Range: 121.92 Meters (400 Feet) 915MHz • Power Requirements: 2 “AA” batteries STATION SPECIFICATIONS (V50AU) • Update Interval: Every 45 Seconds • Indoor Temp. Range: 0°C to 50°C (32°F to 122°F) • Sensor Dimensions: 7.16”... -
Page 22: Warranty
APPENDIX Warranty Care & Maintenance La Crosse Technology, Ltd. provides a 1-year • Do not mix old and new batteries. limited time warranty (from date of purchase) on • Always purchase the correct size and grade of battery this product, relating to manufacturing defects in most suitable for intended use. -
Page 23: Patents
Instagram, Youtube, and Twitter. Black Forest Originals Grand Father Clock, Ltd. DBA La Crosse Technology, Ltd. | 2809 Losey Blvd. South, La Crosse, WI 54601 Please help in the preservation of the environment and return used batteries to an authorized depot Apple and the Apple logo are trademarks of Apple Inc., registered in the U.S.
Need help?
Do you have a question about the V50AU and is the answer not in the manual?
Questions and answers