Table of Contents
Advertisement
Quick Links
Advertisement
Table of Contents

Related Manuals for Signode TENSION-WELD VXT2-19


Summary of Contents for Signode TENSION-WELD VXT2-19
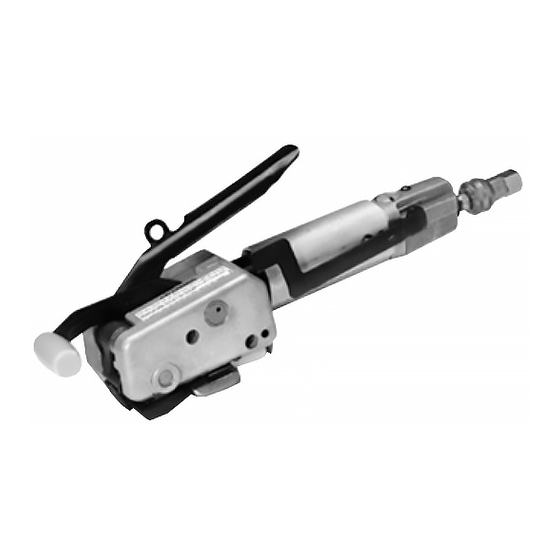
- Page 1 VXT2-16/19 TENSION-WELD® STRAPPING TOOL...
-
Page 2: General Safety Instructions
Use the correct Signode products for your application. 2. TRAINING. This tool must not be used by persons not properly trained in its use. Be certain that you receive proper training from your employer. If you have any questions contact your Signode Representative. 3. EYE INJURY HAZARD. - Page 3 7. WORK AREA. Keep work areas uncluttered and well lighted. Several types of strap can be used with this tool. Use the correct Signode products for your application. If you need help contact your Signode Representative. SAFETY PROCEDURES FOR TOOL OPERATION 1.
-
Page 4: Table Of Contents
TABLE OF CONTENTS Page Page Parts List, Air Motors General Safety Instructions Parts List, Tool Specifications Troubleshooting Pneumatic Information Maintenance Operating Instructions Tool Options Adjustments Declaration of Conformity Parts Removal and Replacement Air Logic and Diagram VXT2-16 Part No. 422580 VXT2-19 Part No. -
Page 5: Pneumatic Information
3/8" I.D. A quick disconnect socket fitting is installed on the stress spring end of the hose for convenient hookup to the air tool. Filter-Regulator-Lubricator Unit (Signode Part No. 008559 or 173111) FRL Mounting Bracket (Signode Part No. 071982) Air Hose, 3/8" ID, 1/4" Fittings (Signode Part No. - Page 6 The remaining moisture is removed at the water leg in the piping system or in the filter (Part No. 008559). NOTE: Additional information is available in the Signode publication, "Air Supply Manual" (Part No. 186038). If you have any questions, contact your local Signode Representative.
- Page 7 Air pressure is assumed to be 90 psig (6.2 Bar) with recommended size and length of air hose. Volume of air is at room temperature and sea level pressure, or so-called "free air" conditions. For more detailed information about air supply systems refer to Signode manual Part No. 186038.
- Page 8 An air line dryer adjacent to the compressor. b. Use lubricant recommended by Signode. Signode has tested the use of anti-freezes, none work well in air tool; the tool will gum up when anti-freezes are introduced and will not function properly.
-
Page 9: Operating Instructions
OPERATING INSTRUCTIONS 3. When the motor stalls, indicating completion of tension, continue to hold the motor lever fully closed against the motor housing and pull back the weld handle with your left hand. The handle Wear safety glasses. should be pulled quickly all the way back without hesitation. - Page 10 5. Push the weld handle to the forward position with your left hand. The motor SEALING OPERATION lever will return to the OFF position as the weld handle is moved forward. This tool is a Tension Weld® type sealer. A properly made joint will appear as shown in the illustration.
-
Page 11: Adjustments
Contact the using High Strength Tenax (polyester) type Signode tool repair center or your Signode strap. representative for information on accessing the adjustment screw. - Page 12 1. Open the tensioner foot and place 1 to 2 Turn the adjustment screw clockwise for layers of .002", 1/2" wide (.05 x 12mm) greater clearance and counter-clockwise shim stock between the feedwheel and for less clearance. Turn the adjustment the gripper plug.
- Page 13 VXT2 STRAP SIZE CONVERSION To convert (re-configure) a VXT2-16 to a VXT2-19 or vice versa, two operations must be performed. 1. The two inner guides (Key 103) must be re-positioned (rotated) by loosening the mounting screw (Key 104) and rotating the guide 1/2 turn.
-
Page 14: Parts Removal And Replacement
PARTS REMOVAL AND REPLACEMENT FEEDWHEEL AND GRIPPER PLUG 6. Lift the torsion spring (23) and the 1. Place the tool on its side and remove the tensioner foot (16) off the support pin two socket head cap screws (75) from (25). - Page 15 CUTTER BLADE 1. Place the tool on its side and remove the 7. Examine the cutter blade (46), spring (84) two socket head cap screws (75) from and pin (74) for a worn or damaged the weld housing (24). areas. Replace if necessary. 2.
- Page 16 3. Lift the slider link (48) from the gear a lower gripper, use Loctite "380 Black housing (72). Examine the teeth on the Max" (Signode Part No. 274111) or an upper gripper (52) for wear. The upper equivalent instant adhesive to ensure the gripper can be replaced by removing the lower gripper will be held securely.
- Page 17 50% full with Non-fluid and secure it with the three socket head Oil No. K-55 (Signode Part No. 177029). cap screws. 3. Check the teeth of the clutch (37) and the 8.
- Page 18 AIR MOTOR This tool is manufactured with one of two Separate the motor mount from the gear available air motors. Inspect the air motor housing and remove the drive gear and housing to determine which specific air bearing. motor instructions to follow. The two motors available for this tool are part number 422525 and 423900.
- Page 19 Turn the air motor assembly clockwise 10. Disassemble the rotor by sliding off the to separate it from the motor mount. front end plate (20), and the two ball NOTE: The air motor has left-hand bearings and spacer (21, 22). Then slide threads.
- Page 20 Remove the air motor from the vise. 21. Lift up the cutter blade and install the Clean the motor mounting threads with small compression spring (84). an appropriate solvent, also clean the threads of the motor mount. Remove the valve housing assembly and O-ring AIR MOTOR VALVE from the air motor.
-
Page 21: Air Logic And Diagram
HANSEN PLUG When removing/connecting the Hansen plug, hold the air motor inlet fitting with one wrench and tighten the Hansen plug with another. If this is not done, you will loosen or over-tighten the air motor housing, thus affecting performance. AIR LOGIC AND DIAGRAM SEQUENCE OF OPERATION 1. -
Page 22: Parts List, Air Motors
PARTS LIST, AIR MOTORS: IR95R17V (422525) & 95R17V (423900) 422525 423900 QTY. PART# PART# DESCRIPTION 020704 020704 Quick disconnect plug 422501 024631 Filter assembly 273822 273822 Fitting 306838 306838 Retaining ring 422502 306831 Valve sleeve 020699 020699 O-ring 422503 306832 Valve stem 094295 094295... - Page 23 ** Secure with Loctite #222 or equivalent. *** Secure with Loctite #569 or equivalent. The pilot valve (Key 33) must only be serviced by an authorized Signode Service Facility or a maintenance person trained by Signode. NEVER remove the pilot valve when air is connected to the tool.
-
Page 24: Parts List, Tool
PARTS LIST, TOOL KEY QTY. PART # DESCRIPTION KEY QTY. PART # DESCRIPTION 422586 Knob 423370 Screw 273815 Bushing 273881 End cap 008751 Needle bearing, 023096 O-ring Torrington #M-781 023097 Bearing, Faf. #9101K 273823 Pressure Eccentric 023082 O-ring 007631 Roll pin, 1/8 X 5/8 023014 Spacer 023446... -
Page 26: Troubleshooting
TROUBLESHOOTING The following items are the most common types of tool malfunctions. For symptoms or remedies not shown, contact your Signode service representative for additional information and details. The following tool conditions are shown in this manual: AIR SUPPLY #1 - The air motor is frozen. - Page 27 #3 CONDITION: The tool runs sluggishly. CAUSE REMEDY The air filter-regulator-lubricator is malfunctioning 1A. Check the regulator to see that the correct air or is not properly maintained. pressure is getting to the tool. 1B. Check to see the filter unit is clean and functioning properly.
- Page 28 TROUBLESHOOTING, Continued #6 CONDITION: The tool stops tensioning before maximum tension is reached, but the air motor continues to run. CAUSE REMEDY This is an indication that the clutch and drive gear teeth These parts must be replaced. See Parts Removal and are worn through normal use, or the clutch and drive Replacement Section.
- Page 29 #11 CONDITION: Strap weld time is erratic. CAUSE REMEDY Dirty or very dry valve in air motor valve housing. Add a several drops of airline oil into the air inlet of the tool and cycle several times to lubricate. If the problem persists, review the air motor valve housing maintenance instructions found in this manual.
-
Page 30: Maintenance
MAINTENANCE TOOL This portion of the tool should be from 1. Always be sure the tensioner foot is free 20% to 50% full of Non-Fluid Oil K-55. and periodically lubricate the support pin. Reinstall the end cap. 2. Clean the teeth on the feedwheel and the gripper plug with the special brush EXCESS OIL REMOVAL provided, (Part No. -
Page 31: Tool Options
P/N 306397 P/N 274437 P/N 274437 P/N 274164 * Shown with the recommended Overhead Tool Balancer, Signode Model Number P-306809. WEAR PLATE, Part No.306857 An optional wear plate can be installed on any VXT2 tool. This option is to protect the base plate from abuse from rough surfaces such as brick and block. - Page 32 VERTICAL AIR COUPLING, Part No. 422590 This option routes the pneumatic connection to the front of the tool rather than the rear. This option is extremely useful for applications which are close to the floor where the standard pneumatic connection and supply hose could get in the way.
-
Page 35: Declaration Of Conformity
It is hereby declared that the undermentioned machinery has been designed and constructed to comply with the health and safety requirements defined in EC Directive 89/392/EEC Machine Supplier: Signode, Division of ITW Ltd. Queensway, Fforestfach Swansea SA5 4ED Machine Description:... - Page 36 Glenview, Illinois plant, any tool which proves to not operate per functional specifications within the stated period. Signode reserves the right to replace any tool which proves not to operate per functional specifications with a new or like-new tool of the same model if in Signode's judgement such replacement is appropriate.
Need help?
Do you have a question about the TENSION-WELD VXT2-19 and is the answer not in the manual?
Questions and answers