Table of Contents

Related Manuals for Arrowquip Bud Flow


Summary of Contents for Arrowquip Bud Flow
- Page 1 Bud Flow Safety Manual & Assembly Instructions Safety Manual and Assembly Instructions Bud Flow Arrowquip, 20 Cook Street, Tamworth NSW 2340 Australia Free Call - 1800 814 107 Email:sales.au@arrowfarmquip.com www.arrowfarmquip.com.au...
-
Page 2: Table Of Contents
Bud Flow Safety Manual & Assembly Instructions Contents Arrow Farmquip Safety Manual The Law Equipment Maintenance Equipment Modification Personal Protective Equipment Necessary Safety Precautions Tips on Cattle Handling Bud Flow Components Bud-Flow Site Preparation Bud Flow Assembly Instructions 8-11 Assembly Checklist... -
Page 3: Arrow Farmquip Safety Manual
Bud Flow Safety Manual & Assembly Instructions Arrow Farmquip Safety Manual It is important that every person who will be involved in using any Arrow Farmquip P/L products has read and understood the precautions / guidelines that are contained in this manual. -
Page 4: Tips On Cattle Handling
Do not place hands on any hinge points/panel junctions whilst operating the Bud Flow. Use appropriate Personal Protective Equipments while operating Bud Flow. Failure to install the Bud-Flow on a prepared, level site may compromise the operation and safety features of the product. It is recommended that the Bud-Flow is always operated on a level site –... - Page 5 Bud Flow Safety Manual & Assembly Instructions 5. Approach from the correct angle: Cattle have approximately 330 degree panoramic vision. Whilst they can easily detect movement around them, they have a relatively narrow binocular or visual field (25 -50 degree) of vision in front of them where they can clearly focus objects.
- Page 6 Bud Flow Safety Manual & Assembly Instructions Product Components Item Description Picture Gate Frame x5- for Full Bud Flow x4 - for Four Section Bud Flow x3- for Three Section Bud Flow x2- for Two Section Bud Flow 2 Curved Panel...
- Page 7 Bud Flow Safety Manual & Assembly Instructions x6 - Full Bud Flow (x5 overhead, x1 ground) x5 - Four Section Bud Flow Bracing Bar (x4 overhead, x1 ground) Bull Clips x4 - Three Section Bud Flow (x3 overhead, x1 ground...
- Page 8 Failure to install the Bud-Flow on a prepared, level site will void any applicable warranty. Any questions please call 1800 814 107. Assembly Instructions 1. Begin with the gate frame section as shown below. The cattle will exit the Bud Flow via the race gateway frame on the left. Arrowquip,...
- Page 9 Bud Flow Safety Manual & Assembly Instructions 2. Identify the Curved Panel Sections from the End Panel Section, see detailed below, place the End Panel section aside. Curved Panel Section End Panel Section 3. Place the first Curved panel next to the race gate frame 4.
- Page 10 Bud Flow Safety Manual & Assembly Instructions 5. Attach the first overhead bracing bar between the centre post and the curved panel. Secure this at the centre post with a bracing bar bull clip as illustrated below. 6. Attach the second curved panel section, repeating steps 4 and 5.
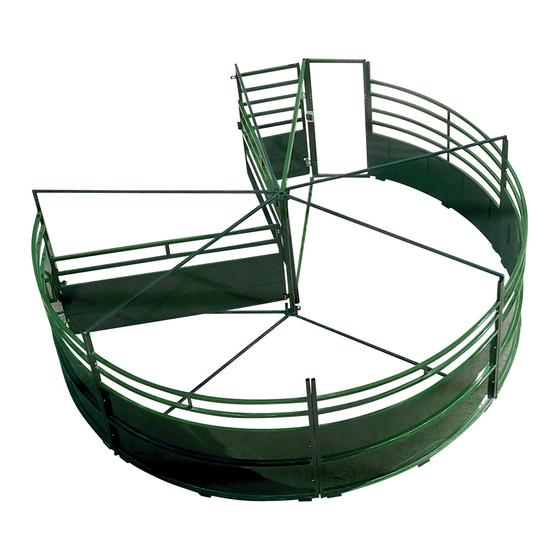
- Page 11 Bud Flow Safety Manual & Assembly Instructions 7. Attach the third curved panel section, repeating steps 4 and 5. 8. Attach the fourth and the fifth curved panel sections, repeating steps 4 and 5. Arrowquip, 20 Cook Street, Tamworth NSW 2340 Australia Free Call - 1800 814 107 Email:sales.au@arrowfarmquip.com www.arrowfarmquip.com.au...
- Page 12 Bud Flow Safety Manual & Assembly Instructions 9. Once the last curved panel section is installed, attach the ground bracing bar as shown. The ground bracing bar is always attached to the last curved section across all models: 2, 3, 4 or 5 section Bud-Flows.
- Page 13 Bud Flow Safety Manual & Assembly Instructions WARRANTY INFORMATION Important Information Our goods come with guarantees that cannot be excluded under the Australian Consumer Law. You are entitled to a replacement or refund for a major failure and compensation for any other reasonably foreseeable loss or damage.
-
Page 14: Warranty
Bud Flow Safety Manual & Assembly Instructions REGISTRATION FORM Personal Details Name ..................Postal Address ................ Phone ..................Email ..................I would like to register the following Arrow Farmquip product/s:……………………………………………………………………………….. Product Purchased from: Dealer / Company ............... Town ................... Date Purchased ................ -
Page 15: Claim Form
Bud Flow Safety Manual & Assembly Instructions CLAIM FORM Personal Details Name ..................Postal Address ................ Phone ..................Email ..................Description of product/s:……………………………………………………………………………….. Product Purchased from: Dealer / Company ............... Town ................... Date Purchased ................Serial No: (if known) ..............
Need help?
Do you have a question about the Bud Flow and is the answer not in the manual?
Questions and answers