Table of Contents
Advertisement
Quick Links
ALMACENAMIENTO
AL AIRE LIBRE
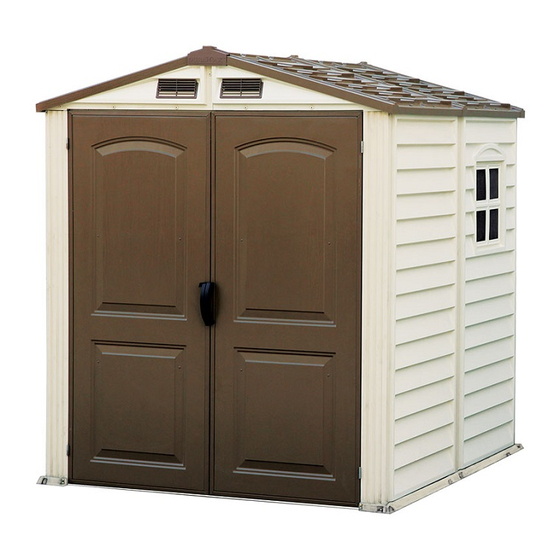
MEDIDAS EXTERNAS
MEDIDAS INTERNAS
1868 mm.
3,50 m
2
1845 mm.
1540 mm.
www.92sa.com
Más información:
EL cobertizo de PVC, STOREMATE 6X6 de Duramax con un diseño
atractivo está diseñado para durar toda la vida. Es de larga duración,
libre de mantenimiento y completamente funcional a lo largo de los
años. INCLUYE VENTANA Y SUELO DE PVC
DOBLES
PUERTAS
kg
84 kg.
EMBALAJE
RESISTENTE
IMPERMEABLE
STOREMATE 6X6
Dimensiones exteriores
(Fondo x Ancho x Alto)
Dimensiones interiores
(Fondo x Ancho x Alto)
Superficie
Apertura de puertas
Suelo rígido
Ventana
EAN
Precio sin IVA
Precio con IVA
SUELO
INCLUIDO
DE PVC
10
años
GARANTÍA
INÍFUGO
1.900 x 1.900 x 2.130 mm.
1.876 x 1.868 x 1.845 mm.
3,50 m
2
2 hojas batientes
Incluido
Incluida
0638801304111
-
-
Advertisement
Table of Contents

Subscribe to Our Youtube Channel
Related Manuals for USP DURAMAX ‘6 Ft StoreMate-V2


Summary of Contents for USP DURAMAX ‘6 Ft StoreMate-V2
- Page 1 años GARANTÍA RESISTENTE IMPERMEABLE INÍFUGO ALMACENAMIENTO AL AIRE LIBRE MEDIDAS EXTERNAS EL cobertizo de PVC, STOREMATE 6X6 de Duramax con un diseño atractivo está diseñado para durar toda la vida. Es de larga duración, libre de mantenimiento y completamente funcional a lo largo de los años.
- Page 3 A Product of A L L P U R P O S E V I N Y L G A R D E N S H E D S (DE) VINYL GARTENHAUS (EN) VINYL GARDEN SHED (DE) VINYL GARTENHAUS (FR) HANGAR DE JARDIN DE VINYLE (NL) VINYL SCHUUR (NL) VINYL SCHUUR (CS) VYNILOVÝ...
- Page 4 (EN) Building Dimensions : Storage Exterior Dimension Interior Dimension Approximate Door Opening Size Roof Edge to Edge Area Volume Base Dimension Wall to Wall inch inch inch inch 6 Ft x 6 Ft 33 1/4 Sq. Ft 198 1/2 Cu.Ft Width 73 1/2 74 3/4...
- Page 5 (EN) Duramax Vinyl Garden Shed Limited Fifteen Year Warranty U.S. Polymer Inc. will send a replacement part free of charge, in the event of material defects and or workmanship for a period of fifteen years from the date of purchase. This warranty is extended only to the original purchaser.
- Page 6 (DE) Duramax Vinyl Gartenhaus 15 Jahre beschränkte Garantie U.S. Polymer Inc. liefert im Falle von Material- oder Verarbeitungsfehlern kostenlos Ersatzteile für einen Zeitraum von fünfzehn Jahren ab dem Kaufdatum. Diese Garantie gilt nur für den Erstkäufer. Für die Inanspruchnahme der Garantieleistungen ist eine Kaufquittung oder ein sonstiger Kaufnachweis vorzulegen. Wir übernehmen keinesfalls die Kosten für Bodenbeläge, Stundenlohn, Montage oder andere damit zusammenhängende Kosten.
- Page 7 (EN) SAFETY & PRECAUTIONS (DE) SICHERHEITS U.- VORSICHTSMASSNAHMEN (FR) SÉCURITÉ ET PRÉCAUTIONS (NL) VEILIGHEIDSVOORSCHRIFTEN (ES) SEGURIDAD Y PRECAUCIONES (CS) BEZPEČNOST A BEZPEČNOSTNÍ OPATŘENÍ (PT) SEGURANÇA E CUIDADOS (SL) VARNOST & VARNOSTNI UKREPI (DE) Bevor Sie anfangen..(EN) Before You Begin... (FR) Avant de commencer...
- Page 8 (DE) 1. Überprüfen Sie die lokalen Bauvorschriften hinsichtlich des Fundaments, des Standorts usw. 2. Wählen Sie einen Standort, der genügend Arbeitsraum um den Schuppen erlaubt, aus. 3. Stellen Sie das Baufundament und das Ankersystem sicher. VORSICHT 4. Lesen Sie das der Verpackung beigefügte Benutzerhandbuch durch. 5.
- Page 9 (EN) SAFETY & PRECAUTIONS (DE) SICHERHEITS U.- VORSICHTSMASSNAHMEN (FR) SÉCURITÉ ET PRÉCAUTIONS (NL) VEILIGHEIDSVOORSCHRIFTEN (ES) SEGURIDAD Y PRECAUCIONES (CS) BEZPEČNOST A BEZPEČNOSTNÍ OPATŘENÍ (PT) SEGURANÇA E CUIDADOS (SL) VARNOST & VARNOSTNI UKREPI (EN) For your own safety, please read and follow these instructions during the shed assembly. (FR) Pour votre propre sûreté, svp lisez et suivez ces instructions pendant le montage.
- Page 10 (EN) Do not attempt to assemble the shed on a windy day. Shed panels can be whipped across by the wind making the worksite difficult and dangerous. (FR) N'essayez pas d'assembler le hangar un jour venteux. Des panneaux de hangar peuvent être fouettés par le vent rendant le chantier difficile et dangereux.
- Page 11 (NL) De schuur moet gebouwd worden op een sterke basis fundering. Een betonnen blok of een grote betonnen patio vierkante steen is aanbevolen voor de geschikte vloer basis. Zorg ervoor dat het stevig en vlak en het goede afwatering toelaat vanuit de plaats. De basis fundering moet zeker 4 inches ( 100 mm) groter zijn dan de afmeting van het schuurtje.
- Page 12 (ES) Aunque esta unidad no requiere mantenimiento, se debe tener cuidado para prolongar la vida de su caseta. CUBIERTA: Mantenga el techo limpio de hojas y la nieve con mango largo y cerdas suaves escoba. Grandes cantidades de nieve en el techo pueden dañar el cobertizo y hacer peligrosa.
-
Page 13: Table Of Contents
(EN) Parts List (DE) Teileliste (FR) Liste des pièces (NL) Onderdelenlijst (ES) La Lista de partes (CS) Seznam součásti (PT) Lista de Peças (SL) Seznam delov (EN) ACCESSORIES (DE) ZUBEHÖR (FR) ACCESSORIES (NL) ACCESORIOS (ES) ACCESORIOS (CS) DOPLŇKY (PT) ACESSÒRIOS (SL) DODATKI (DE)STCK (EN)CODE... - Page 14 (EN) Note : Before starting installation, please refer Safety & Precautions. (FR) Note : Avant de commencer l'installation, référez-vous svp à Sécurité et Précautions. (ES) Pozor : Antes de comenzar la instalación, consulte Seguridad y Precauciones. (PT) Nota : Antes de iniciar a instalação, cheque item “Segurança e Cuidados”. (DE) Anmerkung : Lesen Sie vor dem Aufbau die Sicherheitsanweisungen.
- Page 15 (EN) Exploded View (DE) Explosionszeichnung (FR) Vue Explosée (NL) Barsten bekijken (ES) El Panorama estallado (CS) Zvýrazněný pohled (PT) Vista esplodida (SL) Eksplozijska risba R2LR R1LR R1RR R2RR FPRM RS14R FPLM RS2LR RS2RR RS3R RS9R RS8R RS2LR RS1R RS5R RS14R RS9R RS15Q RS2LR...
-
Page 16: (En)Code (De)Code (En)Qty (De)Stck
(EN) Walls & Columns (DE) Wände und Säulen (FR) Murs et colonnes (NL) Panelen en stijlen (EN) Level Floor Surface Required (ES) Las paredes & las Columnas (CS) Zdi a kolumny (FR) Sol Nivelé Requis (PT) Paredes e Colunas (SL) Stene in stebri (ES) Superficie nivelada de piso requerida (PT) Requer Superfície a Nível do Chão (DE) Ebene Bodenfläche erforderlich... - Page 17 (EN) Back (DE) Hinten (FR) Arrière (NL) Achteraan (ES) Detrás (CS) Zadní (PT) Traseira (SL) Zadaj BPBR BPFR 1,2,3&4 (EN) Front (DE) Vorne (FR) Avant (NL) Vooraannte (ES) Frente (CS) Před (PT) Frente (SL) Spredaj BPBR BPBR BPIN BPFR BPFR (EN) Back (DE) Hinten (FR) Arrière...
- Page 18 FCRE FCRM (EN) Note : Check the stamped label on top of all panels inside. (FR) Note : Vérifiez l'étiquette apposée sur tous les panneaux sur la partie intérieure supérieure. (ES) Pozor : Revise la etiqueta estampada en la parte superior de todos los paneles interiores.
- Page 19 1&2 CB1R CB1R CB1R CB1R SPMW SPMW SPMW (EN) Back (DE) Hinten (FR) Arrière (NL) Achteraan (ES) Detrás (CS) Zadní (PT) Traseira (SL) Zadaj BPBR SPMW 2&3 (EN) Back (DE) Hinten (FR) Arrière (NL) Achteraan (ES) Detrás (CS) Zadní (PT) Traseira (SL) Zadaj...
- Page 20 1,2&3 CB1R CB1R CB1R (EN) Back (DE) Hinten (FR) Arrière (NL) Achteraan (ES) Detrás (CS) Zadní (PT) Traseira (SL) Zadaj BPBR BPBR 2&3...
- Page 21 1&2 CB1R (EN) Back (DE) Hinten (FR) Arrière (NL) Achteraan (ES) Detrás (CS) Zadní (PT) Traseira (SL) Zadaj CB1R CB1R CB1R (EN) Back Wall (DE) Hintere Wand (FR) Mur arrière (NL) Achtermuur (ES) Pared trasera (CS) Zadní stěna (PT) ParedeTraseira (SL) Zadnja Stena BPBR 2&3...
-
Page 22: Cmm
CB1R CB1R 1,2&3 CB1R BPBR (EN) Front (DE) Vorne (FR) Avant (NL) Vooraannte (ES) Frente (CS) Před (PT) Frente (SL) Spredaj BPFR 1&3 BPFR... - Page 23 (EN) Left Wall (DE) Linke Wand (FR) Mur à gauche (NL) linker muur (ES) pared izquierda (CS) Levá stěna (PT) ParedeEsquerda (SL) Leva Stena 1&2 CB1R CB1R CB1R CB1R BPFR FCLM FCLM FCLM BPFR BPFR FCLM FCLM BPFR BPFR 1&3 (EN) Front (DE) Vorne (FR) Avant...
- Page 24 (EN) Front (DE) Vorne (FR) Avant (NL) Vooraannte FCLM (ES) Frente (CS) Před FCLM (PT) Frente (SL) Spredaj 1&2 CB1R CB1R FCLM CB1R...
-
Page 25: Rs1R
(EN) Roof Structures (DE) Dachkonstruktionen (FR) Structure Du Toit (NL) Dakconstructies (ES) Estructuras de techo (CS) Střešni konstrukce (PT) Estrutura do Telhado (SL) Strešne Konstrukcije (EN) Parts needed (DE) Benötigte Teile (FR) Pièces nécessaires (NL) Onderdelen nodig (ES) Las partes necesitaron (CS) Potřebné... - Page 26 FDCR 1&2 (EN) Front (DE) Vorne FDCR (FR) Avant (NL) Vooraannte (ES) Frente (CS) Před (PT) Frente (SL) Spredaj FCRM FCRM FCRM 3&4 FCLM FDCL FDCL FCLM FCLM (EN) Roof Strcture Assembly (DE) Dachkonstruktion Montage (FR) Assemblage De La Structure Du Toit (NL) Dakconstructie montage kit (FR)Assemblage De La Structure Du Toit (ES) Estructura de Asamblea de techo...
- Page 27 (EN) Front Roof Structure Assembly (DE) Vordere Dachkonstruktion Montage (FR) Assemblage De La Structure Avant Du Toit (NL) Voorste dakconstructie montage kit RS1R (ES) Estructura de Asamblea de techo Frontal (CS) Montážní souprava přední střešní konstrukce (PT) Armação da Estrutura do Telhado Frontal (SL) Sestavni Del Prednje Strešne Konstrukcije.
- Page 28 (EN) Note : Make 2 Sets. (FR) Note : Faire 2 ensembles. (ES) Pozor : Hace dos conjuntos. (PT) Nota : Faça duas montagemes. (DE) Anmerkung : Zwei solche Sätze herstellen. (NL) Notitie : Maak twee sets. (CS) Pozor : Připravte dvě sády. . (SL) Opomba : Pripravite 2 kompleta.
- Page 29 RS1R RS8R RS9R (EN) Back (DE) Hinten (FR) Arrière (NL) Achteraan (ES) Detrás (CS) Zadní (PT) Traseira (SL) Zadaj RS9R RS8R RS1R RS1R RS3R RS3R RS3R RS1R RS1R RS3R 1,2&3...
- Page 30 RS3R RS5R RS8R RS8R RS5R RS5R 1&2 RS8R RS8R RS8R RS8R RS5R...
-
Page 31: Rs9R
RS2LR RS2LR RS2RR RS2RR RS8R RS8R RS2RR RS3R RS9R (EN) Front (DE) Vorne (FR) Avant (NL) Vooraannte (ES) Frente (CS) Před (PT) Frente (SL) Spredaj (EN) Back (DE) Hinten RS2RR (FR) Arrière (NL) Achteraan RS2RR (ES) Detrás (CS) Zadní (PT) Traseira (SL) Zadaj RS2LR RS2LR... -
Page 32: Rs5R
RS3R RS2RR RS2LR RS2RR RS5R RS2LR RS2RR RS5R RS3R (EN) Do not fix this hole (FR) Ne pas fixer ce trou (ES) No reparar el agujero (PT) Não fixe esteburaco (DE) Dieses Loch nicht beheben (NL) Deze gat niet vaststellen (CS) Neupravujte tuto díru RS3R (SL) Ne popravljajte te luknje... -
Page 33: Fplm
(EN) Roof Panels (DE) Dachplatten (FR) Planches de Toiture (NL) Dakpanelen (ES) Paneles de techo (CS) Střešní panely (PT) Painéis do Telhado (SL) Strešni Paneli (EN) Parts needed (DE) Benötigte Teile (FR) Pièces nécessaires (NL) Onderdelen nodig (ES) Las partes necesitaron (CS) Potřebné... - Page 34 This is optional and should be done for heavy rain areas if needed. Cette étape est facultative et devrait se faire pour les zones de fortes pluies, si nécessaire. Esto es opcional y se debe hacer para zonas de fuertes lluvias, si es necesario.
-
Page 35: R1Lr
(EN) Note : 1. Use a screw driver to align the holes. 2. Insert roof plugs into roof panels only as indicated. (FR) Note : 1. Utilisez un tournevis pour aligner les trous. 2. Inserez les pistons de plastique dans les panneaux de toiture uniquement. - Page 36 (EN) Back (DE) Hinten (FR) Arrière (NL) Achteraan (ES) Detrás (CS) Zadní (PT) Traseira (SL) Zadaj (EN) Note : Apply silicone around the roof plugs. This is optional and should be done for heavy rain areas if needed. (FR) Note : Appliquer le silicone autour des bouchons de toit.
-
Page 37: (En)Code (De)Code (En)Qty (De)Stck
(EN) Parts needed (DE) Benötigte Teile (EN) Door (DE) Die Tür (FR) Pièces nécessaires (NL) Onderdelen nodig (FR) Porte (NL) De deur (ES) Las partes necesitaron (CS) Potřebné součástí (ES) La puerta (CS) Dveře (PT) Peças Necessárias (SL) Dele, ki jih boste potrebovali (PT) Porta (SL) Vrata (EN)CODE... - Page 38 U.S. Polymers, Inc. 1057 S. Vail Ave Montebello, CA 90640, United States of America...
Need help?
Do you have a question about the DURAMAX ‘6 Ft StoreMate-V2 and is the answer not in the manual?
Questions and answers